Allowing Respondents to Review Last Year's Data
Pre-populating surveys with data you already have is a fairly common need among survey administrators. In this tutorial we will cover how to pre-populate a survey using an Login Action.
The specific use case we will cover is populating one survey with data from another. If you aren't using a previous Alchemer survey to pre-populate you can jump to Step 3: Preparing Your Data File for Upload.
Let's cover the use case example that we will be using in this tutorial so we are on the same page.
Imagine the HR team at Alchemer ran an employee happiness survey last year. This year they wish to re-run the employee happiness survey in order to ask new, follow-up questions of employees who responded last year. For these returning respondents, they wish to have last year's data available in the same data file in order to analyze what aspects of employee happiness improved and what aspects did not.
In addition, because a whole year has gone by, there are a number of new employees that will need to answer the original survey questions. Again, the HR team wants to have this information in the same data file for analysis, so they want to use the same survey to collect responses from new employees.
In this tutorial, we will walk you through one option for accomplishing these requirements: uploading data from a previous survey to a Login/Password action.
As with many things in Alchemer, there are a number of different alternative pre-population options (if these examples don't work for you).
Here is a quick overview of the set up for using an Login/Password action to pre-populate a survey:
- Copy the previous survey and add follow-up questions.
- Export the raw data from your previous survey.
- Prepare the data file for upload to a Login/Password action. The file will include a unique password or login/password combination, a flag indicating whether the respondent is new or returning, and all the fields with data from your previous survey.
- Create a Login/Password action. Specify how respondents will log in. Upload your data file and map data from the previous survey to questions in the new survey. Ensure that the Login/Password action exists solely on its own page, prior to the rest of the survey questions.
- Set up logic to determine what questions/pages returning and new respondents see.
- Choose how you would like to distribute your survey and start collecting data!
Alchemer Features Used in This Option:
- CSV/Excel Export - For pulling previous survey's data.
- Login/Password Action - For pre-population. Learn about other pre-population options.
- Merge Codes aka Simple Piping - For pre-populating survey with previous survey's data.
- Default Answers - For pre-populating survey with previous survey's data.
- Page Logic - To control what questions are seen by the two groups of respondents.
1. Copy Previous Survey and Add Follow-Up Questions
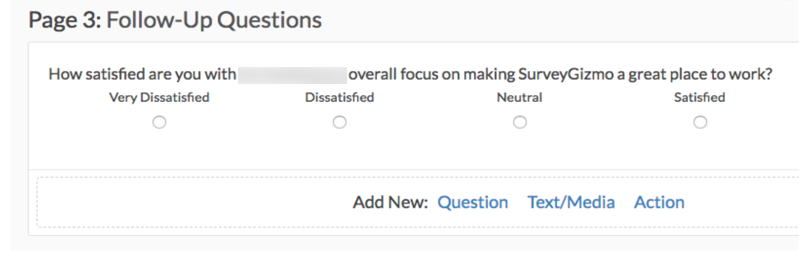
- We will start by copying the previous survey and adding the follow-up questions we wish to ask of returning respondents.

- It's best to have these follow-up questions on a page that follows the previous survey's questions.
- We're also going to add a page to precede all survey questions.
- On this page we will add a Hidden Value Action to store data on whether or not the respondent is a new or returning respondent. We will populate the Hidden Value later when we set up the Login/Password action.
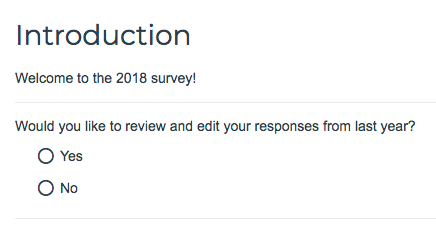
- In addition, because Hidden Values alone on the page make for an odd experience for survey respondents, we will need to add a Text/Instructions element to the page to greet the survey respondent.

- That is it for this step; we will return to this survey later to set up the pre-population and logic.


2. Export the Data From Previous Survey
Now, because we want the data from last year's responses, we need to export the data from last year's survey. We are using the CSV/Excel option found via the Results > Exports tab on last year's survey .
3. Prepare the Data File to Upload to New Survey
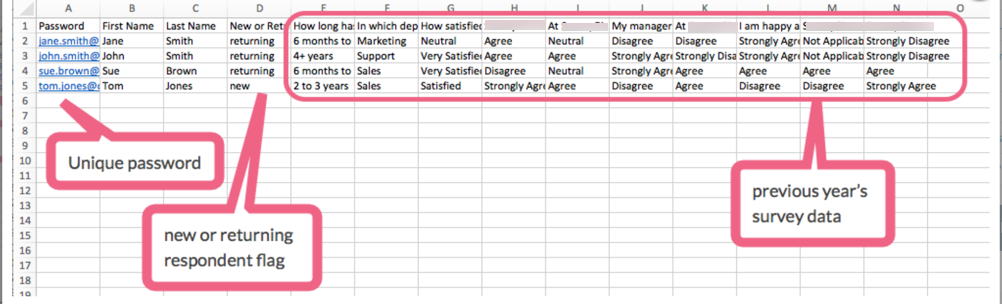
The data file that we will be using in our example is below. At a minimum, we will need the following as part of our data file:
- A unique password or a unique login and password combination for each respondent, new and old. We are using email address as the password.
- A field with data on whether each respondent is a new respondent or a returning respondent.
- Data you wish to pre-populate (in our example this is data from the previous year's survey).
As far as the number of fields you can upload for pre-population, there's not an exact limit. However, the login/password action may fail for very large files. File size is determined by the number of columns and rows. If you think your file is too big, it probably is!
4. Upload Data File to a Login/Password Action
- Next, we will create a new page to precede all survey pages. On this page we'll create a Login/Password Action.
- We will select the Lookup ID/Password in an uploaded spreadsheet option so that we can upload our spreadsheet. After we select the data file that we created in the previous step, we'll click Map Spreadsheet Data.

- In the popup that appears, we're going to check the Hide "username" field checkbox since in our example we are only requiring a password in order for our respondents to login.

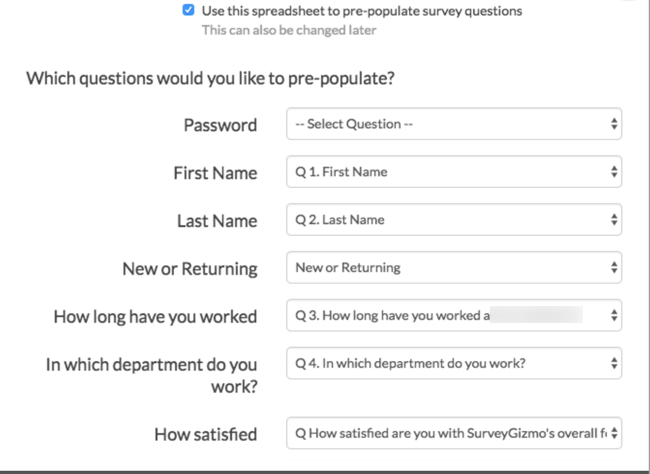
- Next, we will select the Password column from the dropdown menu of fields in our spreadsheet to map to the Password field in the Login/Password action. Our file has a header row, so we'll check this and then check the option to Use this spreadsheet to pre-populate survey questions.
- This will then allow us to map each spreadsheet column to a question in our survey. We'll map the field with the new or returning data to the Hidden Value we created at the beginning of the survey.
- When we're finished mapping, we will click Start Uploading and Save Action. Depending on the number of records in our file this could take several minutes. Once the upload process is finished, you will see a list of your passwords on the Primary Setup tab.
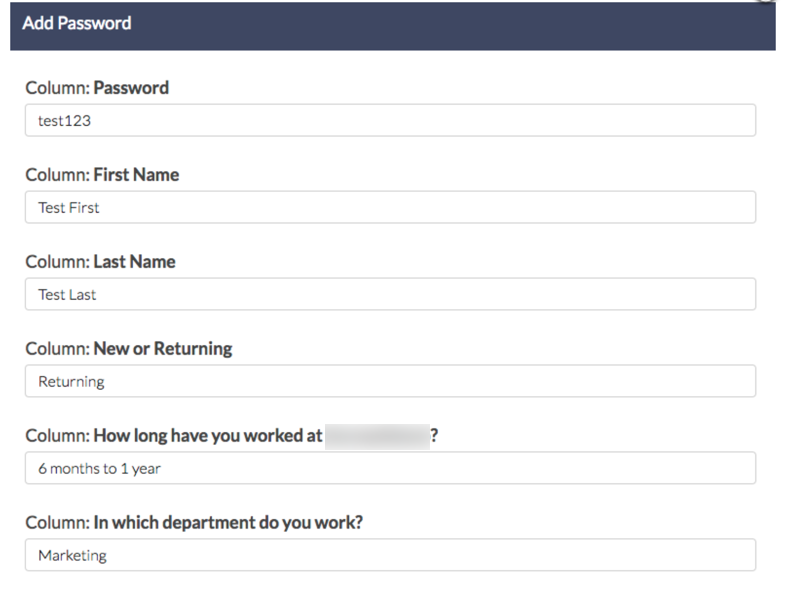
 Feel free to click the blue pencil icon associated with any record to review the data that was uploaded as part of that record.
 - Now that we have the previous data uploaded, we just have to use it in the survey; that's our next step!


 Feel free to click the blue pencil icon associated with any record to review the data that was uploaded as part of that record.
5. Set Up Logic to Determine Which Questions Respondents See
The final step is to set up logic so that new respondents only see the original survey questions and returning respondents only see the follow-up questions. Before we jump into this though, it's a good idea to test our pre-population to ensure that the data is present.
To do so, we can add a dummy password with some dummy data to our Login/Password action. We'll then take the survey, log in with our dummy password, and confirm that all of our original survey questions from the previous survey are populating.
- To add a single password, edit your Login/Password action and click Add Individual Record.

- This will then open a panel that you can use to populate with some dummy data.
- When you are finished, click Save, go to your survey's Share tab, and grab your survey link. You will use this link to test your survey and confirm that the previous year's data is populating. Use the dummy password that you just created to test.


Set Up Logic
Once we have confirmed the pre-population is working, we are ready to set up logic to determine who sees what questions. In our example, we want returning respondents to only see and answer the new follow-up questions added to the survey. We also want for new respondents to only see and answer the original survey questions.
To set up this type of logic, it is easiest to have the original and follow-up questions on separate pages. There can be as many pages for each portion of the survey as you need; we just want to ensure that original and follow-up questions are not on the same page.
- To set up the logic, we'll click the pencil icon above the page and go to the Logic tab.

- Select the Hidden Value that we pre-populated with the new and returning data. In the second dropdown, select the is exactly equal to operator. Finally, enter the data value exactly (case-sensitive) that you stored in this field the Hidden Value.

- For the follow-up survey pages we will set up the inverse of this. Instead of typing new we will type returning.


6. Send Out Survey
Once we are finished setting up and testing our logic we're ready to send out our 2018 Employee Happiness Survey to begin collecting responses. This pre-population method is compatible with whichever share method we wish to use.
Optional Customizations
Allow Returning Respondents to See/Edit Previous Responses
In some cases you might want to allow respondents to see and edit their answers. To set this up, you can add a question asking returning respondents if they wish to review and edit their previous responses. You can then use this question to set up skip logic to jump the respondents who answered "no" straight to the new survey questions.
As far as setup, this question will need to be on a page that follows the Hidden Value with the new or returning respondent data so you can use that field to set up logic so that it is only displayed to returning respondents.

Or, if you wish to have all returning respondents review their previous answers, you can add a Text/Instruction Element to your survey explaining that the beginning of their survey will show the answers from last year which they can edit if they wish.
Again, as far as setup, this Text/Instruction element will need to be on a page that follows the Hidden Value with the new or returning respondent data so you can use that field to set up logic so that it is only displayed to returning respondents.
Finally, if you wish to only display last year's responses you can use Merge Codes within a Text/Instruction Element itself to show respondents their previous responses.
To do so, this Text/Instruction element will need to be on a page that follows your pre-populated questions. Then you can use the Merge Code tool on the editor toolbar of your Text/Instruction Element to pull from your pre-populated questions.

Alternative Options for Pre-population
Email Campaigns
Email Campaign Contact Fields are fully integrated into your surveys and are the simplest of pre-population methods. Check out our Pre-populate Using the Email Campaign Tutorial to learn more!
HTTP Connect and Other Third-Party Integrations
Communicating with external systems, websites, or custom pages allows a unique method for pre-populating your survey by interacting with external databases of information, whether stored in one of our partner's websites or building a custom interaction to your own company. In almost all cases, you can send data from the survey to populate the external databases as well! The following tutorials provide more information about third-party integrations:
- Webhooks - Pre-populate with a returned URL encoded string from a custom webpage and script.
- Salesforce Integration - Pre-populate content based on a Salesforce query with a unique Contact ID.
- Salesforce Marketing Cloud Integration - Pre-populate subscriber information based on their Subscriber ID.
- SSO for Respondents - Are you already using an Identity Provider (IdP) to manage logins and access to the various systems your users need to access? Including Alchemer as a Service Provider (SP) as part of your single sign-on (SSO) acts as an added security layer for your surveys. There is also the added benefit of being able to pre-populate; any data present for each user in the IdP can be automatically passed into the survey, which can then be used within the survey itself or in reporting.
URL Variables
URL Variables are values that can be added to the end of the survey link that pass a name/value pair, such as "firstname=Derek." Within your surveys you can access and use values passed via query strings by using the [url("xxx")] merge code, which could look like the following: [url("firstname")]. This merge code would populate with whatever value ('Bob' in the above example) was passed in the "firstname" query string.