The Login/Password action allows you to set up access protection for your survey. Respondents will be required to log in to take your survey. You can require both a username* and password or a password only. You can also use the Login/Password action for pre-populating your survey with data!
*From a respondent standpoint, usernames are not case sensitive, whereas passwords are. When accessing your survey via a Login Action, a respondent will need to enter their password exactly as the password is specified in the login action setup.
When would I use a Login/Password action?
- Example Use One: Protect Your Survey
The most common use for the Login/Password action is to protect your survey. You can protect both who accesses your survey and as well as how often the survey is accessed by each user using the Login/Password action. - Example Use Two: Pre-populate Your Survey
You can also use the Login/Password action to pre-populate fields in your survey so your respondents don't have to enter info you already have. Using this feature you can simply confirm that each respondent's information is correct and proceed to the rest of the survey.
Step 1: Add a Login Action
- Click Add New Action on the page where you wish to place your action. We recommend that the Login Action is added on its own page. The Login Action is a gateway to all items on subsequent pages so if you have text or questions that you do not want to be seen prior to login, those should be placed on pages after the page containing the Login Action.

- Locate the Login/Password action and click the + Add button.
- Give your action a Name. The name you create here will display to your respondents so we recommend adding some text for describing how to log in to the survey. Next, you will determine how access to the survey will be controlled.

Step 2: Set Up Access Controls
Next, you will be asked, "How do you want to control access to this survey?" There are 3 password control options covered below.
Note: The Lookup ID/Password in an uploaded spreadsheet option is the only option that allows for pre-population.
Option 1: A single password shared by everyone - Specify a general password that all respondents will use to log in. This serves as basic protection to prevent respondents you do not wish to access the survey from getting through.

Option 2: Individual (one-time) passwords that deactivate after use - A one-time password prevents your respondents from re-entering the survey with the same password more than once. Use this option to prevent respondents from forwarding their password along to someone else.
You can choose to enter your own passwords or have Alchemer generate random passwords for you. If you prefer to use Alchemer to generate the passwords, click the Generate Random Passwords option and specify the number of passwords that you need.

Note: If entering your own passwords, make sure that they are entered One password per line in the provided field.
Option 3: Lookup ID/Password in an uploaded spreadsheet - The Lookup ID/Password option allows you to upload an excel file that contains your usernames, passwords, and any other associated data you wish to pull into your survey.
Email and user names uploaded into a login/password action are case-sensitive. Ensure that emails and user names are populated into the spreadsheet in the same style as respondents will populate the action during survey taking.
Ex: abc@123.com is not the same login value as ABC@123.com.
This option also allows you to pre-populate questions in your survey with data from your spreadsheet/list. You could, for example, include respondent contact information in the survey, without them having to fill it out again.
Spreadsheet file requirements
- Excel file extensions: .csv, .xls, .xlsx. If you have special/foreign characters you will need to upload an .xls or .xlsx file or utf-8 encoded .csv. To learn how to encode a csv visit our UTF-8 Encoding Tutorial.
- The minimum required to create a record for a contact is a single column with unique passwords to be mapped to the password field.
- Order of the data columns and extra data columns are not important though if you are uploading a lot of data you may want to include only the data that you will be using.
- Both the login and password fields are case-sensitive, please keep that in mind!
- If you wish to include double quotation marks anywhere in the file you must save and upload an .xls file.
- The file size limit is 2MB.
- Alchemer does NOT support using single quotation marks (') within the header or column rows.
- After selecting this option, indicate your desired password functionality:
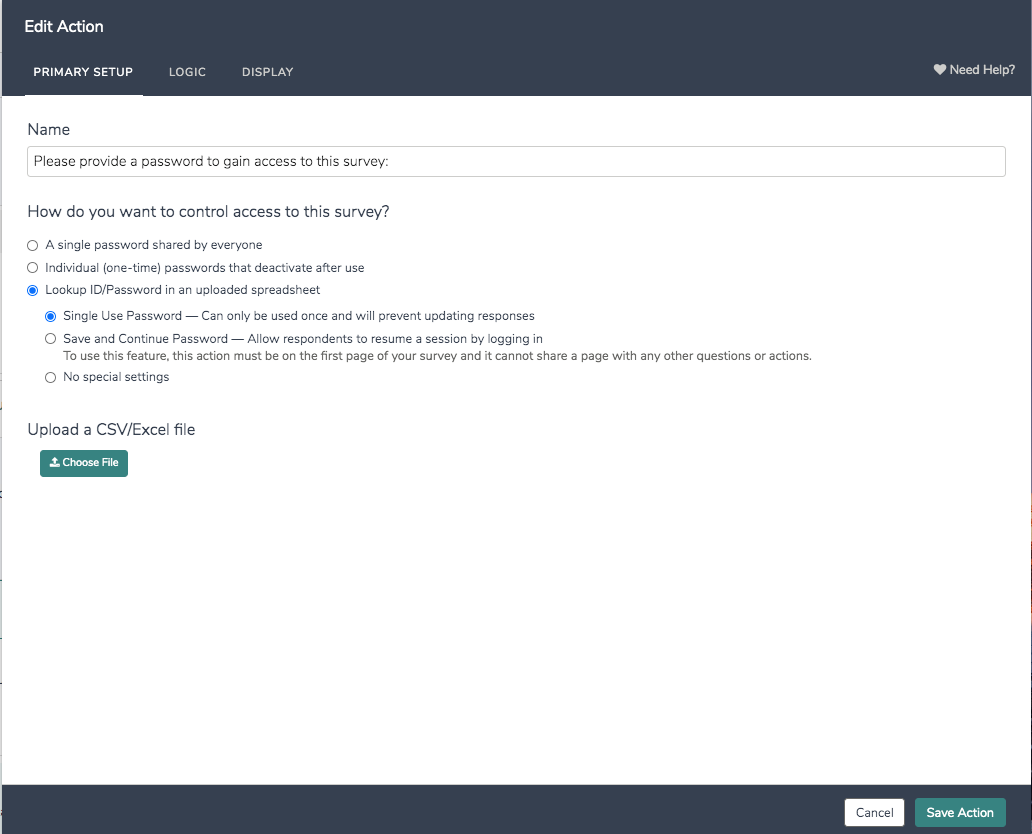
- Single Use Passwords - With this setting enabled, as soon as a password is used it will be marked as used. Once this is the case, the survey will not be accessible via that password again.
- Save and Continue Password* - With this setting enabled, respondents can use their password to return to their in-progress survey response. After entering their password, respondents will be forwarded to the last page they submitted. If the survey was previously completed, respondents will be forwarded to the survey Thank You page.
*In order to use the Save and Continue Password feature, you Login/Password Action must be on the first page of your survey and must be the only question/action on that page. Text/Instruction elements can be added to this page. - No special settings - Respondents can submit multiple responses with their password. Survey progress is not saved and the password is not inactivated after use.
- Next, click Choose File and select the file from your computer.

- Once you have selected a file, click Map Spreadsheet Data. Wait a few moments as the file uploads, the larger the file, the longer it can take to upload.
- In the Map Fields dialogue, map your Username and Password fields to the appropriate column in your spreadsheet. At a minimum, you need to indicate what column in your spreadsheet contains the passwords.
- If you wish to only require a Password field you can select the option to Hide "username" field. This is the only time this setting will be available and cannot be configured at a later time.
- Indicate whether your file includes a header row. We recommend that the first row of your spreadsheet contains column header text, for example, username, password, etc.
- If you are using additional data in your spreadsheet to populate survey fields and questions, select the checkbox to Use this spreadsheet to pre-populate survey questions. We will cover this in greater detail in the next section.

- If you do not need to pre-populate survey questions, click Start Uploading to finish this process. Skip to Step 3 to continue your login action setup.


Mapping of fields must be completed before any passwords for respondents have been used. Any mapping completed after survey taking has begun will not be saved in Alchemer.
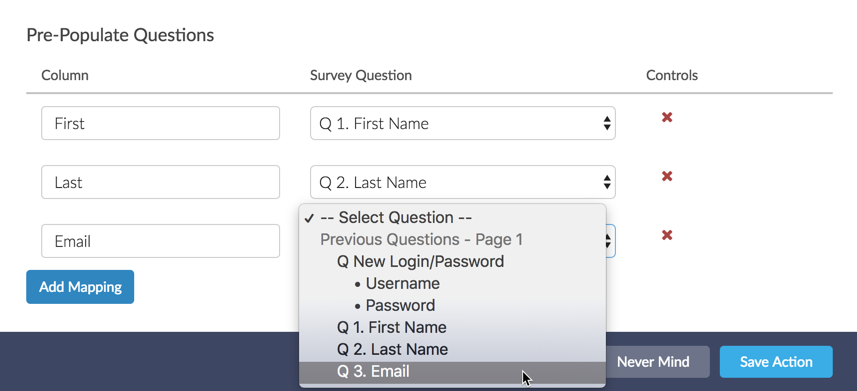
Step 3: Pre-populating Your Survey
As part of the Lookup ID/Password from Spreadsheet option, you can use data in your spreadsheet to pre-populate questions/fields in your survey. Keep in mind that you can pre-populate Hidden Value Actions if you don't want/need to expose the pre-populated information to your respondents.
- If you wish to pre-populate fields in your survey with data from your spreadsheet, select the option to Use this spreadsheet to pre-populate survey questions on the Map Fields dialogue. This will allow you to map the data in your spreadsheet to the corresponding fields in your survey. If you wish to skip this step you can map data to questions later, on the Logic tab.

- Each of your spreadsheet columns will have a corresponding Select Question dropdown menu where you can choose one of your compatible survey questions to push the column data to. Note that you do not need to map all columns to questions.

- Click Start Uploading when you have finished mapping your data. Your data will display below once it is uploaded. This may take some time. You can save the action without seeing the data display or move on to the other tabs to finish setting up your action.


Question Types Available for Pre-Population
- Radio Buttons
- Rating (Likert Scale)
- Dropdown Menu
- Checkboxes
- Textbox
- Essay
- Checkbox Grid
- Radio Button Grid
- Semantic Diff
- Custom Group sub-questions of the above types
Step 4: Customize the Login Display
On the Display tab, you can customize the Labels for both the Username and Password fields (visible to your respondents). To do so, type in your desired labels into the Label for Password Field and Label for Username Field.
You can also select the option to Mask password. This will replace password characters with asterisks (*****) as the respondent types.

You will also see options to:
- Pre-populate Username
- Pre-populate Password
These options allow you to optionally specify text to display within the fields. These are also available to automatically log your survey respondents into the survey.
Both options can be populated via the Select a Merge Code tool. For example, if you are distributing your survey via an Email Campaign and are using the respondent email address as the password, you may want to automatically merge that email address into the password field via merge code.

Finally, if you wish to customize the error message that displays when login fails, update the content within the Error message for login failure field.

Add New or Edit Existing Passwords
If you find you need to add additional passwords to your login action there are a couple ways to accomplish this.
Add a Single Password
If you have a couple of passwords to add, it is probably easiest to add them one by one.
- Edit your login action and click the link to Add Individual Record on the Primary Setup tab. This will open a panel to manually populate each field.

- Next, provide information to create a record. The fields that read Column: username and Column: password are required. It is important to note that you only need to populate the Username field if you originally set up your Login/Password action to use this. If you selected Hide "username" field on setup then this field does not need to be populated when adding new passwords.
- Click Save to create a new record. If you need to add another record, click to Add Individual Record and repeat the process.

Edit Passwords One-by-One
If you wish to make a change to the username or password, edit your login/password action.
- On the Primary Setup tab, search for the record you wish to edit (on the Primary Setup tab). You must search by username!
- By default, passwords are masked with asterisks. You may elect to Show Passwords to make it easier to locate the password that you are looking for.

- By default, passwords are masked with asterisks. You may elect to Show Passwords to make it easier to locate the password that you are looking for.
- Once the search returns the record in question, click the pencil icon on the right to edit.

- You will see all fields associated with the record, including password and username. Make any necessary changes here and Save the record when you are finished.
- You will also see Record Status on this page. The status will indicate whether the password is used/unused. If used, you will see the Date Used information.

- You will also see Record Status on this page. The status will indicate whether the password is used/unused. If used, you will see the Date Used information.


Upload a New File
If you have a number of new passwords to add or edit you can choose to upload a new file.
- Edit your login action and click the option to Upload Spreadsheet on the Primary Setup tab.

- Click Choose File and select the spreadsheet file from your computer then click Map Spreadsheet Data.
- Next, select your Update options.
- Add new data and update existing rows - When selected this update option will match on existing records and update the data. The key for matching will be the username plus the password (unless username is not being used). All data will be updated EXCEPT the Used status of the unique login.
- Replace all existing rows with this data - This will remove all existing contacts and replace them with contacts in your spreadsheet.
- Indicate whether your file includes a header row and click Start Uploading.


Review Uploaded Passwords Via Search
There are a couple of options for reviewing the status of your uploaded passwords. You can do so on an individual basis by using the search tool, or you can download all of your previously uploaded data via a spreadsheet.
- To check on the status of a specific record, search for the record by password via the Search field.
- Once the record is returned, you will be able to see the following data:
- Used - If the password has been used, you will see a checkmark here. If not yet used, this column will be blank.
- Last Used - If the password has been used, you will see the date of last use here. If not yet used, this column will be blank.

- If the password has been used, you will see an eye icon under the Actions column. Click this icon to view the response. This will open a new window/tab and take you to Results > Individual Responses.

Review Uploaded Passwords Via Spreadsheet Download
If you prefer to review your previously uploaded passwords in bulk, you can download a spreadsheet file directly from your login action.
- Edit your login action and click Download All Data.

- Your export will run and once ready you will see the option to Click to download your export. Please note that depending on the number of records that you uploaded, the export make take several minutes to complete.

- Once the spreadsheet downloads, feel free to open it to review your records. The spreadsheet will contain all of your previously uploaded information as well as the following relevant columns:

- used - This column indicates whether the password associated with the record has been used. If used, the row will display TRUE. If not used, the row will display FALSE.
- last used - If used, this column will contain a date. If not used, the column will be blank.
- times used - If you have elected to not toggle the Single Use Password setting when first creating your login action, respondents will be able to re-use their passwords. This column will indicate the number of times a password has been used. If the password has not been used, this column will be blank.


Remove Records
There are two options for removing records from your Login/Password:
- Remove Individual Record
- Remove All Records
Remove Individual Record
- To remove an individual record, edit your login action and use the Search field on the Primary Setup tab to search for the record (by password).
- Once the record is returned, click the red x icon associated with the record to remove it. You will need to Confirm this action before the record is fully deleted.

- If you need to remove additional records, repeat this process as needed.

Remove All Records
- To remove all records previously uploaded to your Login Action, edit the action and click on the Remove All Records link on the Primary Setup tab.

- You will be asked to Confirm this selection before all of your password records are removed permanently.

Logic Tab
There are a few options on the Login Action's Logic tab that you should be aware of:
- There is also an option to Disable Action. Disable the action while you are testing other elements of the survey, then re-enable it once you are ready to launch!
- You can also toggle an option to Require password when editing the survey. This would apply if you are using email campaigns to distribute the survey and/or edit links to edit responses after they have been recorded.
- On the Logic tab, you can also check and change how the data in your file is mapped into your survey if necessary. Do this via the mapping on the Pre-Populate Questions section.

Reporting on a Login/Password Action
If you need to report on what username or password a respondent used to log in, this information is available in three locations.
Individual Responses
- To view a specific respondent's Login/Password credentials, go to Results > Individual Responses.
- Search for the respondent's Individual Response. Once the response is returned, click on it to open the details. The Login and Password will display on the page where your Login/Password action is located.


Standard Report
Login/Password Action information is not available via a Standard Report.
Legacy Summary Reports
- If you would like to see a list of all the Logins and Passwords used in your survey, go to Results > Reports.
- Select Create Report > Legacy Summary Report. Select the option to Include Open Text and click Create Report.
- Your Login/Password action will display as two appendix elements, one for username (if used) and another for password.

CSV/Excel Exports
Login/Password actions are also available in the CSV/Excel Export. You will see a column for username (if applicable) and a column for password.

FAQ
What question types can I pre-populate?
The following question types are compatible with Login/Password Action pre-population:
- Radio Buttons
- Rating (Likert Scale)
- Dropdown Menu
- Checkboxes
- Textbox
- Essay
- Checkbox Grid
- Radio Button Grid
- Semantic Differential
- Custom Group subquestions of the above types
What should I avoid?
Avoid making changes to a live Login/Password action – Once your Login/Password action is live and collecting responses, we strongly recommend against editing it—especially when using the “Lookup ID/Password in an uploaded spreadsheet” option. This includes uploading a new file, adjusting field mappings, or editing records. Instead, make all necessary adjustments before launching: upload your file, map your data, save the action, and avoid further edits if possible. Changes made mid-survey can disrupt respondent access or lead to data mismatches, potentially impacting survey integrity.
Avoid using very large lists – Login/Password actions can time out on upload and during login if your file is too large. File size issues can stem from the number of rows or columns in your spreadsheet. If you're expecting a high volume of responses (e.g., tens or hundreds of thousands), consider using an email campaign instead to manage access and pre-population more efficiently.
Can I View or Download Uploaded Logins?
Yes! To do so, edit your Login Action and click on the Download All Data link on the Primary Setup tab. A spreadsheet will be generated and you will be prompted to download this file. The file will contain all of your previously uploaded records as well as data about password usage.

Is there anything else I should be aware of?
- If copying a survey with a Login Action where you have uploaded a password file, you will need to upload a new file into the action in the copied survey.
- If you need to search for a specific record, you must search by username. You cannot search by password.
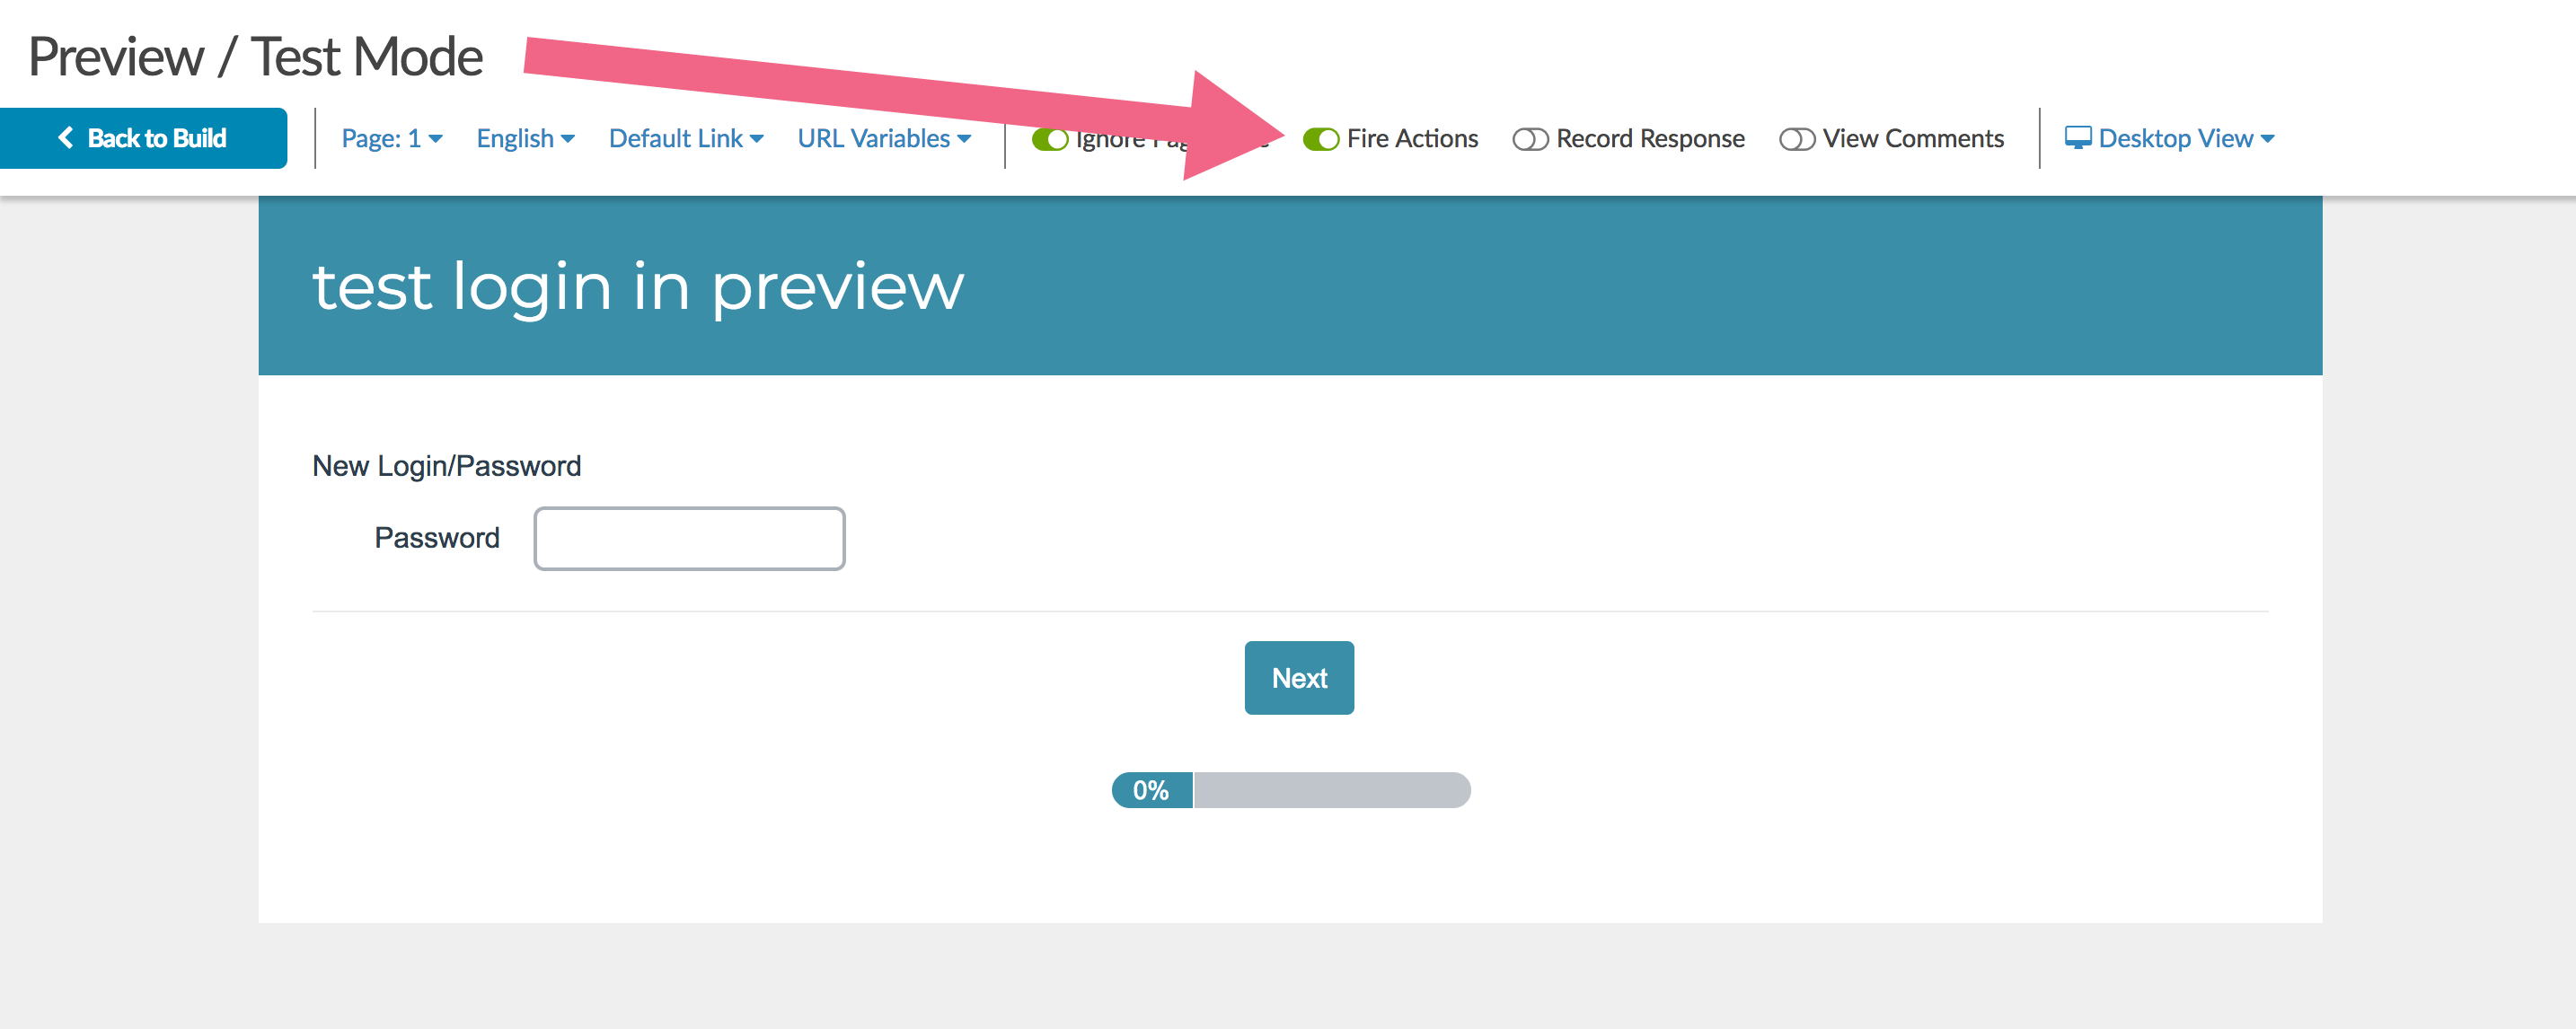
- If you are using Preview to test your Login Action, be sure to click the option to Fire Actions, otherwise, it will not display!

Why can't I select the Save and Continue Password option?
In order to use the Save and Continue Password option, your Login/Password Action must be on the first page of your survey. Additionally, no other Questions or Actions can be on this page.
Keep in mind that you can add Text/Instructions elements to Page One.
If you add a question or action to the page containing your Save and Continue Login Action, you will trigger the following error both on the survey page, and when editing your login action:
To use this feature, this action must be on the first page of your survey and it cannot share a page with any other questions or actions.
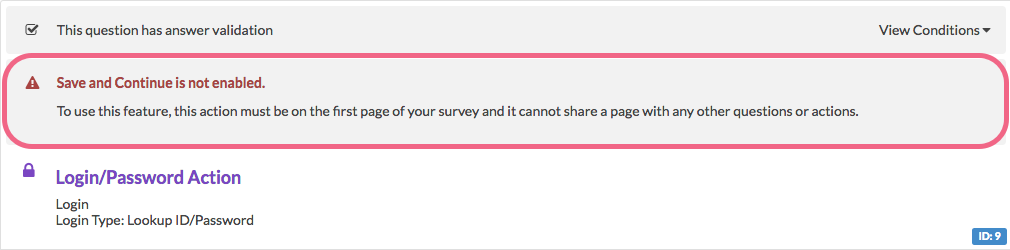
This error will be removed once the Login Action is the only question/action on the page.