Leading Practices and FAQs
Want to see how to take projects from good to great? Check out our Leading Practice & FAQ Home Page!
Alchemer Email Campaigns allows you to quickly send out surveys to a list of contacts via an email set up within Alchemer.
The great thing about an Email Campaign is that it sends a unique link to each contact, so you will have the ability to track each contact's progress and send reminders to those who haven't completed your survey and thank you messages to those who did!
Additional benefits of email campaigns
There are a couple of other benefits to using email campaigns:
- Save and Continue - Because each survey link is unique, respondents will be able to return to their response to complete at a later time! (This is the default setting for Email Campaigns. You can turn off contact tracking within your Email Campaign to allow respondents to share their links if you'd like.)
- Duplicate Protection - By default, respondents who click their unique link a second time will return to the same response, thus preventing them from recording more than one!
All new accounts need to receive authorization in order to test and send an email campaign in our system. We do this in order to prevent abuse of our email system. This improves our overall deliverability.
Before you can send your first email campaign, a physical address must be on file and the campaign needs to be reviewed by our staff. Once authorized you will have full access to the email campaign functionality.
All new Alchemer accounts created after January 25th, 2022 must be provisioned Email Action and Email Campaign authorization from the Alchemer Support team before scheduling and utilizing the email action or campaign features in the Alchemer platform. Alchemer users must have a completed survey prior to submitting an authorization request. Click here for more information.
Setup
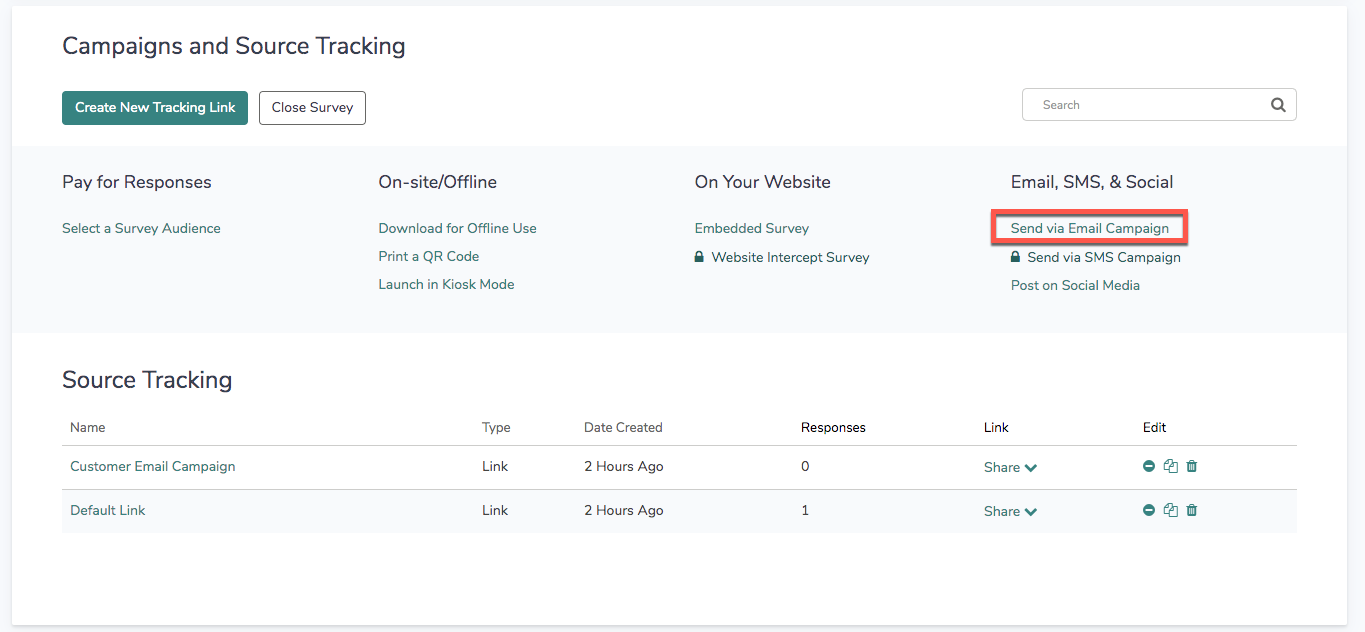
- To create an email campaign, go to the Share tab of your project and click the Send via Email Campaign link (located on the bottom-half of the page).
- Give your campaign a name and click Create Email Campaign. This will bring you to your newly created campaign. Now, follow the steps to set up your campaign!


1. Campaign Designer
Start by using the Campaign Designer to customize your messages. You will write an initial invite message, as well as any reminder or thank you messages you wish to send (reminder and thank you messages can be created at a later time if you wish).
You will also have the option to embed your first survey question into the message body.
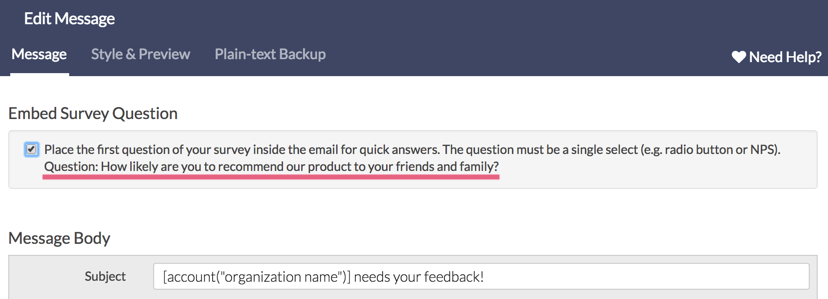
As long as your first survey question is one of the below-listed compatible questions, it will be available to embed:
Learn more about about this feature, including setup instructions by visiting the Embed Survey in an Email tutorial.
A default invitation will be set up for you. You'll need to edit this message as it includes instructions for you as user on how to craft a message that improves your response rates and reduces spam complaints. Click Edit Message to begin making your changes.
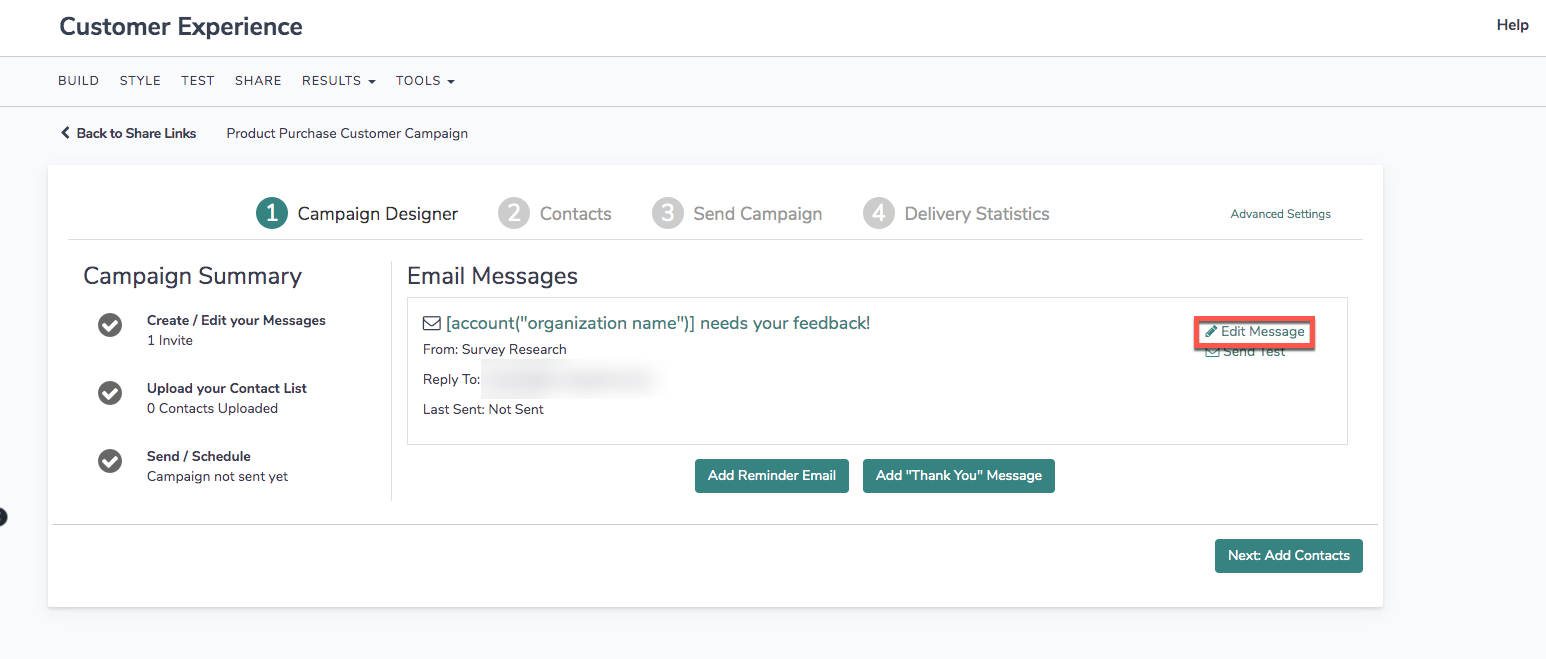
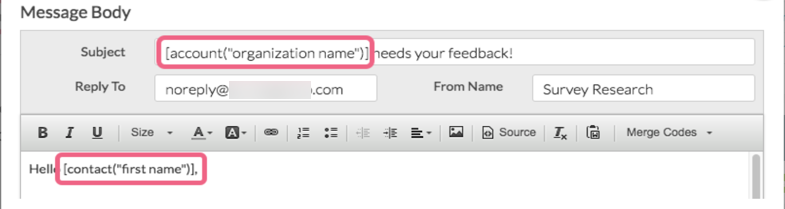
On the Message tab you can edit the Subject of your email, the From Name, the Reply To email address, and the Message Body in the Campaign Designer.
If you have configured SMTP and/or SPF & DKIM for sending email with Alchemer, you will see an option to customize your From Address. Select from the available options (noreply@alchemer.com is the default "from" email address). If you need to change the From Email Address in your Email Campaigns, visit our Custom Email Settings tutorial to learn how!
Different From and Reply To addresses may cause emails to be marked as spam and to fail to make it to the recipient. To ensure your email is delivered appropriately, it is recommended to have the From and Reply To Address match. This is a known issue when sending to Gmail accounts.
If you don't have a custom domain, the From Address will be noreply@alchemer.com and this should be what matches the Reply To.
If you'd like the recipient to reply to a different address, we recommend including this information in the message body.
The default message is full of great tips. For example, we inserted Merge Codes in both the subject and the body to help you personalize your invite. Contact Merge Codes will dynamically populate with available information you upload for each contact. Account Merge Codes will dynamically populate with the organization of the Alchemer account holder, based on the primary Account Information. Feel free to delete these or add more!
Best Practice: If your email is highly personalized and you want to include data specific to your contact list, skip to step two and upload your contact list first, before customizing your email message.
To learn more about available fields, their merge codes and how to use them both in your messages and the survey itself check out our Using Email Campaign Contact Data Tutorial!
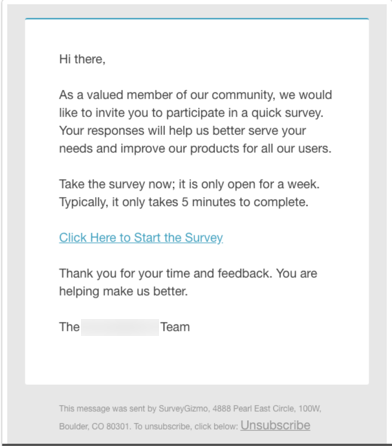
The default message also includes grey-colored tips that should help you in crafting a message that improves your response rates and reduces spam complaints. You'll want to delete these tips from your message.

The most important part of the message body is the survey link. By default, the survey link in the HTML message will be included:

If you wish to customize the link to read something other than the default "Click Here to Start the Survey", double click the link. In the popup that appears enter the text you wish to display as the clickable survey link in the Link Text field. Be sure to leave both the Link Type and URL fields as is! When you are finished, click OK. These steps are demonstrated below.
To learn more about personalizing your invite messages, visit our tutorial on Using Email Campaign Contact Data in Invite Messages.

The Email Footer (required for all messages) can also be customized. By default, the footer will include your account's physical address and unsubscribe link merge codes. To learn more about editing your Email Footer check out our Customize Email Invite Footer Tutorial.
When you are finished editing your message text, head over to the Style & Preview tab to customize your message look and feel.
You can choose colors using the color picker for the Background, Body, Body Text, Link Text, Footer and Footer Text. As you select colors, the preview below will update with your color choices!
If you wish to override our default styles check the option to Disable all Alchemer styling and use my own.

On the Plain-Text Backup tab you will see the content that will be sent to recipients who cannot receive or opt not to receive HTML emails. This content is set to automatically sync based on the HTML you set up on the Message tab.
If you wish to customize the plain text message, uncheck the option to Update Backup Messages automatically when HTML Message is changed and customize away!
If you wish to ONLY send a plain-text message check this option.

Below your initial invite, you have an option to add a reminder or thank you message. For Reminders and Thank You messages, the setup is the same as above with one difference: you can choose when to Schedule the message to send.
Visit our Send a Reminder or Thank You Message Tutorial for more information!

2. Contacts
Now it's time to add all the people you wish to send to! Click Contacts to get started. Learn about requirements for email addresses added to Alchemer Email Campaigns here.
Click Add Contacts to begin adding contacts. If your contacts are in a spreadsheet (either .csv, .xls or .xlsx) click Upload a Spreadsheet.
Alternatively, you can Use an Existing List previously uploaded to our Contact Lists feature or Manually Enter a Single Contact.
Because uploading a spreadsheet of contacts is the most common method for adding contacts, we'll follow this option through. When uploading a contact file, each column should ideally contain a header describing the contents of that column; if it does not, uncheck the option File includes a header row.
If you would like to add a contact's email address more than once, check the Allow duplicates option. This will send multiple emails to this respondent and allow them to take the survey more than once.
Once you have chosen your file and selected your file options make sure to review the details about how to properly use Email Campaigns in Alchemer. Click Continue when you are finished.

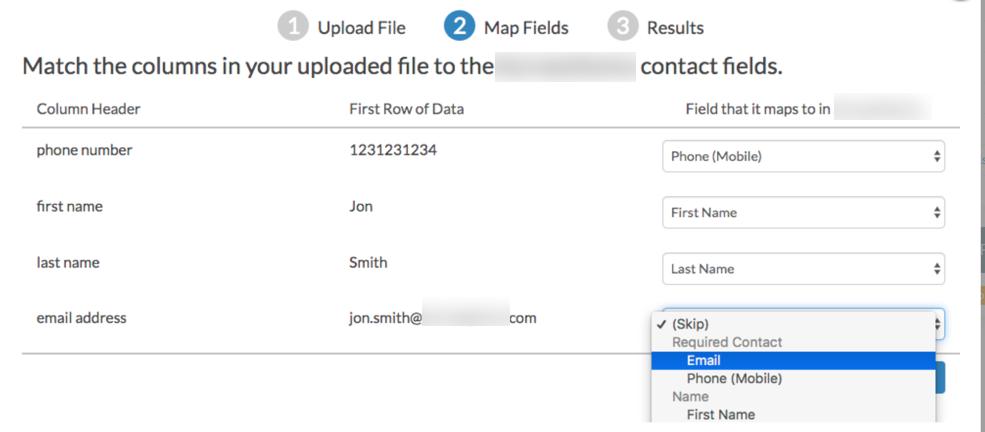
This will bring you to the Map Fields tool where you will map each column in your spreadsheet to a field in Alchemer where you wish to store this information. Click Continue when you are finished mapping.
To learn more about the Alchemer Contact Fields available for mapping and storing data check out our Contact Fields Tutorial.
You will receive a message that your contacts have been queued for upload. The option to receive an email when the upload is finished at the email address listed on the Results page will be selected by default. If you do not wish to receive an email uncheck this option. Click Continue when you are done.

When your contacts are uploaded they will display under the Contacts step. A total count of successful contacts uploaded will display at the top. If there were any errors when uploading your file this will be listed in a warning message. Click View Upload Error Log to get more details about upload errors.
Once you've added your contacts you are ready for your next step, which is to Send or Schedule your Email Campaign to Send!

3. Send Campaign
Once all the above steps are complete, you are just about ready to send this email! Go to the Send Campaign step to get started.
Over Limit
On the send step you'll have information about where your account stands with respect to its monthly email volume limit. Learn more about these limits, including how to increase your volume limit in the Email Volume Limit tutorial.
If you have set up a SMTP server to send Alchemer emails, you are not subject to the email limits. Learn about setting up SMTP by visiting the Custom Email Settings tutorial.

Test
We recommend sending a test of all of your messages to ensure proper formatting. Under the Send Campaign step there is a Test option available for each message you set up.
Check out our tutorial on Testing Your Email Campaign for more info!
Send Now
Once you're done testing and everything is good to go, it's now the moment of truth! Click the Send Now link under the Send Campaign step. This will bring up a pop-up for you to confirm. Check the number of contacts you are about to send to and click Send Invite Now if you are ready!

Schedule
If you prefer to schedule your messages to go out at a later time, click the Not Scheduled link for each message. You can schedule the message to go on a specified date and time (on the half hour)*.
*We recommend that a message is scheduled no less than 30 minutes in advance of the desired send time to allow time for the message to be queued up via our scheduling mechanism. Scheduling a message less than 30 minutes in advance of the desired send time can result in the message not being queued up and thus failing to send.
All times are Eastern Standard Time (UTC-5) for accounts using US servers and Coordinated Universal Time (UTC) for accounts using EU and CA servers.
If you choose to schedule your email send, you will receive an email from Alchemer once your invitation has been successfully sent. It can take 20-30 minutes from the time you schedule your campaign or reminders to go out to when they will actually send as the messages are sent out in batches to help ensure high deliverability.

4. Delivery Statistics
Once you've sent out your messages, you can monitor the progress of each message under the Delivery Statistics step. This page will dynamically update with information for each message including, how many messages were sent and how many were successfully delivered versus bounced.
As your respondents begin to take your survey the Completed Survey column will also update with the number of people who have completed the survey.
If you wish to dive deeper and explore which of your contacts clicked the survey link in the email or responded to your survey, click Export Contacts with Send Status to pull a spreadsheet with the status of each contact.
To learn more visit the Monitor Contact's Progress Tutorial.
Advanced Settings
Under Advanced Settings, you have many more customization options.

Email Settings
CAN-SPAM Address - This address is included at the bottom of each of your email invites. By default, this address is pulled from the physical address on file for your account. If you are sending email invitations on behalf of your clients, you can add additional company names and physical addresses by clicking Manage Addresses. Learn more about customizing your CAN-SPAM Address in the Email Invite Footer Tutorial.
Link Settings
Link Behavior - There are 3 different link behavior options you can choose under Advanced Settings. 99% of the time you'll want to leave this set as is.
- Everyone gets unique links (can resume partially completed surveys) - This is the default link setting for all newly created Email Campaigns because it allows for the most functionality. Unique links allow for tracking who has responded to your survey so you can send reminders and thank you message. Contact tracking also allows you to determine whose response is whose. Finally, this setting creates built-in save and continue for your survey respondents, as well as, duplicate protection.
- Everyone gets the same link (can only take survey once) - This setting sends the same link to everyone and allows each recipient to respond once.
- Everyone gets the same link (can take survey as many times as they want) - This setting sends the same link to everyone and allows as many responses with that link as needed. This is great if you want to allow your recipients to forward their email to recruit others to respond.
Current Link Status - Click Close This Link Now or Open This Link Now depending on your preference. This status is also affected by the Auto Open/Close Link settings discussed directly below.
Auto Open/Close Link - Specify specific dates/times to allow responses to be recorded. This date/time should be specified according to the timezone settings in your account settings. There are three options available:
- Open on a Certain Date - specify a date and time for your email campaign links to open. If the open date is in the future, the Current Link Status will be set to closed.
NOTE: Campaign messages scheduled to send during a time when the link is closed will not be sent. - Close on a Certain Date - specify a date and time for your email campaign links to close. The Current Link Status will be set to closed on the specified time and date.
- Close When Quota is Reached - specify a number of complete responses that should be collected in order for the campaign links to be closed. Once the campaign has collected the specified number of responses, the Current Link Status will be set to closed.


you choose to customize the open and close dates/times, be sure to make invite recipients aware of these dates in your invite messages.
When a campaign link is closed via Advanced Settings, the default experience allows for existing survey responses to finish if a respondent is currently in the survey-taking process.
Link Closed Message - Specify a custom message to display when this link is closed.
Link URL Format - The link for your email campaign is generated automatically when you create a campaign, you can click Customize to change this to a secure link, use your Private Domain or change the server location. Please be sure to make these changes before sending your invites, they are not retroactive.
URL Variables - These can be used to pass data in the survey for all contacts in this campaign.
Settings that Modify Your Survey
Language - Change the language for the survey. When set to Auto this will detect the language of the respondent's browser and display in that language if you've provided a language translation.
Survey Theme - If you wish to specify a specific theme for this campaign check the option to Use a different theme specific to this email and select the theme.
Message Sending Process and Bounce Rate Checks
The time it takes to send all messages depends on the size of your contact list. To protect deliverability and ensure your messages reach valid recipients, we perform a health check before sending your full campaign.
How the Health Check Works:
Health checks can be performed for campaigns with over 2000 contacts. Additionally, for campaigns over 50k contacts, only 5000 emails are sent every 30 minutes.
- We start by sending your campaign to a small sample: 5% of your contacts or 400 recipients (whichever is smaller).
- If the bounce rate in this sample exceeds 10%, the send will be canceled, and the campaign creator will receive an email alert.
What Counts as a Bounce?
- A bounce occurs when an email address is invalid. This includes:
- Hard bounces: Non-existent or incorrectly formatted addresses.
- Soft bounces: Temporary issues, such as a full inbox or server problems.
- We check for bounces every 5–10 minutes during the initial send. If you view your Delivery Report during this time, you may see hard bounces accumulating.
Next Steps After the Health Check:
- After 30 minutes, we calculate the bounce rate:
- If it’s below 10%, sending continues until all messages are delivered.
- If it’s above 10%, the send stops, and you’ll be notified.
For Large Campaigns:
- Messages are sent in batches. The batch size and timing between batches can vary based on your contact list size and current server load. This process may take several hours to complete.
This process helps maintain high deliverability for all customers and ensures your messages reach as many valid recipients as possible.
FAQ
What is the file size limit for contact uploads?
The short answer is that this varies and is largely dependent on the amount of data associated with each contact (number of columns in your spreadsheet). You may find that this is a bit of a trial and error process.
If you have 100,000 contacts in your spreadsheet and are only uploading the email addresses, a single upload will likely do the trick. If the same amount of contacts contains 10 columns of associated data, you will have better luck splitting the spreadsheet into 4-5 separate spreadsheets and uploading each spreadsheet separately into the same campaign.
If you intend to use the .CSV file format, larger lists can be imported successfully via single upload. Keep in mind that the upload may take in excess of 10 minutes to complete.
Net Promoter®, NPS®, NPS Prism®, and the NPS-related emoticons are registered trademarks of Bain & Company, Inc., Satmetrix Systems, Inc., and Fred Reichheld. Net Promoter Score℠ and Net Promoter System℠ are service marks of Bain & Company, Inc., Satmetrix Systems, Inc., and Fred Reichheld.