Using the Alchemer Salesforce Marketing Cloud Integration you can pull information from and push information to Salesforce Marketing Cloud.
Set Up the Salesforce Marketing Cloud Integration
1. Make sure API access is enabled in your Marketing Cloud account first. If you don't know if it's enabled, it probably isn't. Call Salesforce Marketing Cloud and ask the fine folks there to please enable it.
2. Select Integrations > Data Connectors, click Configure next to the Salesforce Marketing Cloud integration. Input your Marketing Cloud username and password to link your account. Once you're done, click Save.

Enterprise 2.0 Account Setup
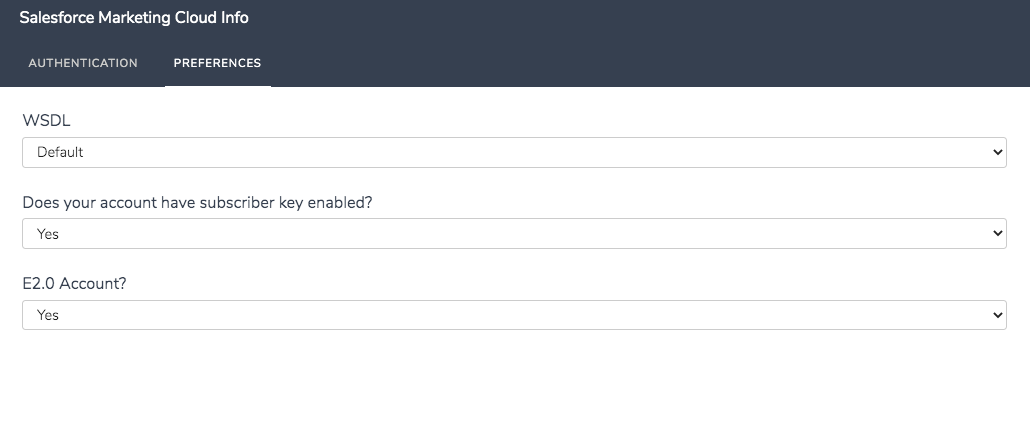
If you have a Salesforce Marketing Cloud Enterprise 2.0 account, go to the Preferences tab and select Yes in the E2.0Account dropdown.
Note: If you do not have a Salesforce Marketing Cloud Enterprise 2.0 account, please do not attempt to set up your Alchemer Plugins as an ET2.0 account, it will cause your push and pull actions to freeze up. Do not add the ET2.0 flag until you are certain that your SF Marketing Cloud account has that functionality.
Check out the E2.0 section below to learn more!
If you need to link another account, follow the same steps. If you have more than one account linked, we recommend utilizing the Account Label field so you can easily differentiate between accounts.
Action Modes: Push and Pull
Once you have linked your account, you can go back to the Build tab and click Add New Action on the page where you need your Marketing Cloud action. There are two action modes available: Pull or Push.
The Pull action allows you to pull subscribers from SF Marketing Cloud and populate survey questions from attributes in your Marketing Cloud account.
The Push action allows you to add and/or update subscribers and/or data extensions and set custom attributes.

Pull Example 1: Format a Salesforce Marketing Cloud Email to Pass Info to Alchemer
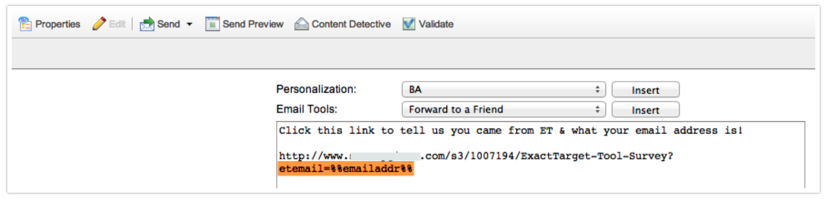
In order to tell Alchemer how to get information from your Marketing Cloud account, you need to pass the Marketing Cloud subscriber's email address. Specifically, we need to create a link to the Alchemer survey that includes a URL parameter, then merge in the personalization code from SF Marketing Cloud.
The screen shot below comes from the Marketing Cloud email editor. Notice the orange highlight?
That's where we:
- created a URL parameter called etemail and
- specified that the SF Marketing Cloud Email Address should be merged in using the merge code %%emailaddr%%
When the recipient clicks on this URL, they are essentially telling Alchemer "I received this message from SF Marketing Cloud and my email address is _________." You can use any parameter name, but they must match in both SF Marketing Cloud and Alchemer, which we'll show you next).
Pull Example 2: Lookup Info in Your SF Marketing Cloud Email List
Now that we've passed the email address via a link, we can turn to Alchemer's SF Marketing Cloud Pull action to fill in survey data from the SF Marketing Cloud database.
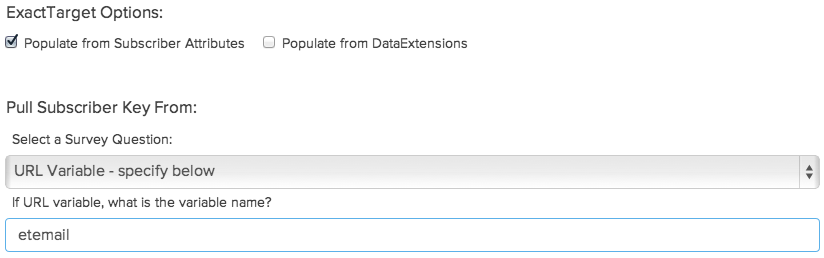
1. Click Add New Action, select SF Marketing Cloud - Pull, then give it a name like "ExactTarget subscriber lookup" and click Add and Edit Action.
2. Select your SF Marketing Cloud Account and indicate you'd like to Populate from Subscriber Attributes.
3. Now, input the URL parameter that contains the SF Marketing Cloud Email Address, which we specified in the example above. We named the parameter etemail. You can use any parameter name, but they must match in both SF Marketing Cloud and Alchemer.
NOTE: Make sure you put the lookup before any survey questions that will use the data. Otherwise, the SF Marketing Cloud data will not be available when rendering the questions.
Push Example 1: Push Info from Alchemer to Salesforce Marketing Cloud
1. Click Add New Action in the survey builder, give it a name, then choose SF Marketing Cloud - Push. Click Add Action and Edit.
NOTE: Because a form submission is necessary to initiate the call to ExactTarget's API, this type of Trigger only works on the second page or later.
2. The goal is to add a survey respondent to an ExactTarget list, so we need to specify which list the subscriber should belong to, and the question that captures their email address.
3. (Optional) You can select an ExactTarget email to trigger using the Triggered Send option. To learn more about the ExactTarget Triggered Sends, please visit ExactTarget Triggered Email.
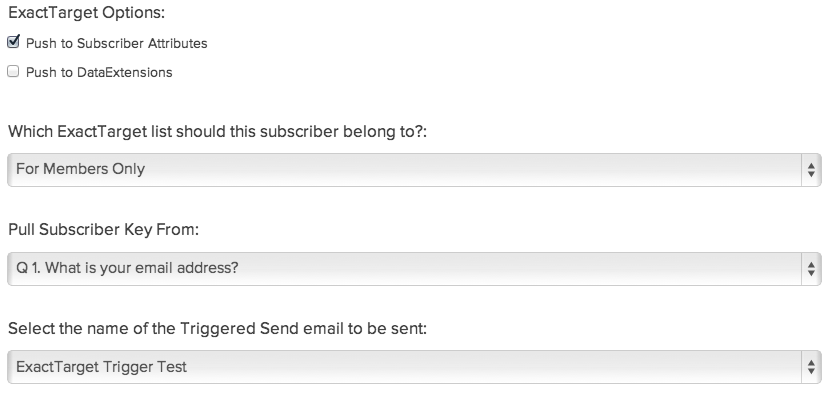
5. (Optional) In the Set Subscriber Status you can choose from Active, Unsubscribe from this list only or Unsubscribe from all lists. If you do not wish to change the subscriber's status leave it set to Do not change.
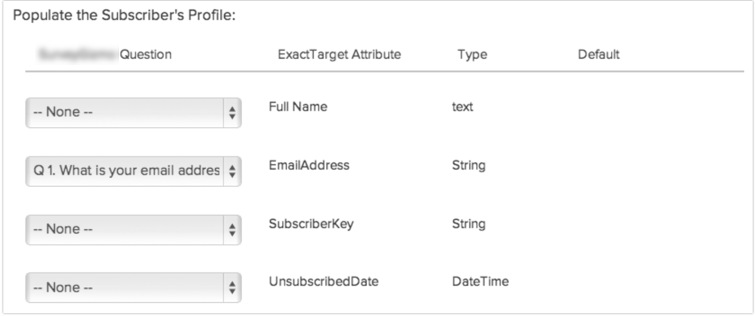
6. (Optional) You can also populate the subscriber's profile with other data collected in the survey by matching questions from Alchemer to ExactTarget Attributes:
Enterprise 2.0 Push Actions
If you have an Enterprise 2.0 account make sure it is set up properly, go back to your survey.
1. Create a new, or edit an existing SF Marketing Cloud action.
2. Select the account that has E2.0 enabled.
3. Select the appropriate Business Unit you'd like to update from and continue on as normal!
Troubleshooting
Is your action not working? Below are the most sources of this trouble.
- API access is not turned on in your Salesforce Marketing Cloud account.
- Your Salesforce Marketing Account does not have Read/Write API access.
- The WSDL / E2.0 account / Subscriber Key settings are wrong.
- Your Salesforce Marketing Cloud account is using the Restrict Logins by IP Address (IP Whitelisting). If so, reach out to us for the IP that must be whitelisted to use this integration. Learn more.