Pulse surveys are rising in popularity as an employee feedback tool for HR teams. These short surveys are designed to gather ongoing feedback from employees to help your organization gain insights, track goals, and get a sense of the overall pulse of the company. Think of pulse surveys as a quick check-in with your employees.
Visit the Alchemer Blog for tips on running successful pulse surveys.
Characteristics of Pulse Surveys
Pulse surveys can mean many different things and are implemented in a variety of ways across organizations. Having said that, there are several characteristics that pulse surveys commonly share:
- Pulse surveys are brief. In general these surveys should not have more than 15 to 20 questions. Often, 5 to 10 questions is recommended.
- Related to the above note, these surveys need to be quick-to-complete (they should take employees around five minutes or less). Any longer than that and you are likely to see decreased participation from employees.
- They are sent out on a regular basis (weekly, monthly, quarterly). Data is collected over time to better visualize trends and track progress.
- Pulse surveys include a mix of quantitative and qualitative (open-ended) questions. Keep in mind that open-ended question are more time consuming to answer! You probably should not ask more than one of these question types.
Before you get started, you should determine both the topic(s) that you want to track as well as the frequency with which you will send out your survey. Depending on the topic, you may not need to solicit feedback each week. You can also adjust the frequency as needed based on feedback or need.
Below, we will discuss a couple common implementations of pulse surveys and how you can leverage Alchemer features to configure these.
Example One: Simple Pulse Survey
A common implementation of pulse surveys utilizes a handful of questions that remain unchanged for the duration of the survey.
- These are highly focused surveys that usually cover a single topic such as Employee Satisfaction, Team Dynamics, or track employee reaction to a particular initiative or internal project.
- Because the questions remain unchanged, you may want to run these types of pulse surveys less frequently, perhaps monthly rather than weekly, to avoid survey fatigue.
Create Simple Pulse Survey
Creating a pulse survey in Alchemer is just like creating any other survey. The number of questions as well as the types of questions you ask will depend on your company's goals and what you need to track. Visit Alchemer's blog for tips and best practices on running Pulse surveys.
- On your Alchemer homepage, click the Create a Survey button to get started.
- Give your pulse survey a title and click Start Building.
- Add the questions that you have decided on. Remember that pulse surveys should be brief to encourage regular participation from employees!
If your survey is anonymous, you might still consider asking for some more general demographic information, such as team or department. This data may give you some interesting insights about how a particular issue is felt across teams. You can use this information to filter or segment your reports down the line.
Now that your Pulse survey is built, you will want to determine how you want to share the survey with employees. There are several options to choose from.
Share a Link to the Pulse Survey
If your Pulse survey is anonymous, or if you don't have a need to connect responses to specific employees, sharing a generic link to your survey is a great option. You can send this link to employees from your own email system at a regular interval (weekly, monthly, etc.).
Consider an optional question asking for identifying information (such as employee name) directly on the survey. This will allow employees to request follow up if they feel it's warranted.
Send an Email Campaign
When you send your survey via an Email Campaign, Alchemer automatically generates unique, one-time-use links for each added contact. This provides you with employee tracking and ensures that each employee can only submit one survey response each week, month, quarter, etc.
- You can store your employee contact list via Alchemer's Email Lists contact management system to streamline the process.
- Create an Email Campaign to send out the first iteration of your pulse survey.
- When it's time to send out the next pulse survey, you can copy your Email Campaign, update your messaging if needed, add contacts from your Email Lists, and send the next wave!
If you only want to send your pulse survey to a random selection of employees, you can use the Email List sampling feature to do so.
Recurring Responses
Alchemer's Recurring Responses feature is a great option for a pulse survey where the questions are constant and unchanged for the duration of the survey.
Recurring Responses allow respondents to start a new response with the same link on a set schedule. This feature allows the following frequency options (weekly or monthly are recommended for pulse surveys):
- Yearly
- Monthly
- Weekly (Sunday to Saturday)
- Daily (based on your account timezone)
To illustrate how this feature works, we will use the weekly frequency as an example:
- The employee receives their unique survey link on week 1. The link is open for the duration of the week (Sunday to Saturday). The employee can fill out the pulse survey at any point during that week, until Saturday at midnight.
- Once week 1 rolls over to Sunday, week 2 begins and the employee has the next seven days to provide their response for week 2, and so on.
You can even use this feature in conjunction with Email Campaigns!
Example Two: Modified Pulse Survey
Another common implementation of pulse surveys utilizes a question bank.
- For example, you might have a pulse survey that runs weekly.
- Perhaps the survey has twenty total questions, but each week of the survey only five of those questions are sent out to employees.
- Each set of five questions is focused around a different topic; week one might be overall employee satisfaction questions, week two might be team/department specific questions, and so on.
This type of pulse survey allows you to gather data on a wider set of topics while also combatting survey fatigue since employees are not answering the same questions each week when the survey is sent out.
Setting up this modified pulse survey requires the use of the following advanced Alchemer features:
We recommend familiarizing yourself with the above features before proceeding.
Create Modified Pulse Survey
Visit Alchemer's blog for tips and best practices on running Pulse surveys.
This type of pulse survey requires a bit of up-front set up. Because all questions are not shown each time the survey is run, we have to build a mechanism to determine when each set of questions should show.
As an example, let's say that we have a bank of ten questions for our pulse survey.
- We are gathering feedback on two different topics: Employee Satisfaction and Company Culture.
- Each topic has five questions.
- We want to send out this survey twice a month (every two weeks) and only want to get feedback on one of the two topics any given time:
- The first time we send out the survey, we will only ask the Employee Satisfaction questions.
- Two weeks later, we will send out the survey again and this time only ask the Company Culture questions.
Note: Your survey might have more questions and more topics. You also may want to send it every week, or once a month. This example can be extended to accommodate these variations.
- On your Alchemer homepage, click the Create a Survey button to get started.
- Give your pulse survey a title and click Start Building.
- Add the questions that you have decided on. Using our example, we want to create a separate survey page for each topic (one page for satisfaction, one page for culture), a page to collect some demographics and optional contact information, and the Thank You page. Our example survey structure is as follows (your survey may have more pages and topics, depending on your needs):
- Page One: Employee Satisfaction
- Page Two: Company Culture
- Page Three: Demographics and Contact Information
- Thank You Page
Now that all of our questions have been created and grouped by topic, we will be able to use logic to trigger appropriate pages to show, depending the survey iteration. You can apply a similar approach to your monthly or quarterly pulse survey.
Create Multiple Tracking Links
There are several different approaches to sharing a pulse survey like the one described in this example. We recommend creating separate tracking links for each iteration of the survey.
- In our example, we have two separate topics, and as such we will create two different Tracking Links* on the Share tab.
- We will need to keep these organized, so as a best practice we have added a clear link Name to each. In our example, we titled the links Employee Satisfaction and Company Culture, respectively.
*Visit our documentation to learn more about setting up multiple tracking links.
![]()
The next step will enable you to create logic conditions to show specific pages based on each link.
Add URL Variables to Links
In order to target specific tracking links via Page Logic, URL variables will need to be added to each link.
- Click on the link name to edit the link that you plan to send out for the first topic. In our example, we will edit the link with the name Employee Satisfaction.
- Navigate to the Advanced tab and locate the URL Variables section. Here you will provide a URL variable of your choosing that will be passed in behind-the-scenes when a survey is taken using this link.
- Add a URL variable in the provided field. This should be unique to the link but will establish a convention that you will follow for the remaining links. In our example, our URL variable will be
pulse=satisfaction. You can use whatever URL variable you want as long as each of your links uses a different value after the equals sign.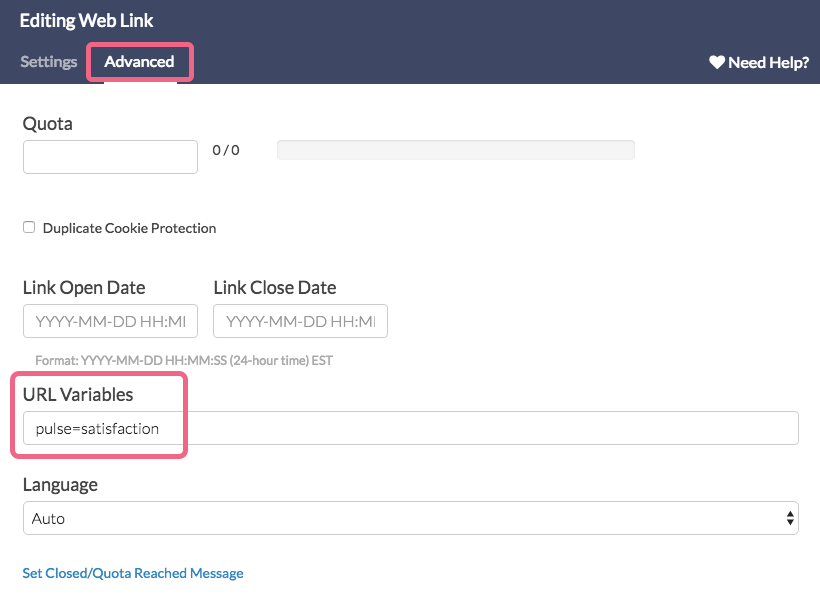
- Repeat this process for each of the tracking links that you created, but make sure to change the URL variable for each iteration. For example, our first link has the URL variable of
pulse=satisfaction, our second link has the URL variable ofpulse=culture.
Now that we have added URL variables to each of our tracking links, we can target these variables via Page logic.
Add Page Logic Conditions
To trigger the topic based pages, we will use Page Logic in combination with the URL variables that we just added to each of our links. Each link will trigger only one of the two topic pages to show.
For example, let's say our first share link looks like this:
https://survey.alchemer.com/s3/employee-satisfaction
In our example survey, we pass in the following URL variable behind the scenes:
pulse=satisfaction
Next, we need to ensure that only the Employee Satisfaction page shows for the above employee satisfaction link.
- On your pulse survey's Build tab, edit the page that contains the first topic questions.
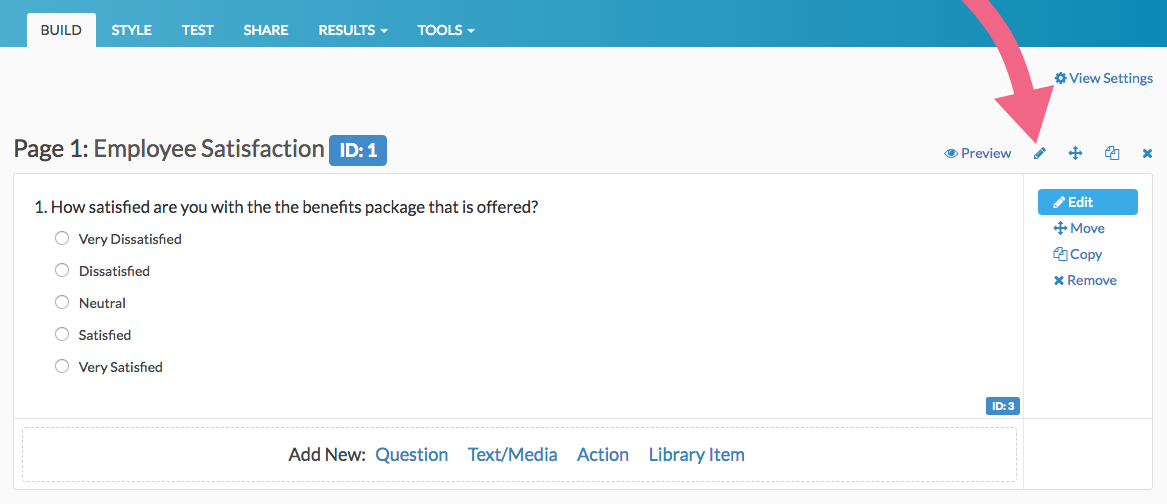
- Access the page Logic tab to create a logic condition based on a specific URL variable.
- Using the Select a condition dropdown menu, choose URL Variable from the First Party Data section.
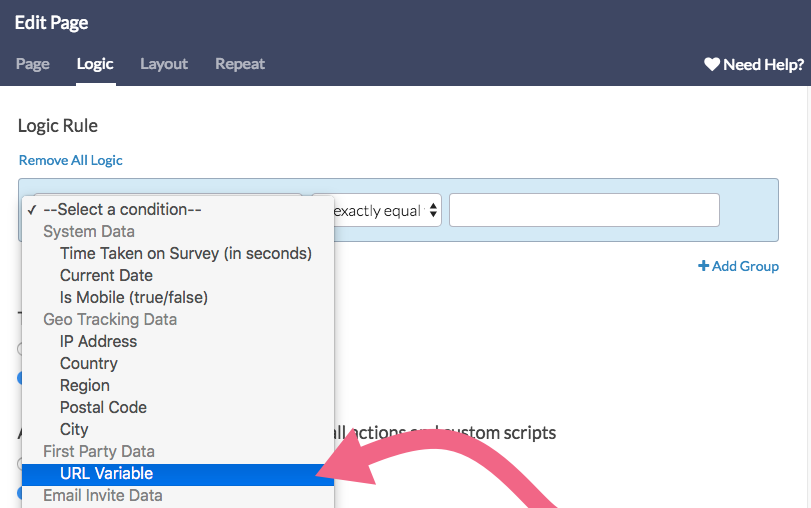
- In the second field, provide the name of the variable that you specified for your tracking links. In our example, we used
pulse. - We do not need to make changes to the logic operator dropdown. This should remain as the default: is exactly equal to.
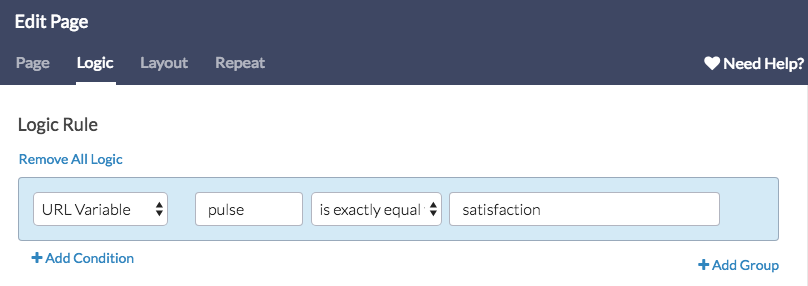
- Last, provide the URL variable value that should trigger this page to show.
- In our example, this page will be shown when we send the Employee Satisfaction link. Remember, this link contains the
pulse=satisfactionURL variable. As such, we will input satisfaction into this field. - Our finished condition reads as follows (to match the variable we added in the link):
URL Variable:pulseis exactly equal tosatisfaction.
- In our example, this page will be shown when we send the Employee Satisfaction link. Remember, this link contains the
- Using the Select a condition dropdown menu, choose URL Variable from the First Party Data section.
- Repeat this process for each page in your pulse survey. In our example, Page 2 (Company Culture) will be triggered by the URL Variable
pulse=culture.
Summary
The following diagram illustrates the workflow of the example pulse survey we just created, depending on the link that is sent to respondents:
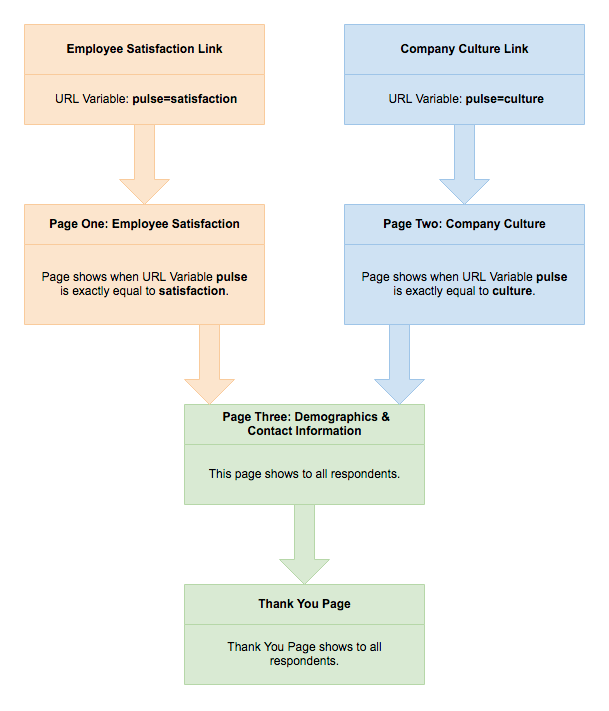
Using the combination of Page Logic and URL Variables, we have now configured our pulse survey to show only one of our pulse topic pages per link.
We will send out a different link twice a month (every two weeks) which will trigger a specific subset of our survey's question bank. Because we are using tracking links, we will likely need to send the links via your own email distribution system. We will also need to keep track of which link should be sent next according to your pulse survey schedule.
In our example, it will take us a whole month to gather data on all of the questions in our survey. You can imagine that using this method, it may take some time to start seeing trends in your data, so you will likely want to run this survey for an extended period of time.
Report on Your Pulse Survey
Once you have started collecting data via your pulse survey, you can access this data via the Standard Report. By default, the Standard Report will display all the aggregate data that the survey has collected (all-time).
- If you only want to see a subset of the data (or perhaps just the responses from the most recent week, month, or quarter), you can filter your report by response date.
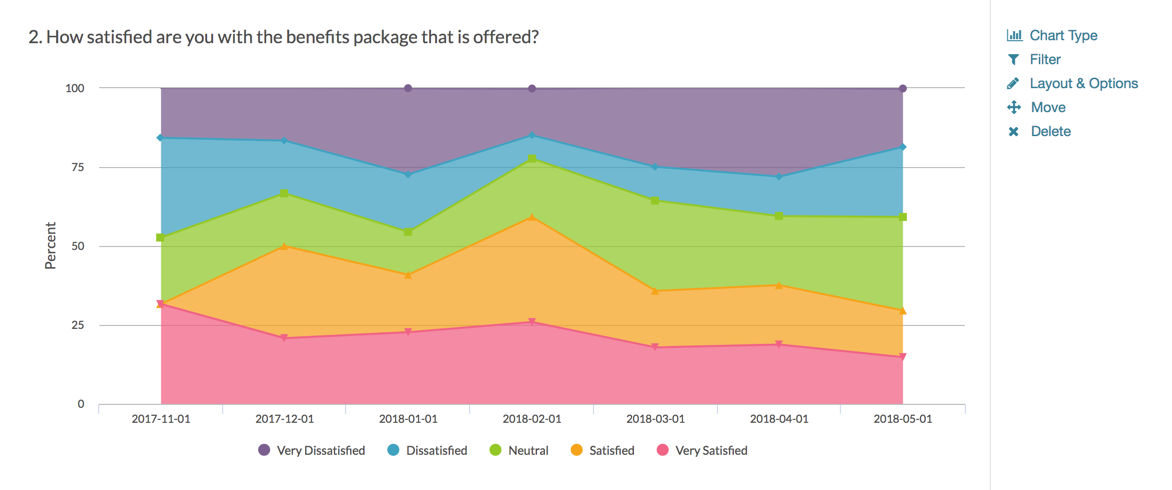
- If you need to track changes overtime, the Standard Report Longitudinal Reporting feature is built just for that.
- If you are collecting open-ended responses, consider the Open Text Analysis tool. Analyzing your open ended responses will allow you to quantify this data and help you see trends on this type of feedback, too.
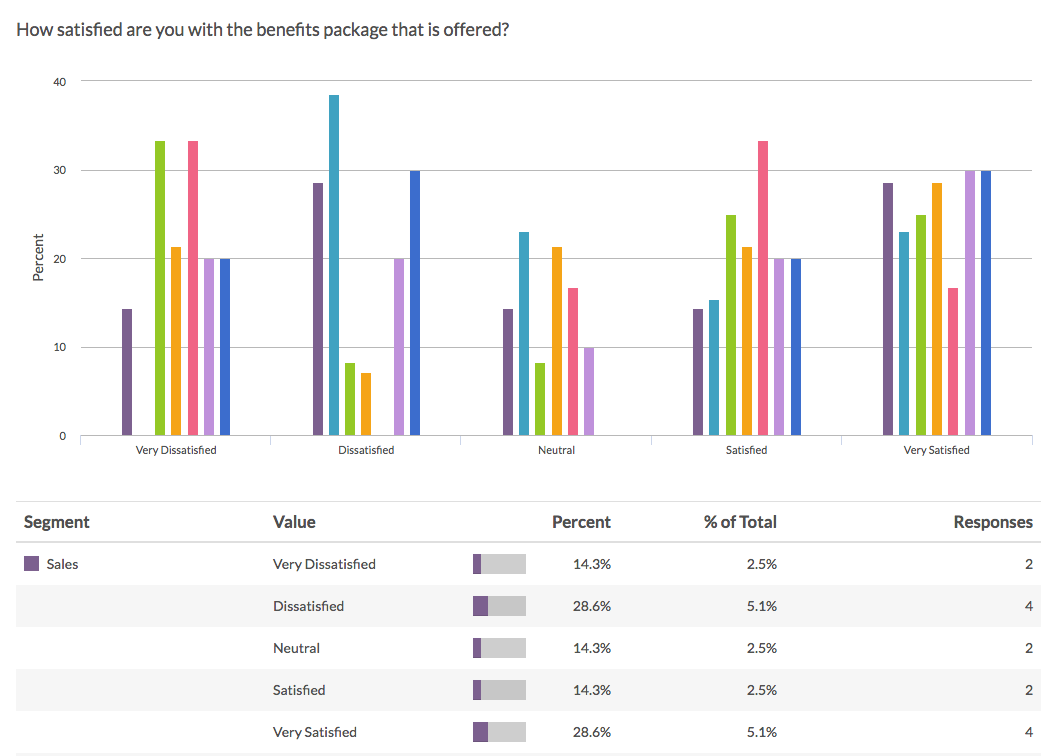
- If your pulse survey collects demographic information such as the employee's department, you can use this data to create filters and segments in your Standard Report to gain additional insights.
Optional Customizations
There are several Alchemer features that you can utilize to customize your Pulse survey.
Anonymous Responses
There are different schools of thought regarding pulse surveys and anonymity.
- You want your employees to trust the process and want them to be able to feel like they can provide honest feedback. Setting up a survey to be anonymous can help with that trust.
- You also want to be able to act on specific feedback that might not need to be addressed with the whole team/company.
The choice is ultimately yours, but one option is to make your survey anonymous and have an optional question for employee contact information for further followup, if needed. This allows to employee to opt-in to sharing their details.
If you have made the decision to make your survey anonymous, follow these steps to enable the setting:
- Go to Tools > Response Settings.
- Check the Anonymous Responses option.
- Click Save Settings to finish.
Visit the Anonymous Surveys documentation for additional information about this setting.
Show Questions Randomly
If you have a bank of questions on your pulse survey and only want to ask a portion of these on each occurrence of the survey, one option that you can consider is Question Randomization. One of Alchemer's randomization settings allows you to show a random set of questions on a given survey page to each participant.
For example, if you have twenty questions on your pulse survey, you can elect to show a set of 5 questions each time your run your pulse survey. Before you go down this road, there are some potential drawbacks that you should consider:
- Using this method, each employee gets a different set of 5 questions. This is truly random so there is a chance that for certain questions you run the risk of getting either no data, or not enough data to make conclusions.
- If you are using this method, it's best for long running surveys that allow you to build up a large dataset for each question over time. You likely will not want to make conclusions early on if you are not getting a large or complete data sample for each question.


