The Jira initiator is available for purchase as an add-on. If you are interested in purchasing, please contact us for additional information.
Overview
Jira is a tool commonly used for project management and issue tracking. The Alchemer Workflow Jira initiator provides Product and Technology Teams with an integrated solution to incorporate detailed and customizable feedback surveys into their ticket management processes.
Through this integration, initiate Workflows and surveys when events occur in Jira, adding feedback seamlessly into your ticket or product management processes.
With the Jira Initiator, you can initiate Workflows in Alchemer whenever:
- Issues or comments are created, updated, or deleted.
- Custom events occur in Jira Automation, using Jira web requests.

Setup
Issue or Comment Webhook Setup
Issue and Comment Webhooks are intended for use with Jira Webhooks. For more details on using Jira Webhooks, refer to this documentation.
1. Create a new Workflow. 2. Name your Workflow.
3. After creating a new Workflow, select Jira as your Workflow initiator.

4. Select Comment Webhook or Issue Webhook as the event you want to initiate a Workflow off of.

5. Click "Next" on the initiator overview screen.

6. Add a new authentication.

7. Name your new authentication then input your Jira Site URL. Then click "create".
The URL provided needs to be the full URL for your Dashboard. Example: https://mydashboard.atlassian.net.

8. In the Jira authentication window that appears, authorize the Jira Alchemer Workflow integration.

9. Copy the Jira Webhook URL, you will need this URL to configure the Webhook on the Jira side.

10. In your Jira account, go into Setting > System.

11. Under the System > Advanced, select WebHooks. 
12. Click "Create a Webhook". 
13. Name the Webhook, paste the Jira Webhook URL provided by Alchemer, and select when (Comment Updated, Comment Created, Comment Deleted) you want the Comment Webhook to initiate the Workflow.
You can also add JQL to filter for specific events.
If you are setting up the Jira Issue Webhook, this process is the same, you will just check the boxes underneath "Issue" instead of "Comment".

14. To finalize the initiator, click "Save."
Start a Workflow from Jira Automation
Jira Custom Webhooks are intended for use in Jira Automation. For more details on using Custom Webhooks in Jira Automation, refer to this documentation.
1. Create a new Workflow. 2. Name your Workflow.
3. After creating a new Workflow, select Jira as your Workflow initiator.

4. Select Jira Custom Webhook. Then click "Next".

5. Click "Next" on the initiator overview screen.

6. Copy the Jira Webhook URL, you will need this URL to configure the Webhook on the Jira side.

7. In Jira, navigate to a Project. Under the Project Settings, select Automation.

8. Under Automation, create a new rule or use a pre-existing rule.
9. Define the "When" events that will trigger the "Then" event. After created both events, paste the Webhook URL provided by Alchemer in the Web request URL field for the "Then" event. Then click "update".

10. Set the HTTP Method to POST and define any automation variables (custom fields) that you want to pass to Alchemer.If you don't need to add automation variables you can just pass over the fields associated with that particular issue.
Example formatting for automation variables in a JSON object:
{
"email": "{{creator.emailAddress}}",
"last_name": "{{creator.lastname}}"
}
The variable names in the JSON object in Jira must be identical to the custom field name you provide in Alchemer, seen in the step below.
You can also use the Issue Webhook initiator here with Jira automation parse all of the Issue fields.
If you select use the Issue Webhook initiator, choose "Issue data (Jira format)" in the web request body field.
11. In Alchemer Workflow, add any additional custom fields that you would like Jira to pass to Alchemer for use in the Workflow. When complete click "Add to Custom Fields."

12. To finalize the initiator, click "Save."
Merge Codes
For more information on how to use these merge codes in your Workflow, check out this article.
Merge Codes: Jira Custom Webhook
When the webhook fires, Jira will pass any custom fields you defined to Alchemer Workflow. After configuring this initiator, you can use these fields in merge codes, logic, and other Workflow features.
Merge Codes: Issue or Comment Webhook
When the webhook fires, Jira will pass the following fields to Alchemer Workflow. After configuring this initiator, you can use these fields in merge codes, logic, and other Workflow features.
Fields for Jira initiator - Comment Webhook
Jira | Comment Webhook | commentBody
Jira | Comment Webhook | commentId
Jira | Comment Webhook | commentUrl
Jira | Comment Webhook | issueId
Jira | Comment Webhook | issueKey
Jira | Comment Webhook | issueStatus
Jira | Comment Webhook | issueSummary
Jira | Comment Webhook | issueType
Jira | Comment Webhook | issueUrl
Jira | Comment Webhook | projectName
Jira | Comment Webhook | userEmailAddress
Fields for Jira initiator - Issue Webhook
Jira | Issue Webhook | eventType
Jira | Issue Webhook | issueId
Jira | Issue Webhook | issueKey
Jira | Issue Webhook | issueStatus
Jira | Issue Webhook | issueSummary
Jira | Issue Webhook | issueType
Jira | Issue Webhook | issueUrl
Jira | Issue Webhook | projectName
Jira | Issue Webhook | userEmailAddress
Use Case
A Customer Success Team wants to be notified automatically when the Technology Team completes bug fixes in Jira. The Technology Team wants to send a survey to the Customer Success Team, whenever bugs fixes are made, asking for feedback on if the resolution was satisfactory and met customer needs.
To accomplish these needs, the Technology Team sets up a Jira Custom Webhook, that automatically initiates a Workflow in Alchemer when a Jira ticket is moved to the "Complete" column.
When the Workflow initiates, an email is sent to the CSM for the account that reported the bug. Additionally, a survey is sent to the CSM asking for feedback on the resolution and if it was satisfactory. Using If/Else Logic, depending on the answers provided this feedback is then routed to the appropriate stakeholder on the Technology Team.
FAQs
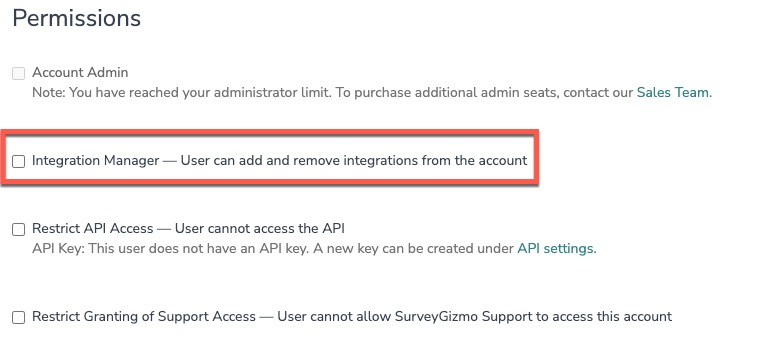
1. The Integration Manager Permission is required to set-up and use the Jira initiator. If you don't have this permission, you will see the following message when selecting an initiator:
 2. To grant this permission to someone on your team, go to the left-side product navigation and select the Account drop-down, then click on the User Management tab.
3. Then select the Users tab under User Management.
4. Click the username for another member of your team.
5. Scroll down to the Permissions section and check if the Integration Manager box is checked. If you are an admin you can check the box for other members of your team.
Yes, you can create an unlimited number of Workflows that listen to the same initiator. However, you will need to create a new Workflow and configure the initiator each time. You can reuse the same Jira authentication.
Alchemer is committed to continuously releasing updates and enhancements to our Workflow initiators. If you have specific use cases, questions, or just general feedback, we would love to hear it. Contact us here!