ATTENTION!
SAML SSO is available to our business platform customers.
If you are interested in SSO, please contact us for additional information.
Launching early November: New SSO management!
Alchemer is introducing an enhanced SSO experience. This update will simplify user management and strengthen login security.
No action is needed at this time and your current SSO setup will continue to work alongside the new experience until you choose to migrate.
More details coming soon. Stay tuned!
Are you already using an Identity Provider (IdP) to manage logins and access to the various systems your users need to access? If so, you can now include Alchemer as a Service Provider (SP) as part of this single sign-on (SSO).
We support any IdP that uses the SAML 2.0 protocol. At this time, we have tested SSO from Active Directory Federated Services (AD FS), Azure (AD FS), and Okta, Auth0, OneLogin, and Ping Identity.
SSO Options in Alchemer
Within Alchemer you can use SSO to...
1. authenticate users into the Alchemer application to build and administer surveys. This tutorial will cover this option.
and/or
2. authenticate respondents into surveys. This option is covered in our SSO Authentication for Survey Respondents Tutorial.
In both cases SSO acts as an added security layer. When using SSO for authenticating survey respondents there is also the added benefit of pre-population; any data present for each user in the IdP can be automatically passed into the survey, which can then be used within the survey itself or in reporting.
Why SAML SSO?
When security is of paramount importance, organizations will set up an Identity Provider (IdP) to manage all logins for all users. This allows IT professionals at the organization to control the number of logins out there in the wild. Identity providers also allow IT professionals to set up password reset rules to increase security.
If you are not already using an IdP you probably won't start just for Alchemer.
How Does It Work?
Single sign-on allows organizations to set up a trust relationship with a service provider (Alchemer in this case) that allows the IdP to send encrypted login credentials to the service provider thus preventing the user from having to log in more than once, hence single sign-on.
What You Will Need Before You Get Started
If you're not an IT professional at your organization, go get one; you'll need his or her assistance to set this up.
First, you'll need the below ingredients from your IdP; your IT professional can help you with this.
Entity ID - This is the globally-unique URL/string of your IdP entity. It's like a mailing address that we, the service provider, use to contact your IdP. Not sure where to find this? Learn more.
Login URL - This is the URL for logging in to your IdP. The Login URL is often very similar to the Entity ID URL. This is where we will send the SAML request.
SSL/Signing Certificate - We'll use your SSL/Signing certificate to encrypt the data being sent back and forth via SAML. You will need to upload your SSL Certificate from your IdP. Not sure where to find this? Learn more in our glossary of SSO terms.
Alchemer-Side Setup
You must be an administrative user in Alchemer in order to access these settings.
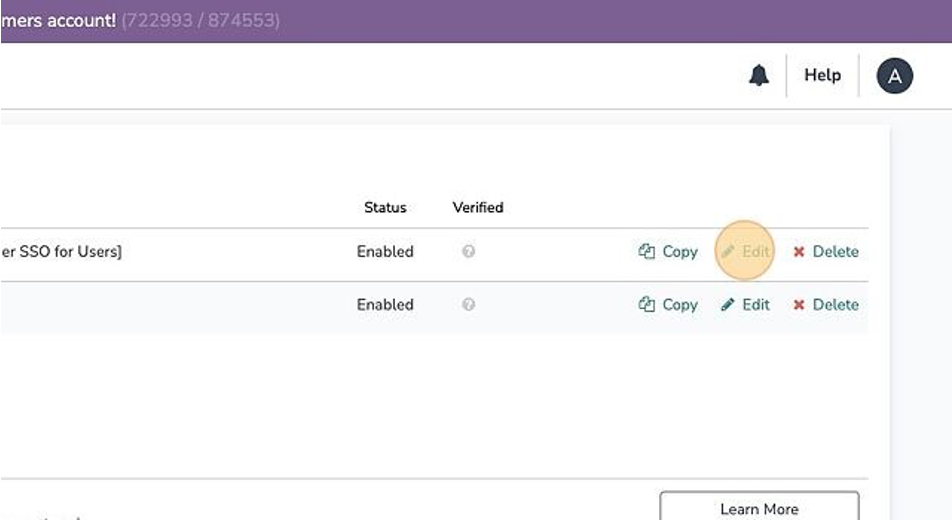
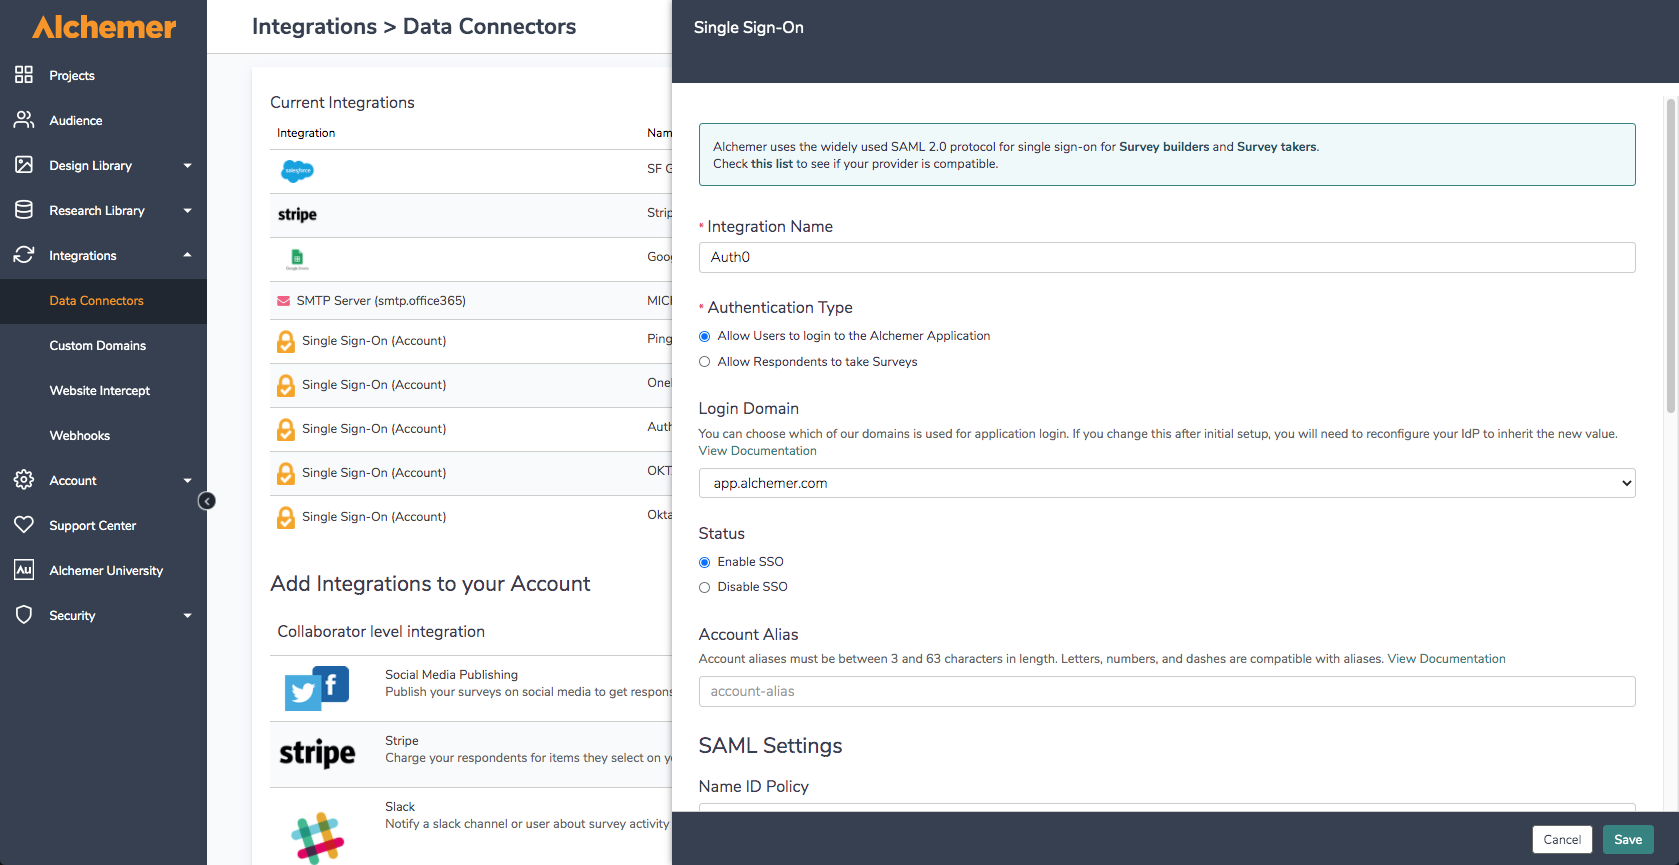
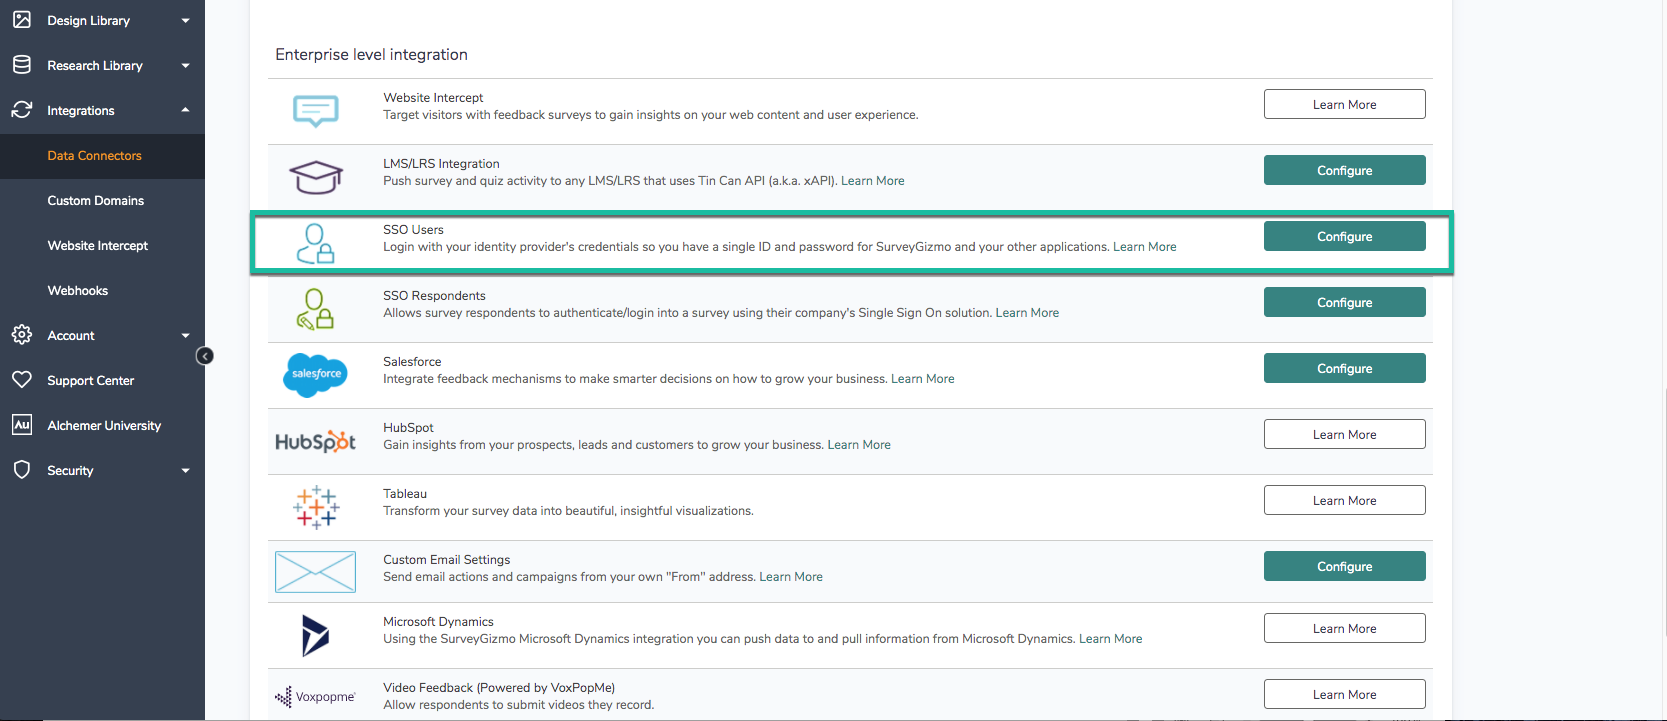
- Go to Integrations > Data Connectors and click the Configure next to the SSO Users option.
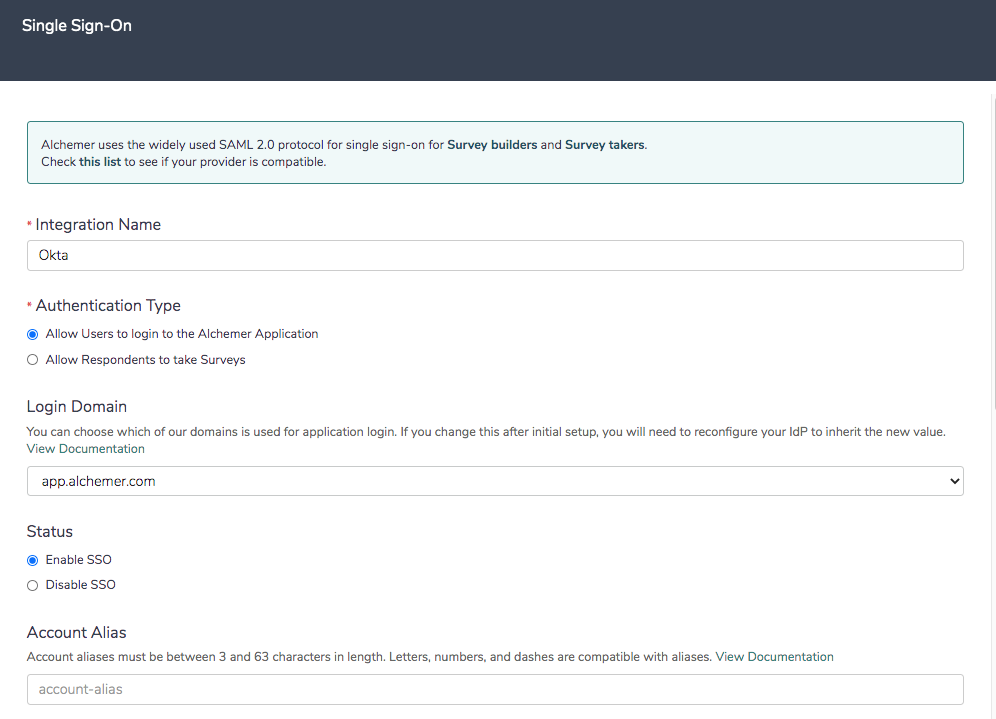
- Give your SSO Integration an Internal Name. This is particularly important if you plan to use SSO both for authenticating users and for authenticating survey respondents as this name will display when setting up SSO authentication within surveys.
- Choose the Authentication type > Allow Users to log in to the Alchemer Application.
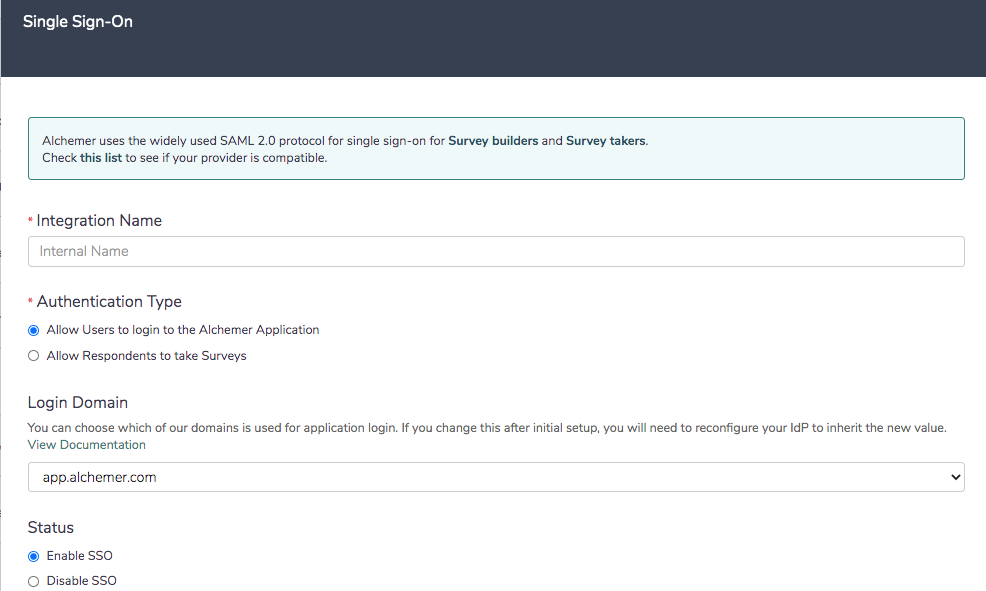
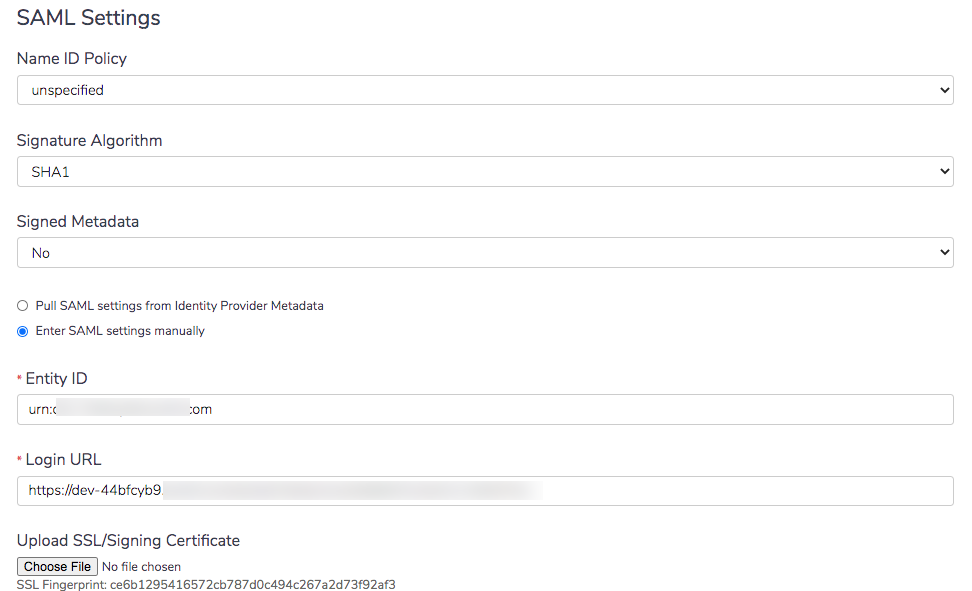
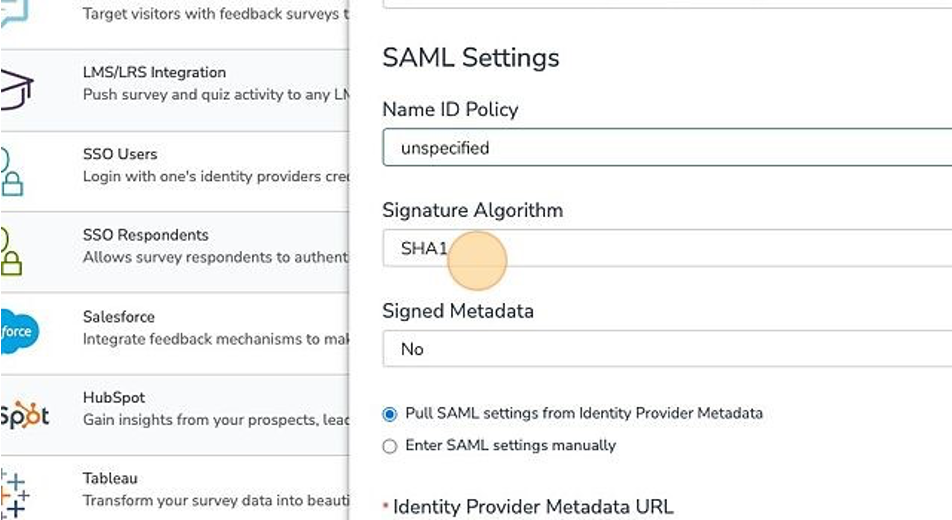
- Under SAML Settings, choose the Name ID Policy format that your IdP will provide to Alchemer in the SAML assertion. Your options are unspecified and email. Certain IdPs do not allow email addresses to be passed via the unspecified format.
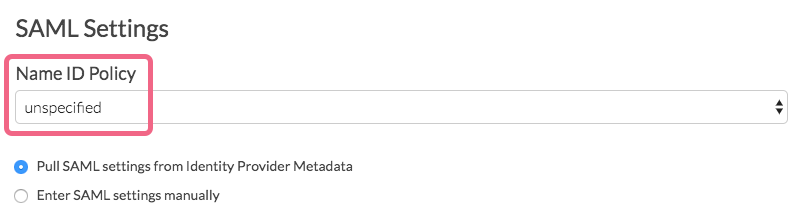
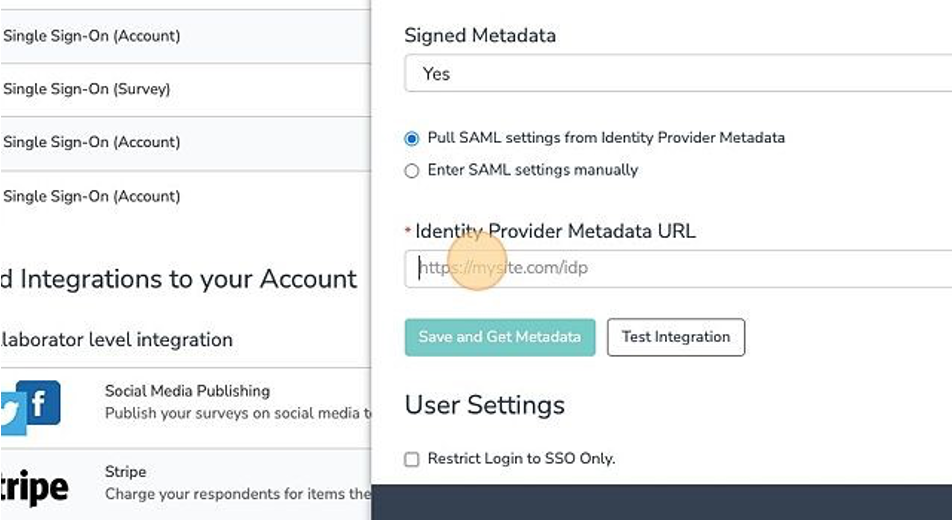
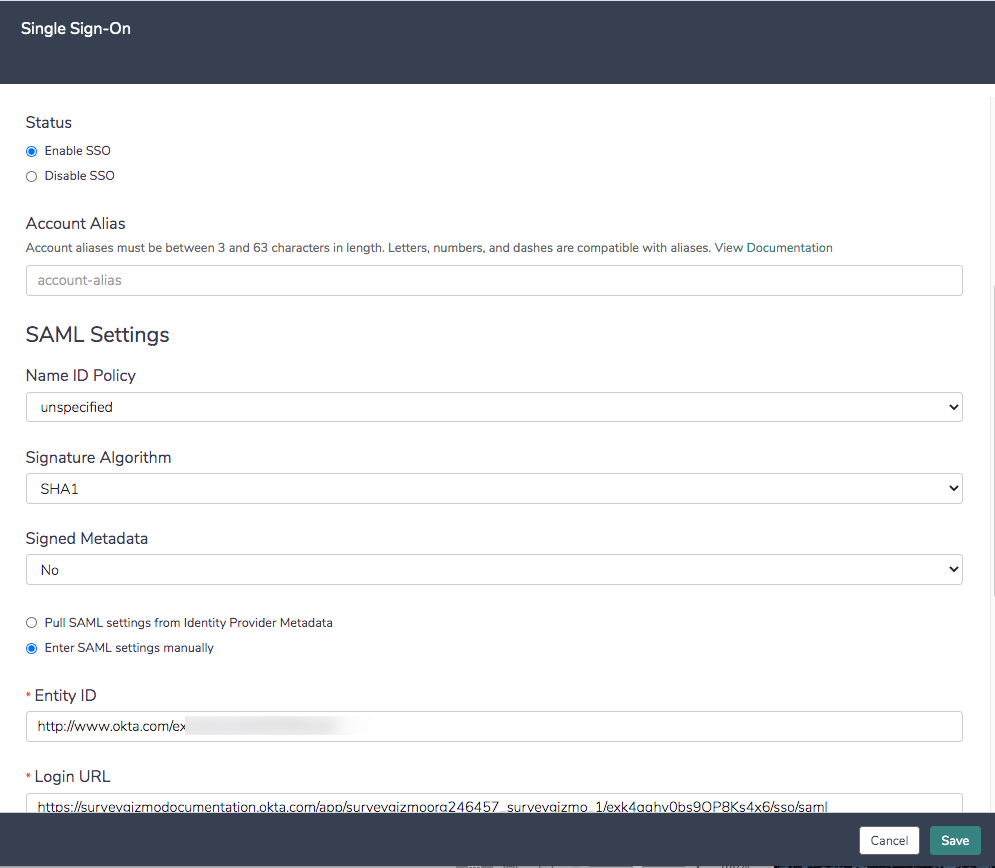
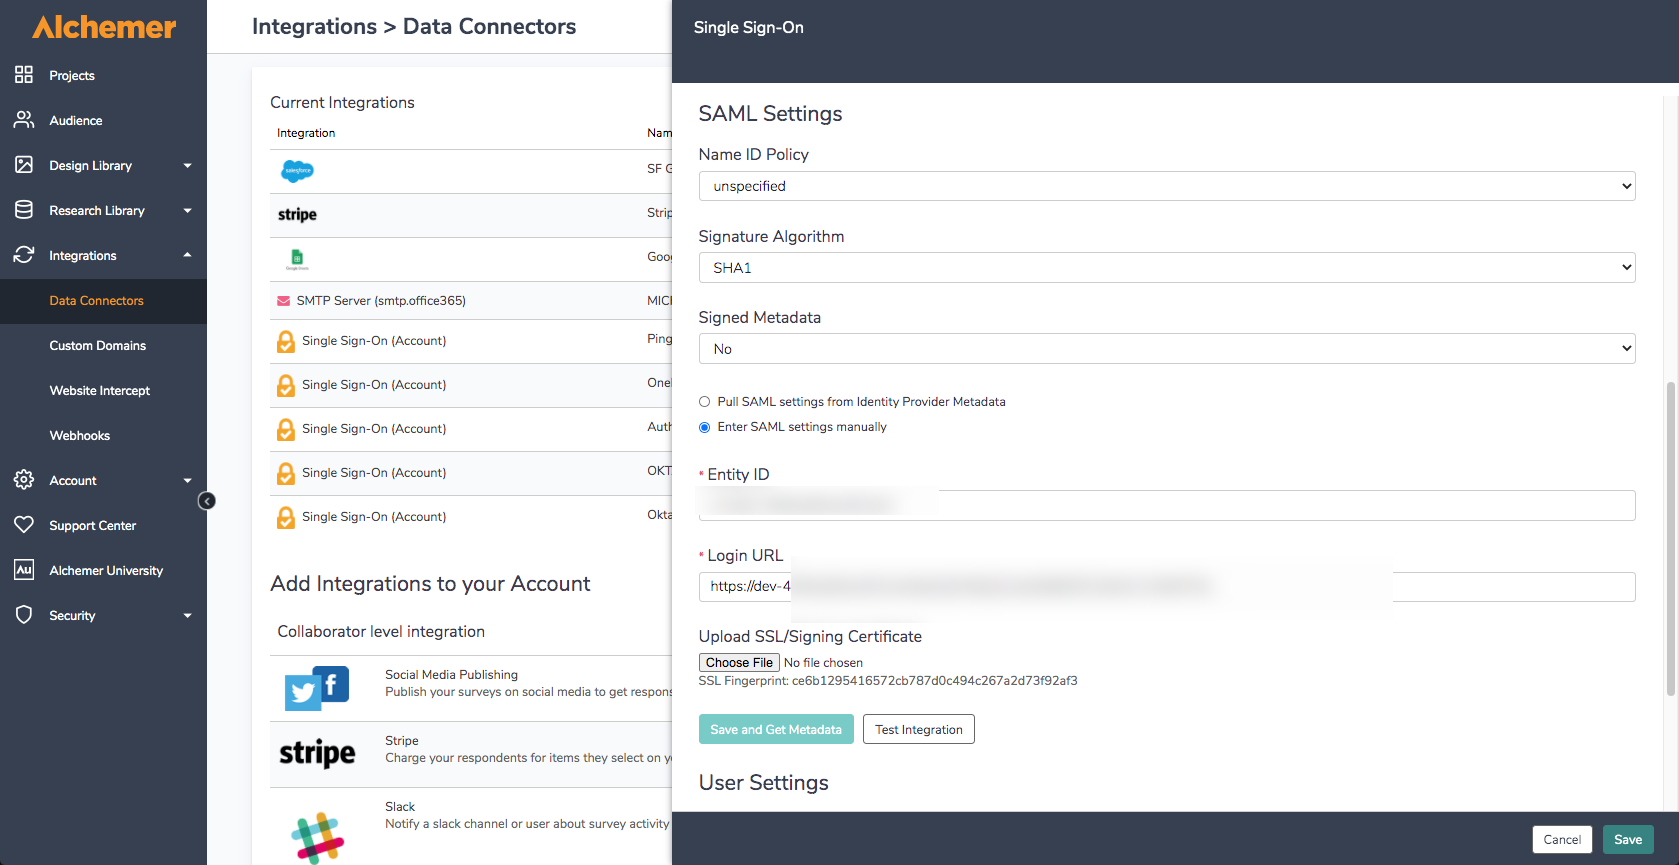
- Next, choose whether you wish to Pull SAML settings from Identity Provider Metadata or Enter SAML settings manually.
- In order to use the option to Pull SAML settings from Identity Provider Metadata your metadata will need to be hosted somewhere so that you can provide a URL for our system to access and parse it.
- Enter the URL to your hosted metadata xml file in the Identity Provider Metadata URL field

- Enter the URL to your hosted metadata xml file in the Identity Provider Metadata URL field
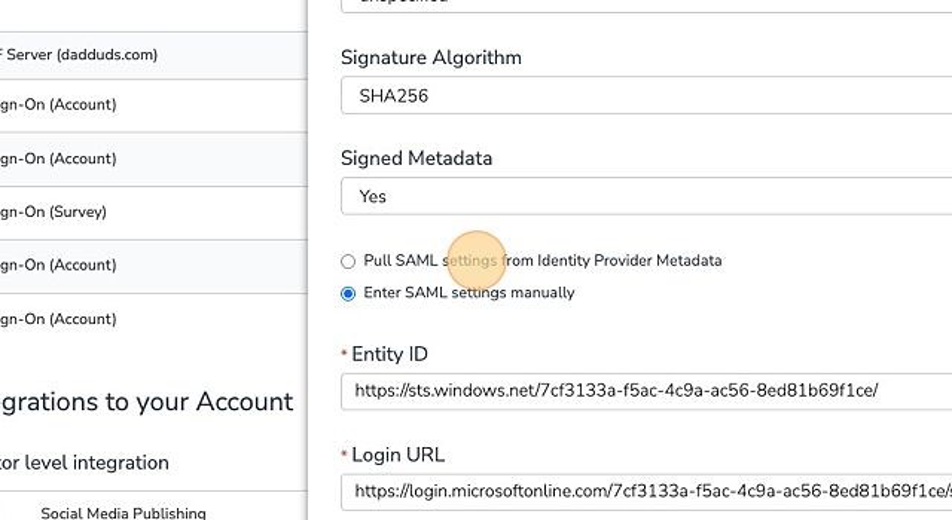
- If you prefer to enter your SAML settings manually, populate the Entity ID, Login URL, and SSL/Signing Certificate from your IdP. These fields are required.
 Manual Setup Tips:
This is your certificate file (.crt) for your IdP which can be downloaded from your SSL Issuer.- Files must include the the begin and end tags. The result should look like this:
-----BEGIN CERTIFICATE-----
(Your Primary SSL certificate: your_domain_name.crt)
-----END CERTIFICATE-----
- Files must be Base64 encoded.
- Use this SSL Checker to validate your file.
- If the file you have also has the ‘intermediate’ or ‘root’ certificate chains in them, that’s fine, as long as it has the main certificate for the domain included.
- Files must include the the begin and end tags. The result should look like this:
- In order to use the option to Pull SAML settings from Identity Provider Metadata your metadata will need to be hosted somewhere so that you can provide a URL for our system to access and parse it.
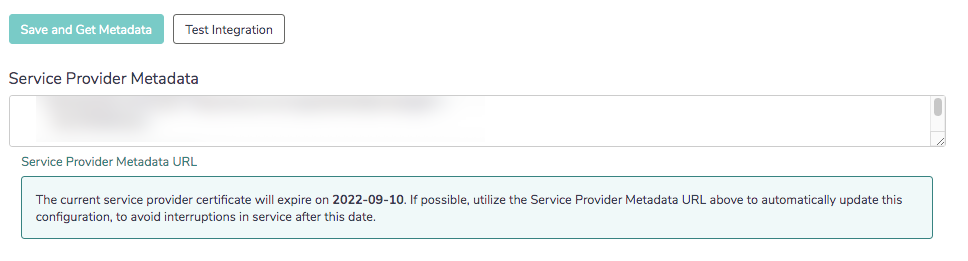
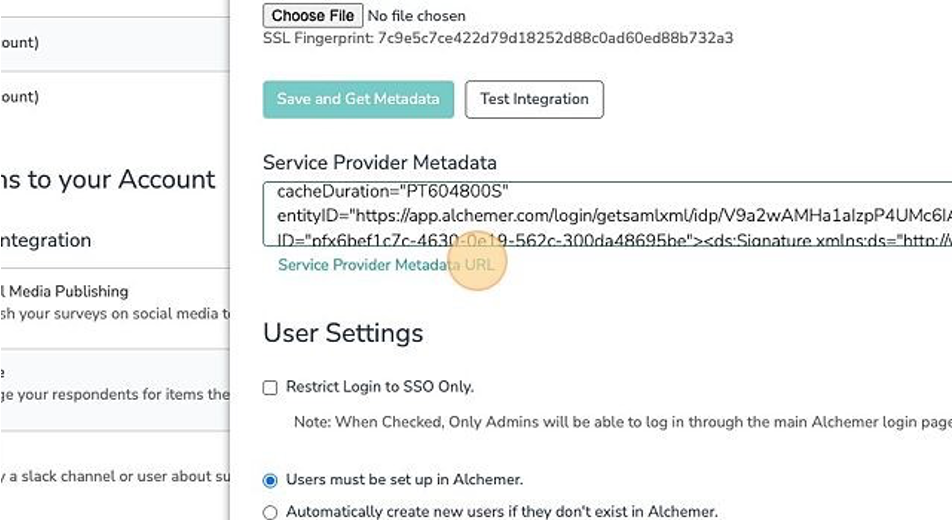
- When you are finished with the SAML Settings click Save and Get Metadata. The following Service Provider Metadata XML will be provided to you for you to use in the IdP Setup.
Integration Not Successful?
If the option to pull from metadata does not work we recommend trying the manual setup option. If you've tried both and neither were successful check out our troubleshooting tips for common causes of failure.'validUntil' Value Explainer
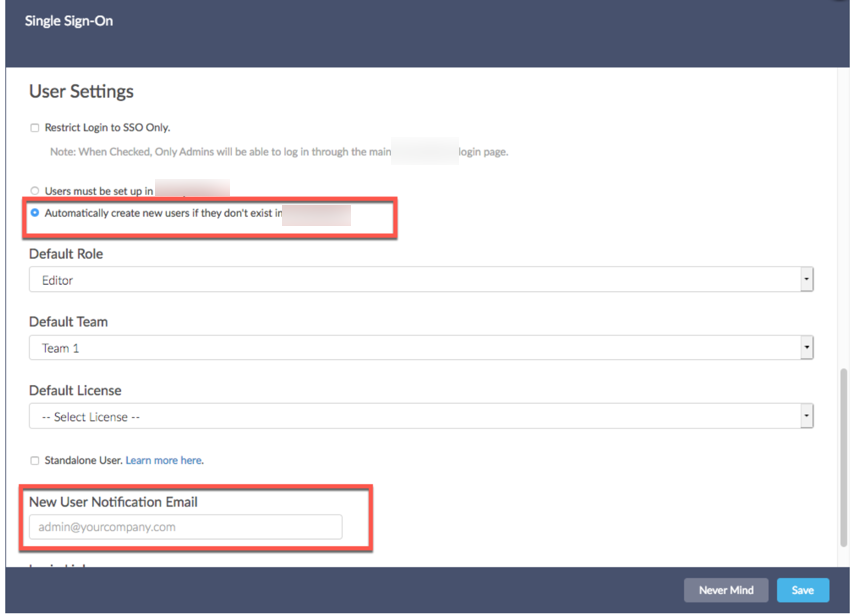
In the MetaData XML file, there is a 'validUntil' value displayed at the top of the file. This 'validUntil' value is NOT the expiry on the your SSL, your SSO integration, our SSL certs, it is only information about the MetaData XML file itself. - (Optional) Restrict Login to SSO Only - If you wish to only allow users to access Alchemer via your IdP, check this box. If you wish to allow users to login via either way, IdP or Alchemer, leave this unchecked.

The Restrict Login to SSO Only Setting will affect both who can access Alchemer and how they will access Alchemer.
- If the Restrict Login to SSO box is unchecked all users will be able to log in via both the IdP and Alchemer, with the exception of users created via SSO.
- If the Restrict Login to SSO box is checked, any users that attempt to login directly via Alchemer will not be able to and will see the following message:
This account is restricted to Single Sign-On only. Please contact your account admin for assistance. - Administrative users that were created in Alchemer will always be able to log in via both the IdP and Alchemer regardless of the status of the Restrict Login to SSO option.
- Users created via SSO will only be able to login via the IdP.
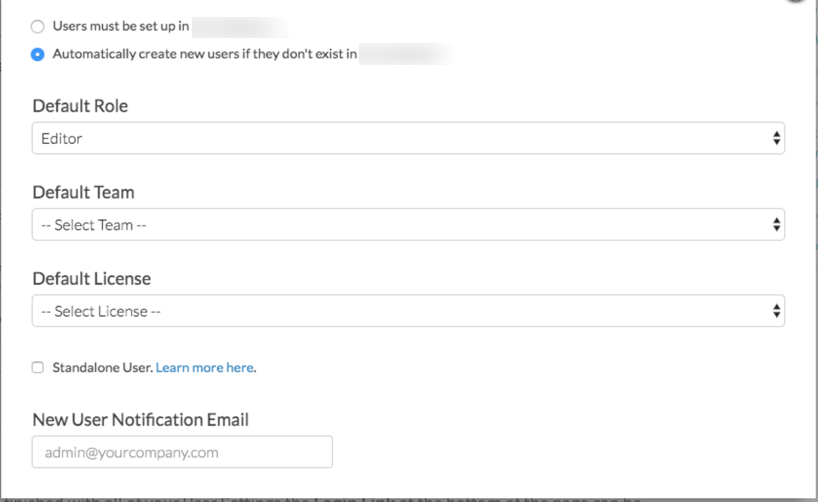
- Next, there are two options that control how user seats in Alchemer are handled:
Users must be set up in Alchemer - This means that administrative Alchemer users will need to log in to Alchemer via the Alchemer log in page and add users as described in our Add Users Tutorial. Once a user is set up then the SSO via the IdP will work.
OR
Automatically create new users if they don't exist in Alchemer - This option will create Alchemer users when users click the link/button to log in to Alchemer if a user with those credentials doesn't already exist in Alchemer.- If you choose to automatically create new users, you'll need to specify a Default Role, Team, and License for these newly created users.
- You will need to have enough licenses available in order to create the user. If there are no available licenses of the type you selected in the Default License field, the user will be created but disabled.
- Check out our Teams and User Permissions Tutorial to learn more about Teams and Roles! Check out our User License Tutorial to learn about licenses.
- As an alternative to selecting a default role and team, you can select the option to set up all SSO created users as Standalone Users. Standalone users will only be able to see the surveys that they create, regardless of team or role. Standalone users will have full access (meaning they will be Editors) to their own surveys (provided that their user license supports survey editing).
- Finally, if you are automatically creating new users, it is a good idea to add an email address in the New User Notification Email field for the Alchemer to send notification of user creation errors.
- When you are finished with all of your User Settings the Login Link at the bottom of the page can be used to create a button within your IdP to log users into Alchemer. This link will not work until you complete the IdP Setup below.


IdP-Side Setup
Regardless of your specific IdP vendor, the setup on the IdP side requires:
- A claim rule with user's email address in Alchemer passed as the as the Name ID.
- (Optional) additional data from attributes can be sent to populate User Data Fields. Learn more about populating User Data Fields.
See a step-by-step example of the IdP-side setup with Azure Active Directory
- Login to the Alchemer Dashboard and select "Integrations" under Tools in the left-hand menu.
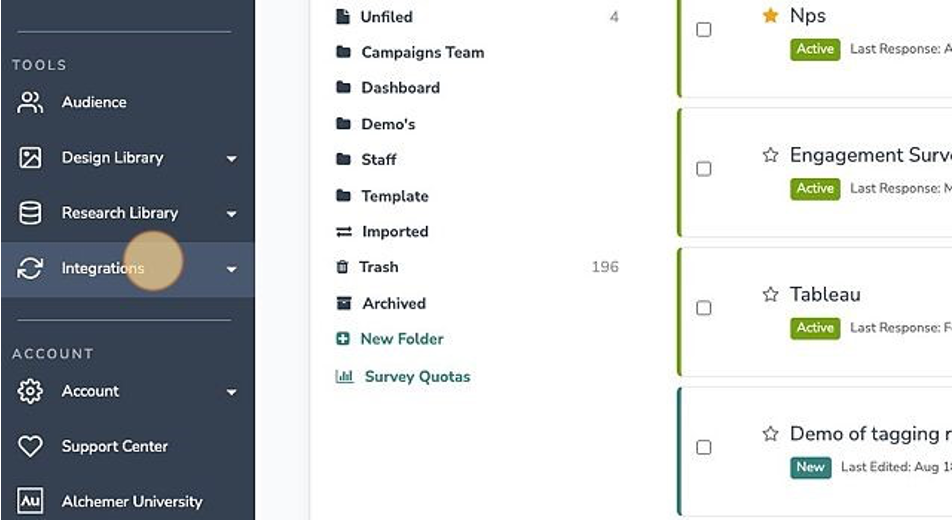
- In the Integrations drop-down menu, select "Data Connectors"
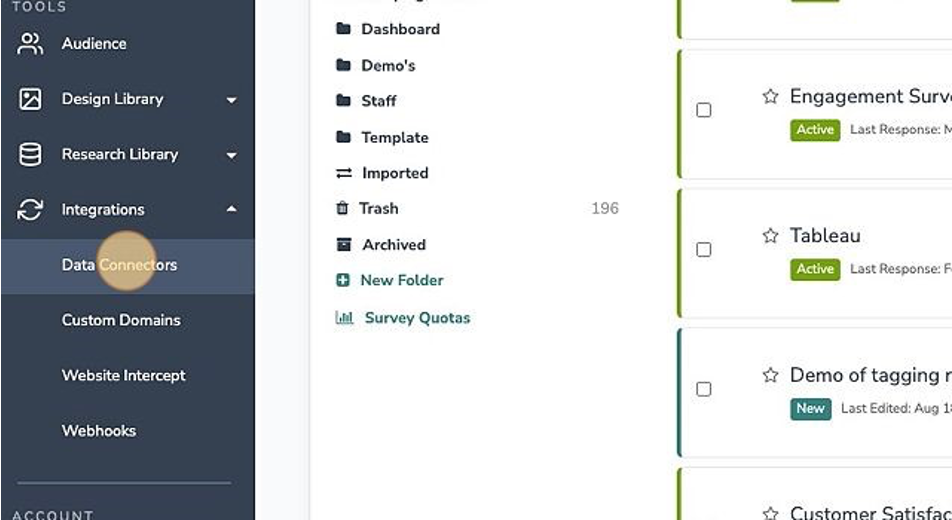
- Scroll down to the Enterprise Level Integrations section and click configure next to "SSO Users"
- In the "Integration Name" field, assign a title to the integration.
Example: Alchemer SSO for Users.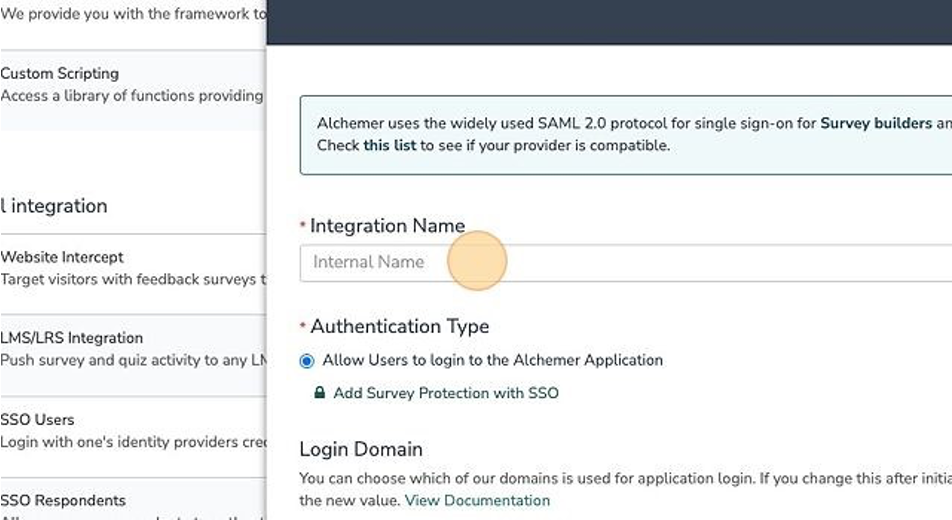
- In the Login Domain field, leave the domain toggled to app.alchemer.com.
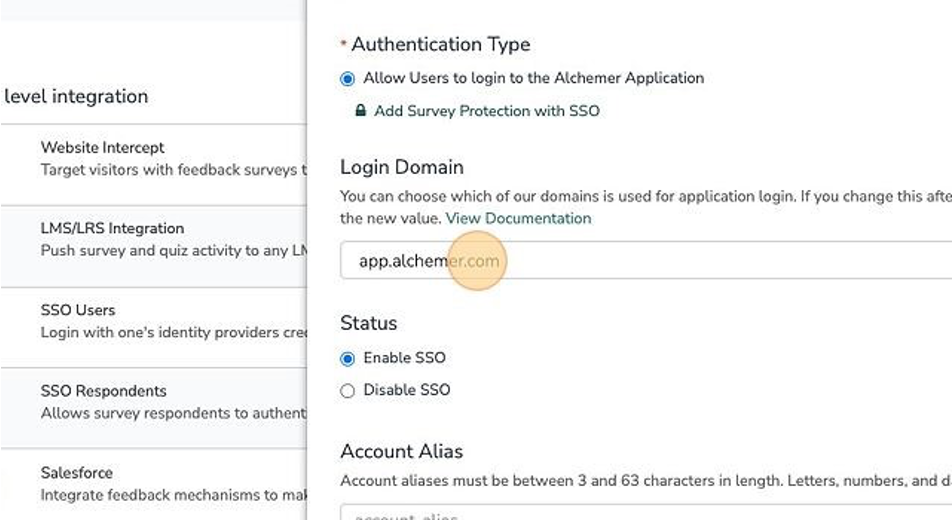
- In the Status field, ensure the status is set to "Enable SSO."
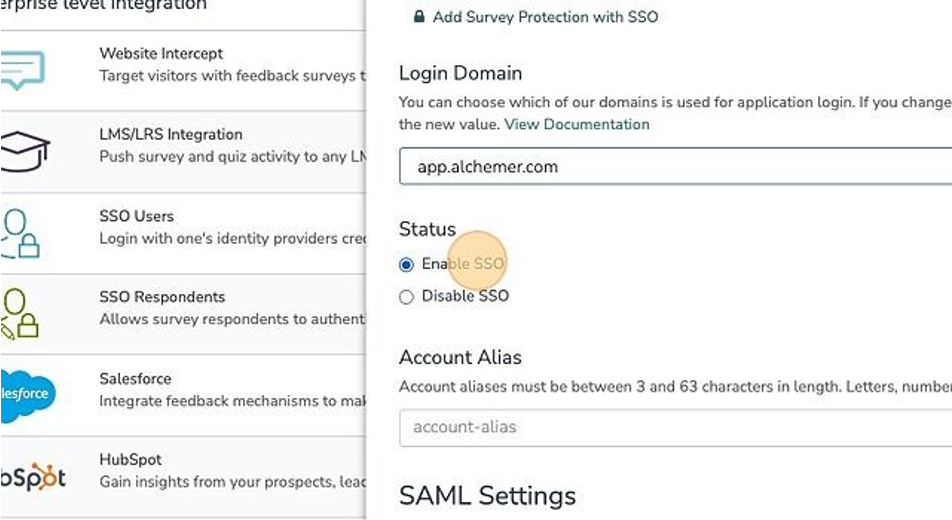
- (OPTIONAL) Click the Account Alias field to assigned a login alias from app.alchemer.com.
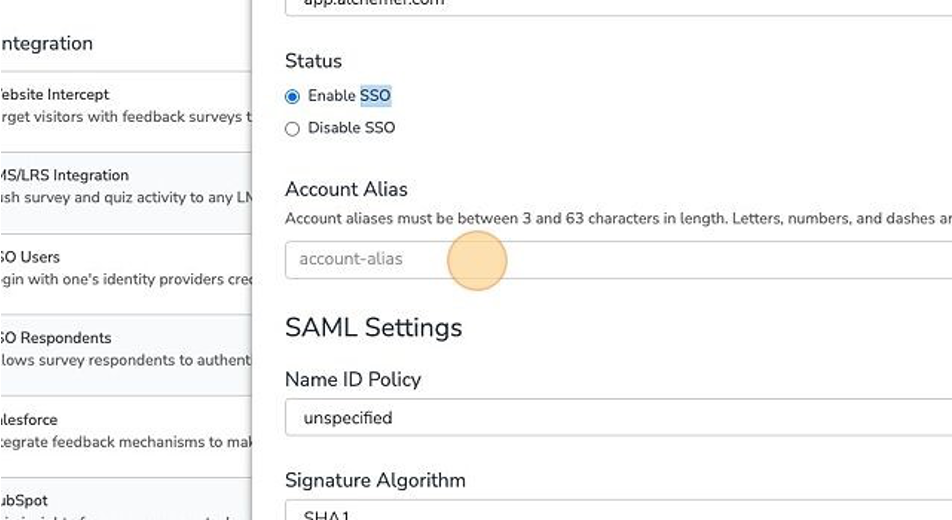
- For SAML Settings, leave the Name Id Policy as "unspecified."
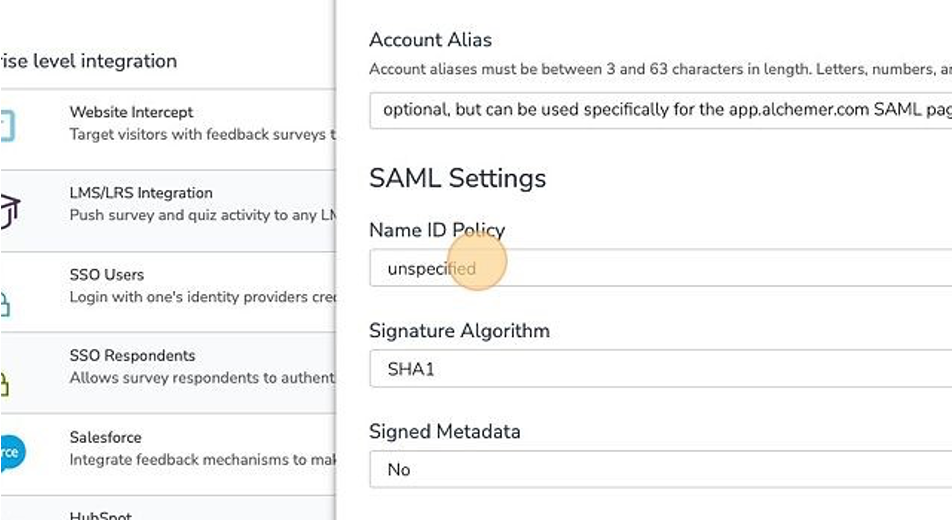
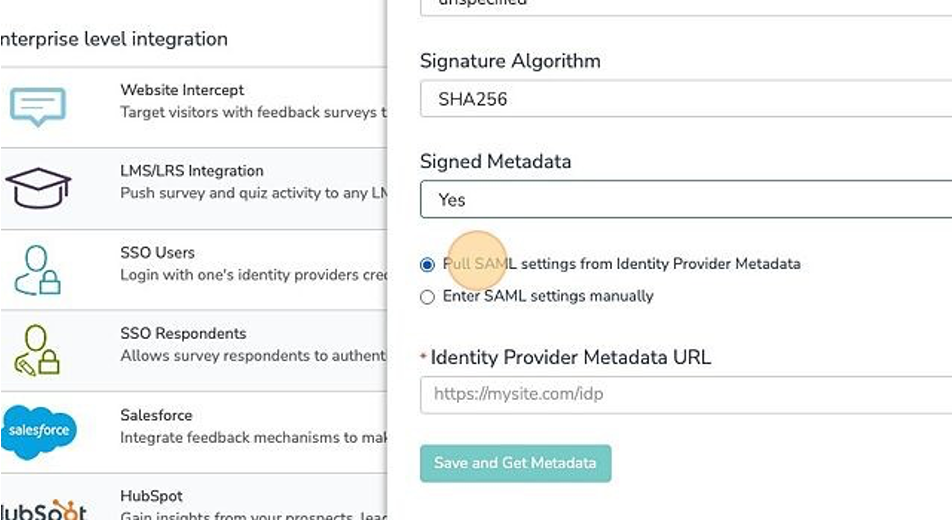
- For SAML Settings, set the Signature Algorithm to "SHA256"
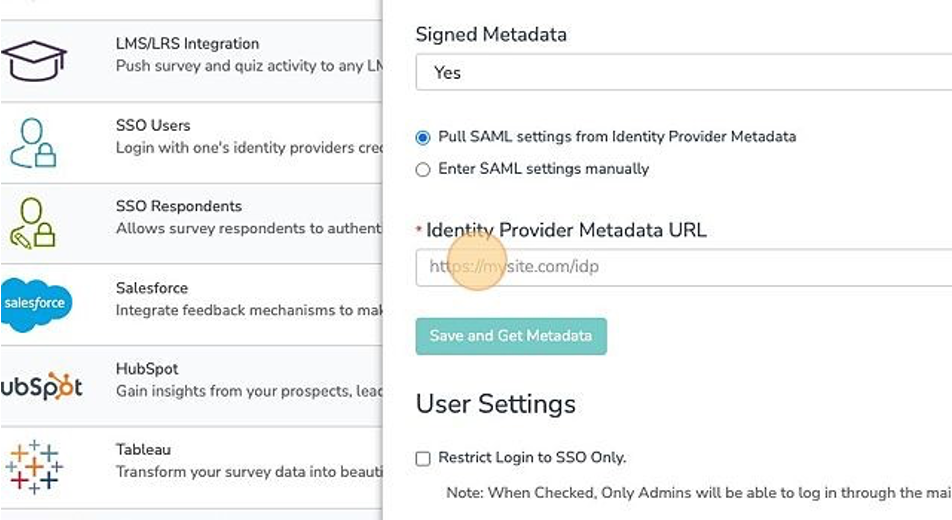
- For SAML Setting, toggle Signed Metadata to "Yes."
- Click "Pull SAML settings from Identity Provider Metadata."
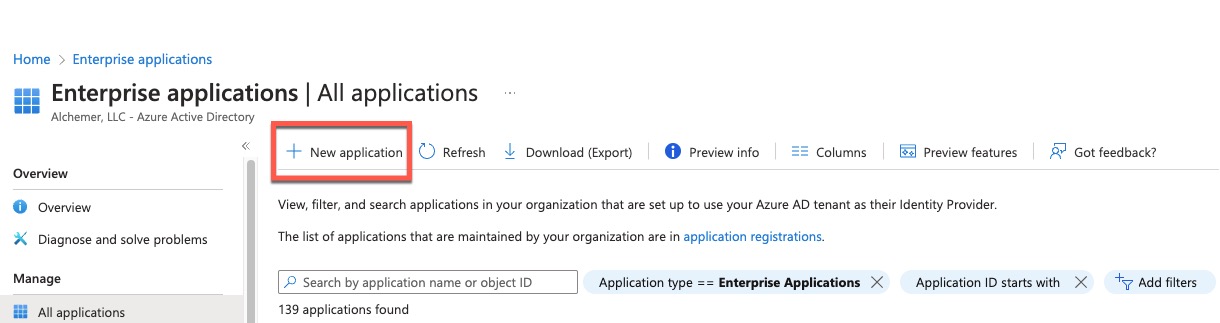
- In another tab, sign into Azure and view your Azure Active Directory.
- Click on Enterprise Applications.
- Click the "New Application" button.
- Type Alchemer in the Search Application Dialog box. Select Alchemer and then click the "Create" button. Creating may take a moment.
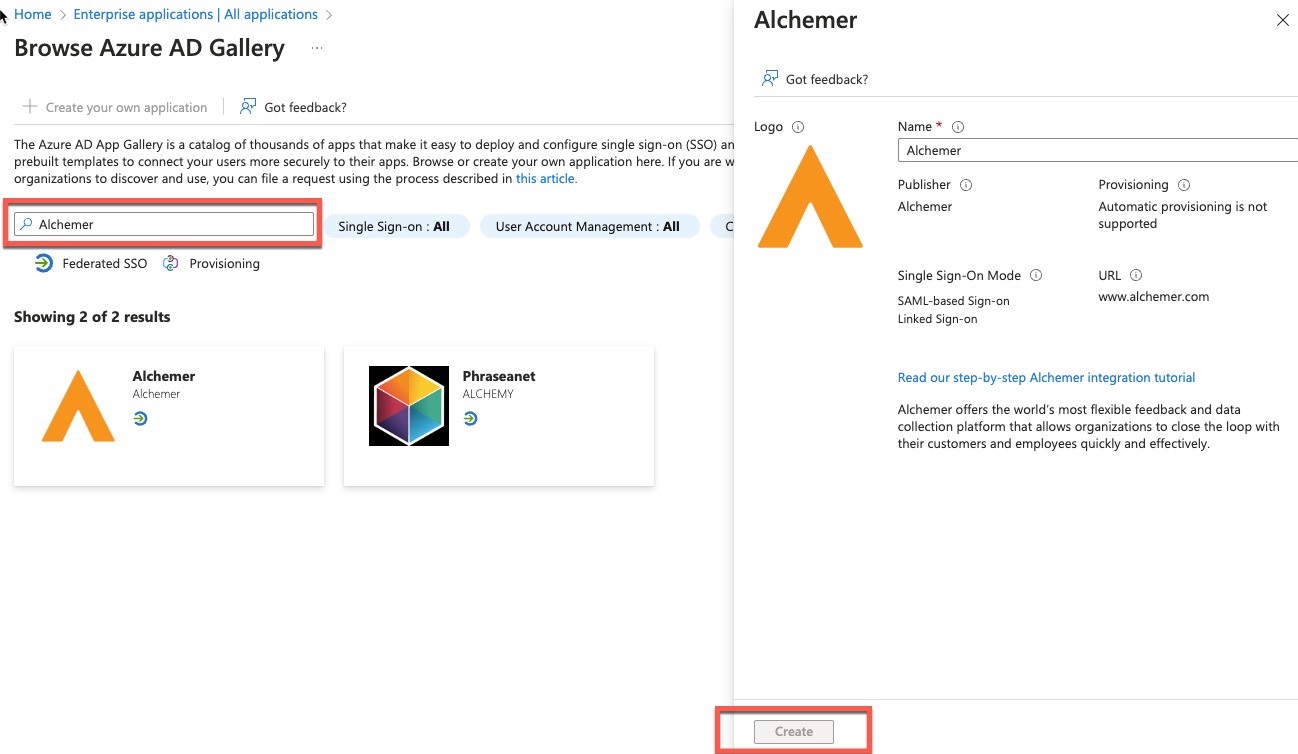
- Once created, find the Alchemer application, in your Application gallery, and and click on it.
- In the Azure portal, on the Alchemer application integration page, find the Manage section and select single sign-on.
- On the Select a single sign-on method page, select SAML.
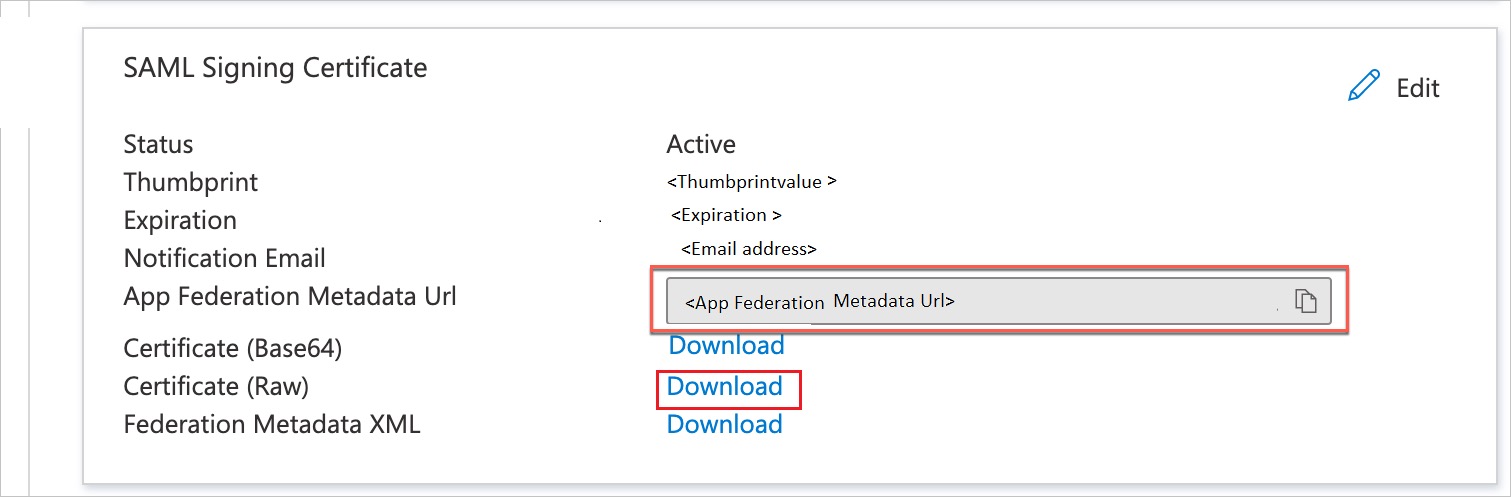
- On the Set-up single sign-on with SAML page, in the SAML Signing Certificate section, find Certificate (Raw) and select Download to download the certificate and save it on your computer. Then copy the App Federation Metadata Url.
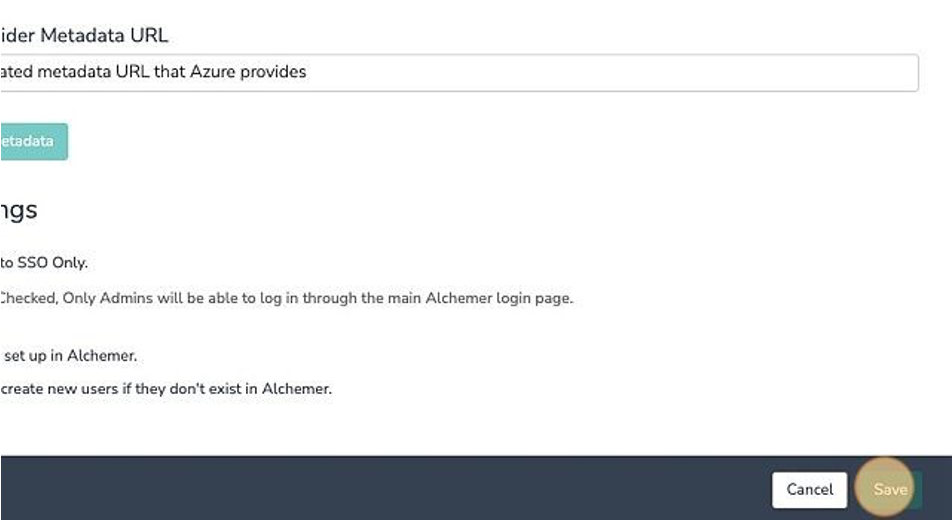
- Return to the Alchemer Dashboard, and continue configuring the SSO User Settings. Take the federated metadata URL that Azure provides and paste it into Identity Provider Metadata URL field.
- Click "Save" in the bottom right corner of the integration to validate the meta data entered.
- Click "Edit" to open up the integration again.
- Scroll down to verify the SP Metadata is now available. Click "Service Provider Metadata URL." Save the XML which will be uploaded to Azure.
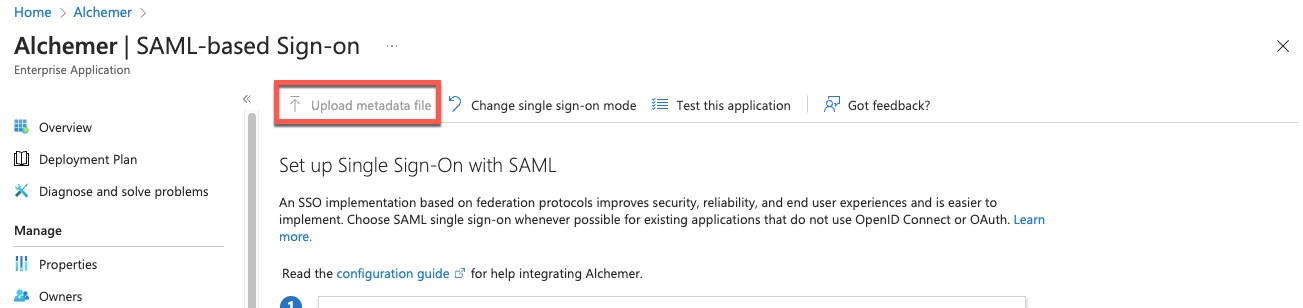
- Go back to Azure, and in the Alchemer configuration click on the "Upload metadata file." Then upload the xml file that downloaded in the previous step.
- After the upload is complete, go back to the Alchemer dashboard and edit the integration again by clicking "Pull SAML settings from Identity Provider Metadata."
- Re-enter the Azure metadata URL from above and save the integration in the bottom right-hand corner again.
 Resaving the Identity Provider Metadata URL will ensure that Alchemer and Azure are both utilizing the correct certificates. It is important to verify that the certificate thumbprint from Azure is matching the Thumbprint in the SSO integration.
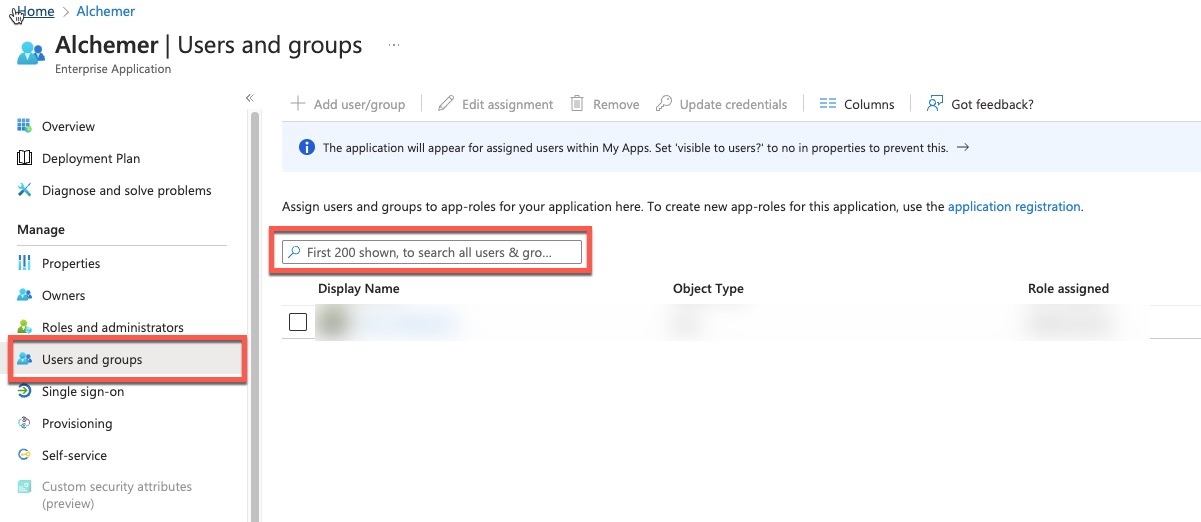
 - Back in Azure, click on "Users and Groups" to assign a user for the application.
- Search for your user(s) and or groups and choose select.


 Resaving the Identity Provider Metadata URL will ensure that Alchemer and Azure are both utilizing the correct certificates. It is important to verify that the certificate thumbprint from Azure is matching the Thumbprint in the SSO integration.
See a step-by-step example of the IdP-side setup with Active Directory (AD FS)
These setup instructions will walk you through the basic settings for SSO setup in Active Directory (AD FS).
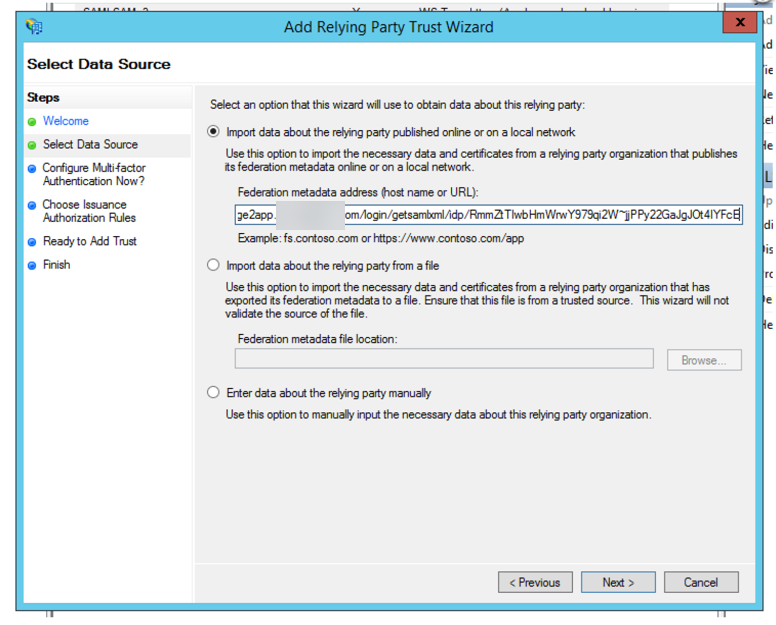
Launch the AD FS Management Console. Then, go to Trust Relationships > Relying Party Trusts > Add Relying Party Trust. This will open the Add Relying Party Trust Wizard. Click Start.
Chose the Import data about the relying party published online option and copy and paste your Alchemer SP Meta data URL in the Federation metadata address field. Click Next.
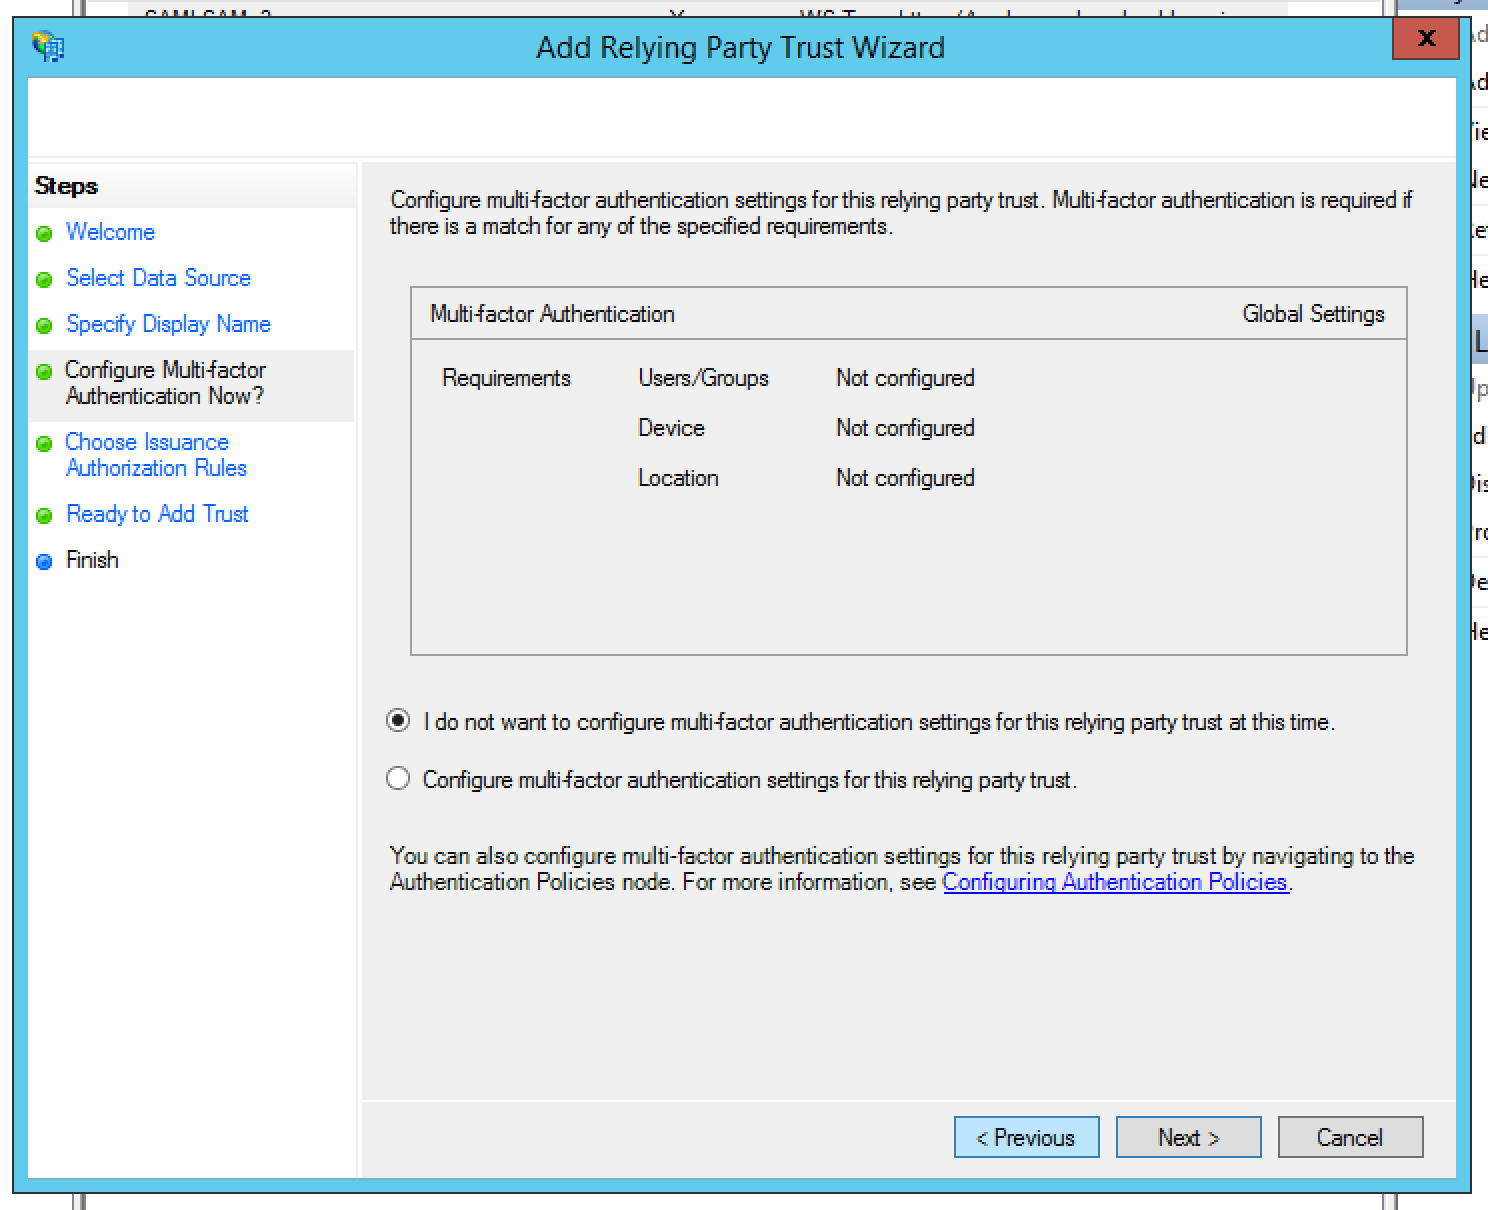
Leave the default option selected for multi-factor authentication and click Next.
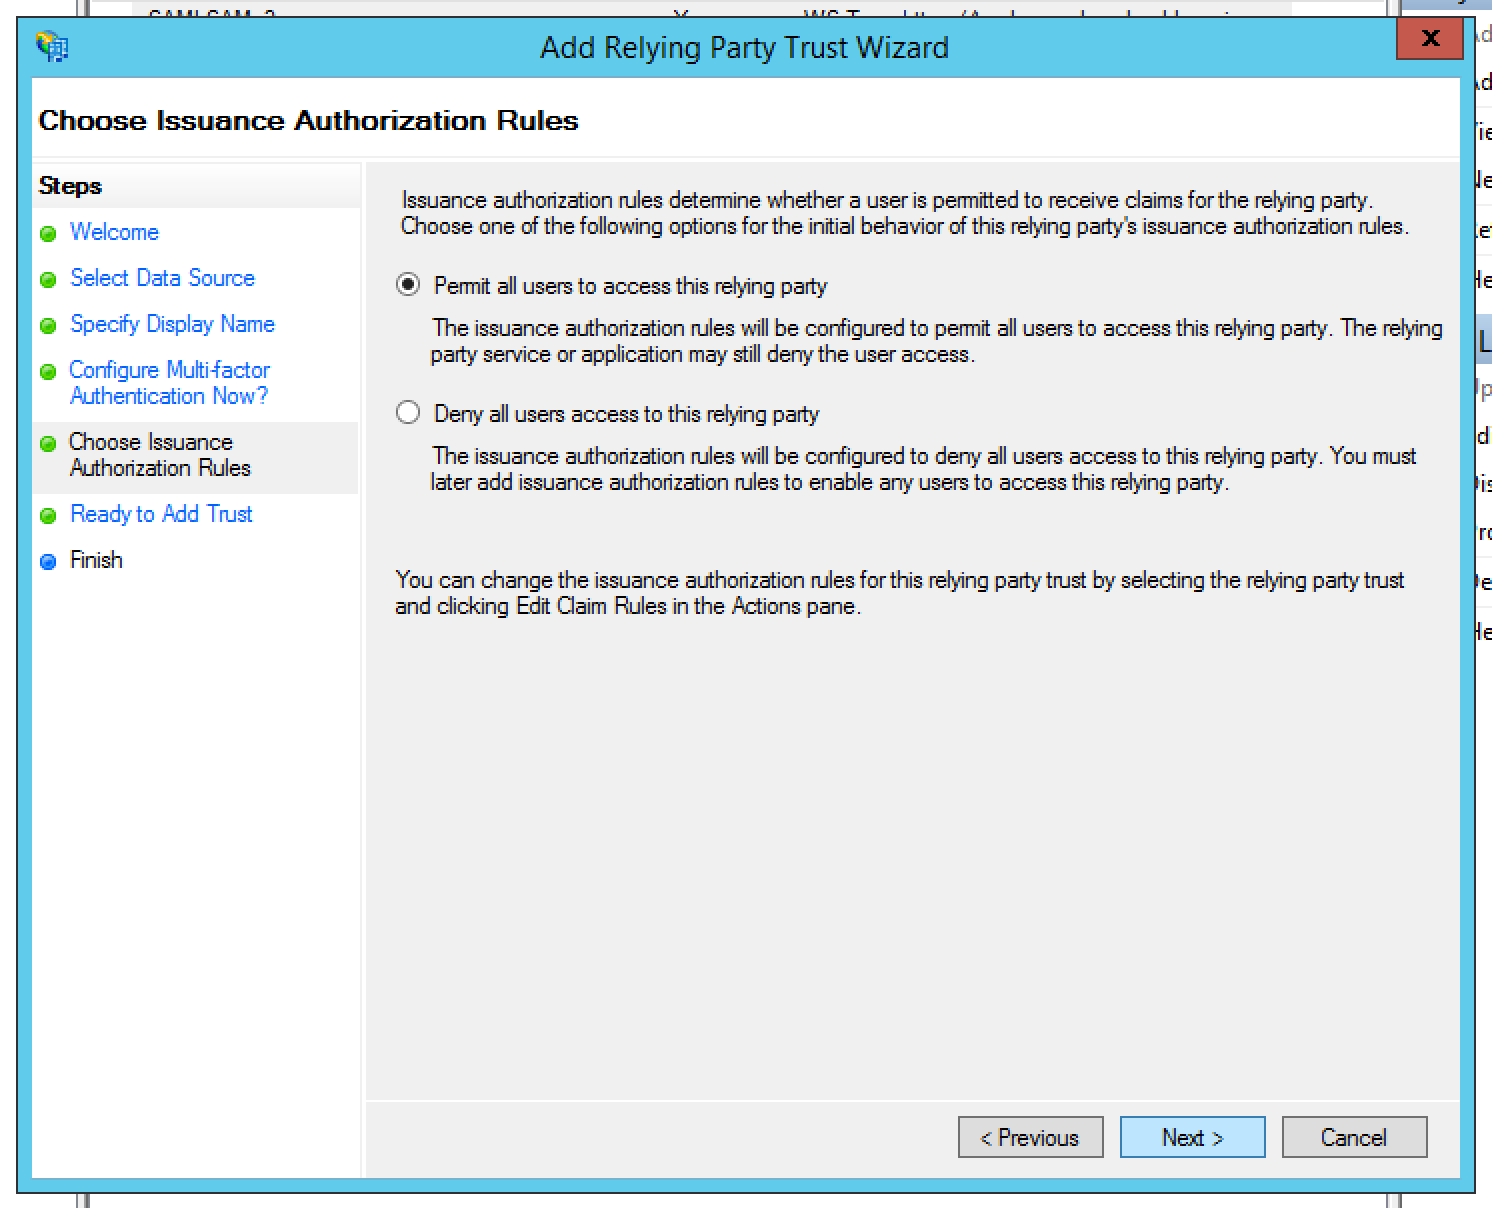
On the next screen leave the option to Permit all users to access this relying party selected and click Next.
Review your settings and click Next.

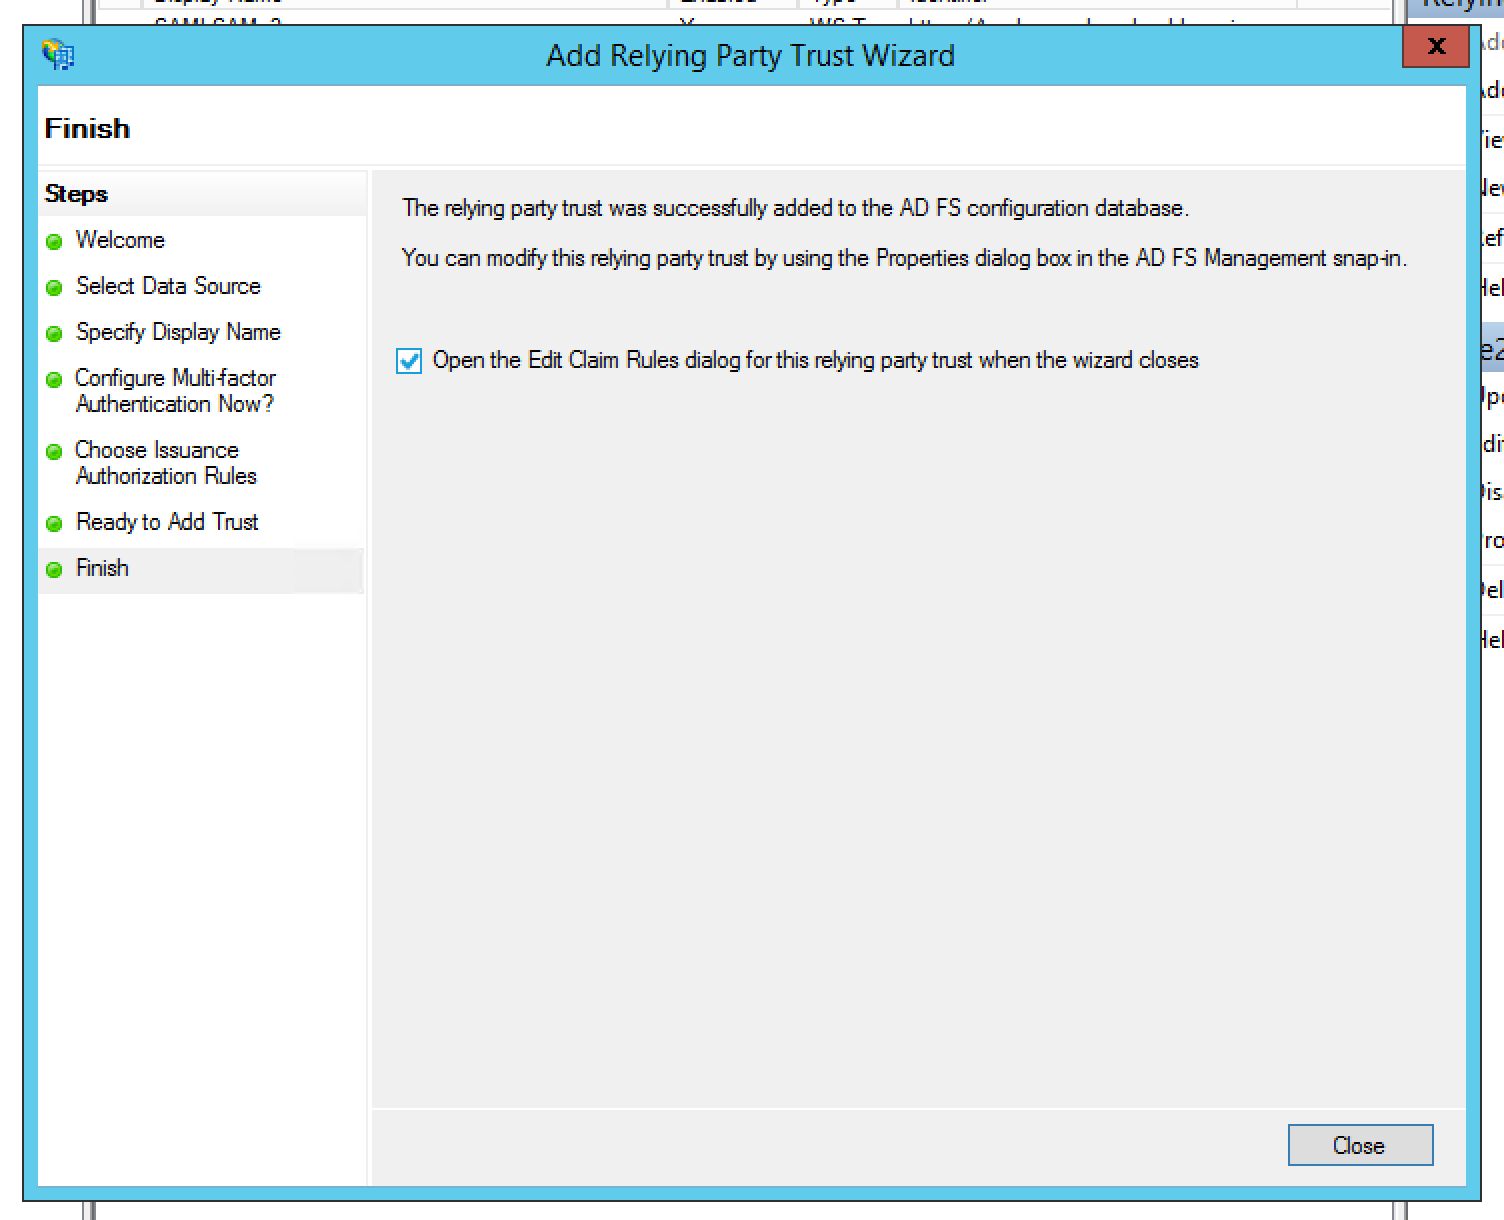
On the next screen leave the option to Open the Edit Claim Rules dialog selected and click Close.
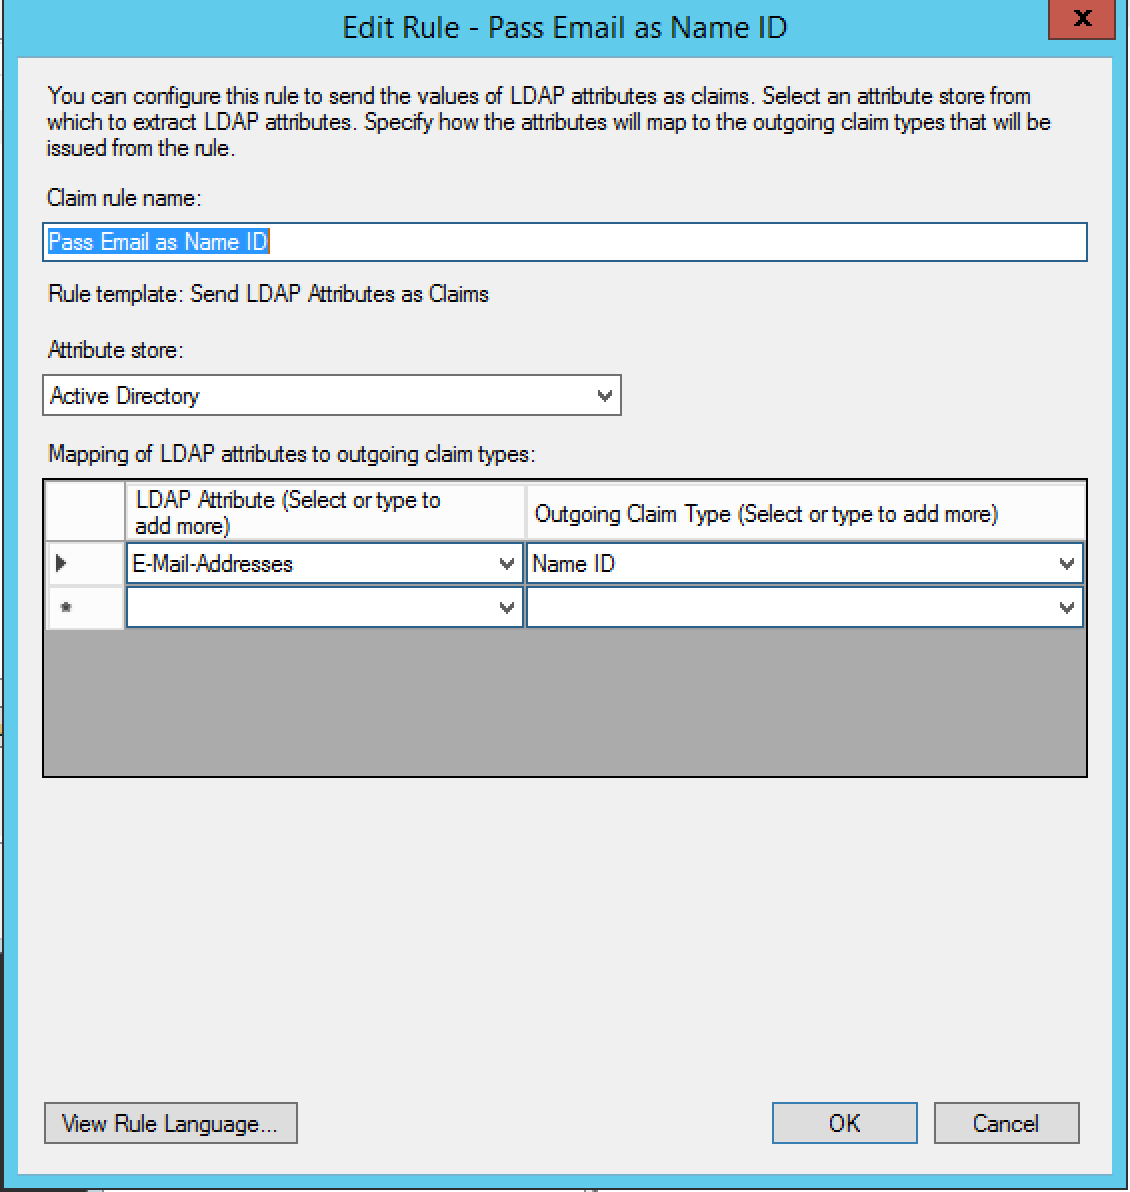
This will take you to the Edit Claim Rules dialog where you will need to a rule. Get started by clicking Add Rule.
In the Claim rule template dropdown menu, select Send LDAP Attributes as Claims and click Next.
We're going to pass through the users email address in Alchemer as the Name ID claim type so name the rule as such.
Select Active Directory in the Attribute Store dropdown menu.
Select E-Mail-Addresses (or the field in the IDP that matches the users' email in Alchemer) from the LDAP Attribute dropdown menu and Name ID in the Outgoing Claim Type Dropdown and click Finish and Apply.
Once you finish your IdP setup go back to Alchemer and copy your Login Link. When you go to this link via a browser you will be taken to your IdP login page. Once you log in, you'll be taken to Alchemer.
If this didn't work check out our troubleshooting tips below.
If this does work, now you're ready to set up a button or link for your users to access Alchemer!
Important Note Regarding Maintenance of Your SSO Integration
As we need to periodically update the cert used to create an SSL connection for SSO, we recommend putting a check in place so that your SSO integration is seamless. Once your integration is successfully set up, a simple script that checks for differences between the metadata in your integration setup and our SP metadata URL and accordingly handles updates to your integration ensures that there is no interruption in service.
See a step-by-step example of the IdP-side setup with Okta
Check out Okta's walkthrough of the setup by clicking the link here.
At this time Okta's built in integration supports US based production. If one uses an EU or CA account follow the manual instructions below.
- These setup instructions assists users through the manual setup for SSO in Okta. Okta allows users to utilize an access management system for storing login credentials.
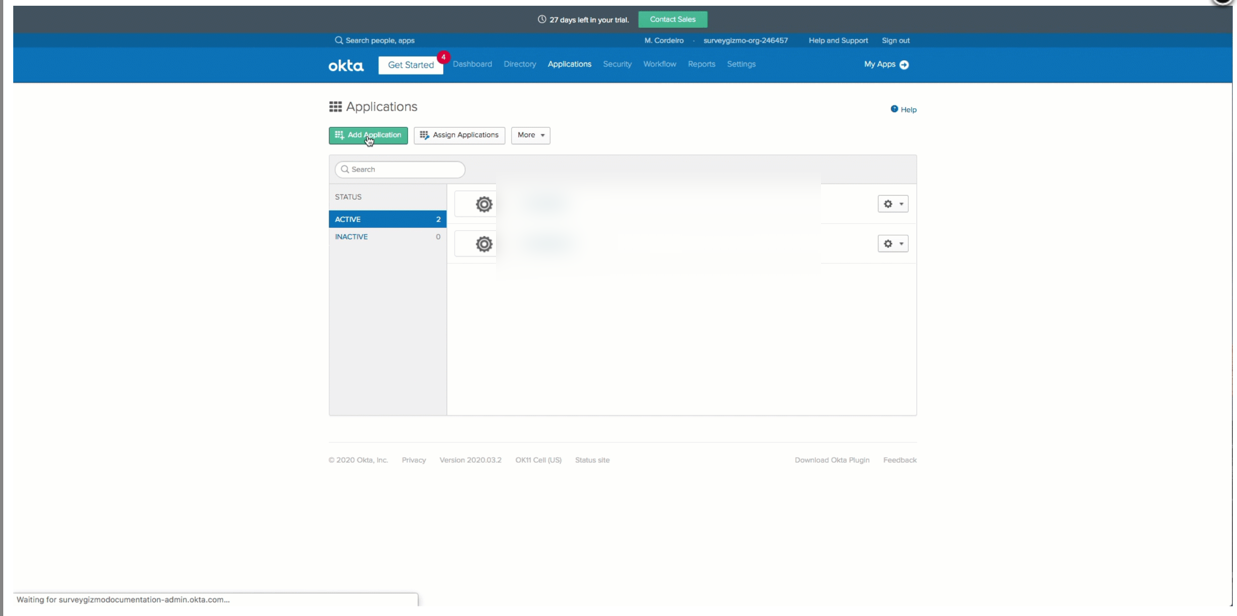
- Log into Okta and navigate to Applications. Once there, Select Add Application > Create New App:
- Once here users see a Create a New Application Integration:
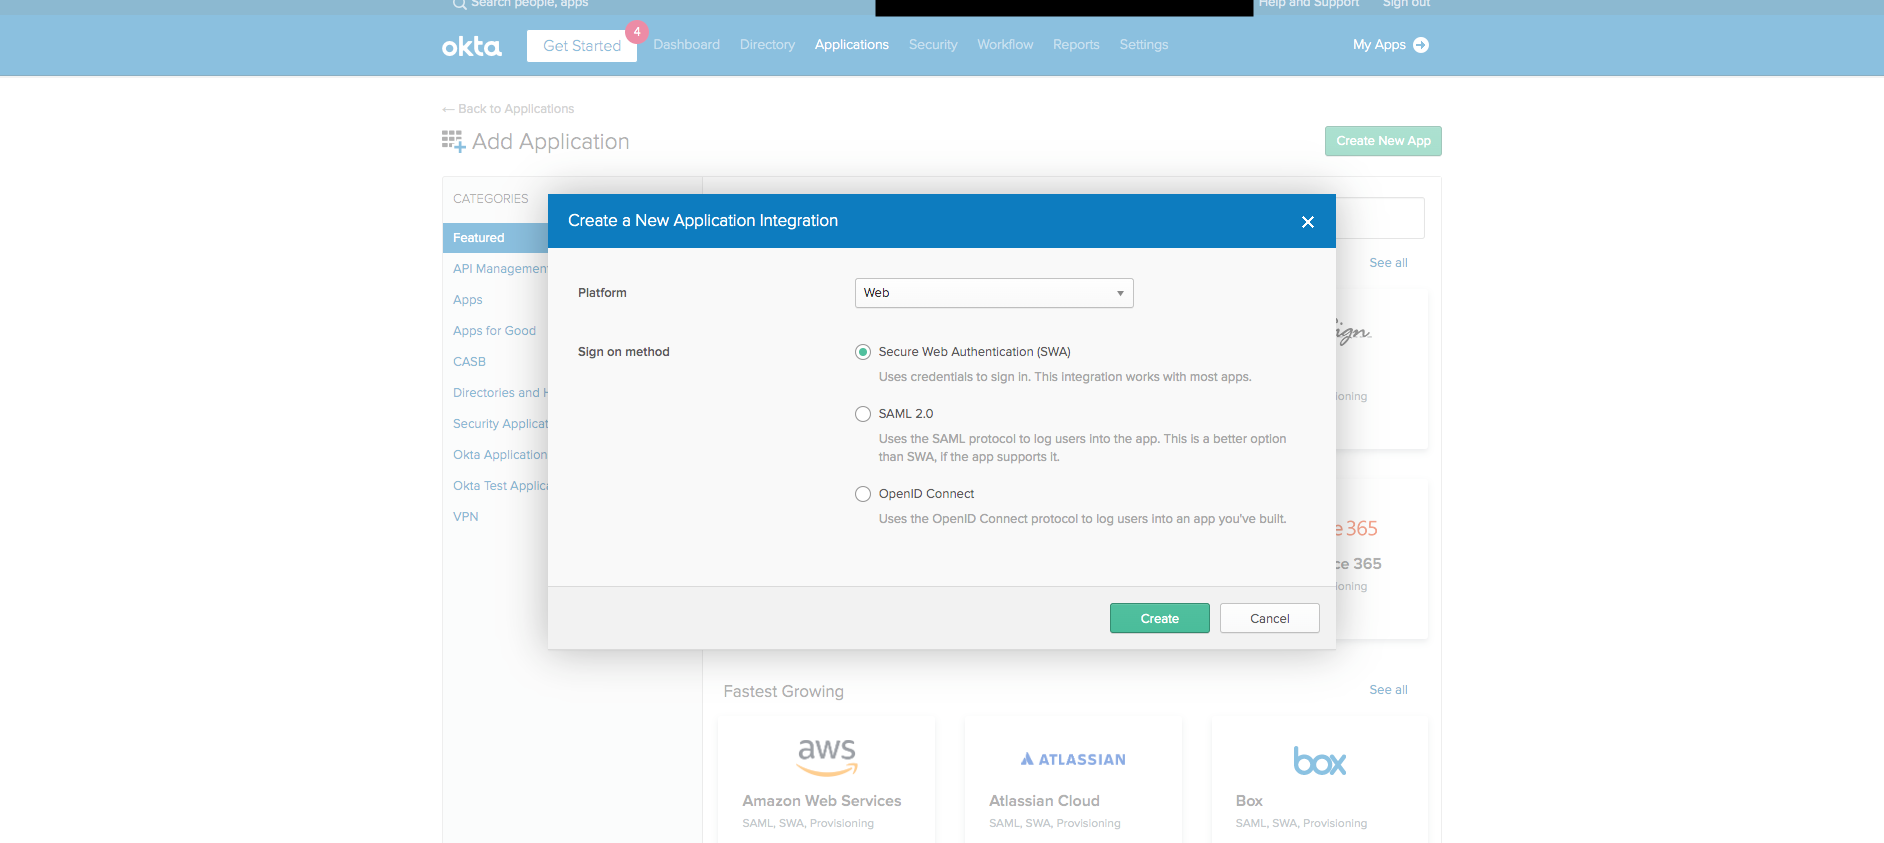
- Ensure that the Platform is set to Web and select SAML 2.0 Select Create.
- Users are brought to the Create SAML Integration page to add the application name (Alchemer) and logos as necessary. Select Next:

- On the ConfigureSAML screen (Screenshot below), provide the Single Sign on URL as well as the Audience URI (SSP Entity ID). For now provide the following placeholders for each field in Okta. These are replaced later in the build with live links:
- Single Sign On URL: http://example.com/saml/sso/example-okta-com
- Audience URI: http://example.com/saml/sso/example-okta-com
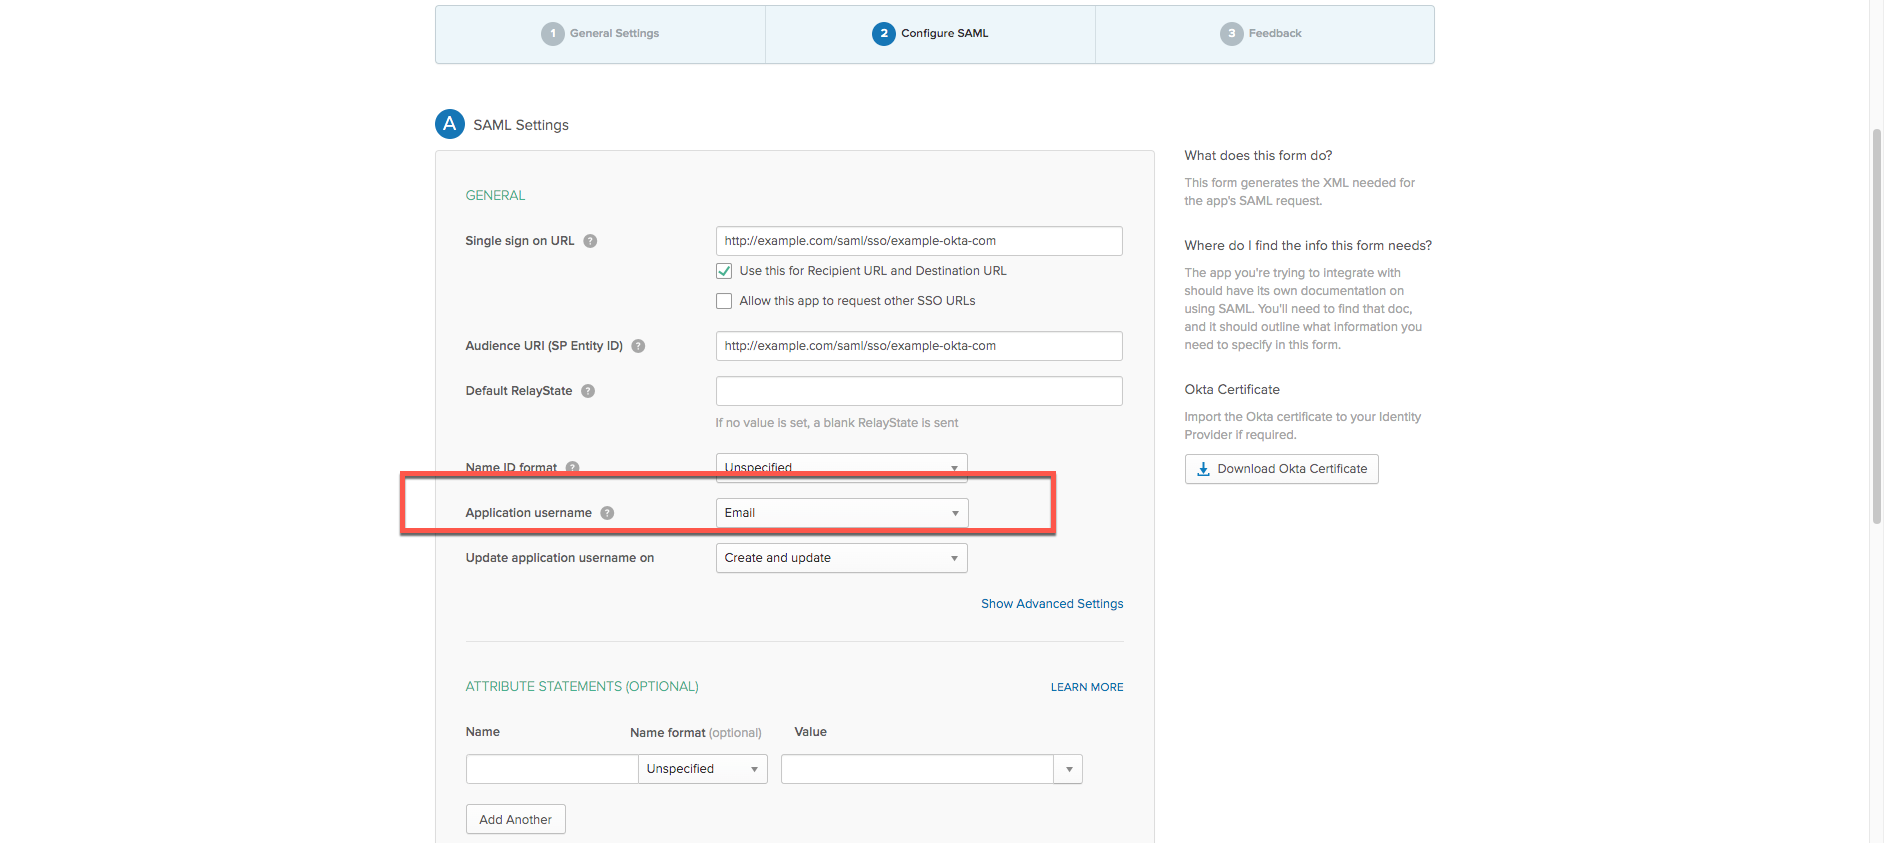
- Change the Application Username to reflect Email. Whether a username or custom field, the value set for the application username must match the email address for the username that exists in Alchemer.
- Click Next to reach the feedback section:
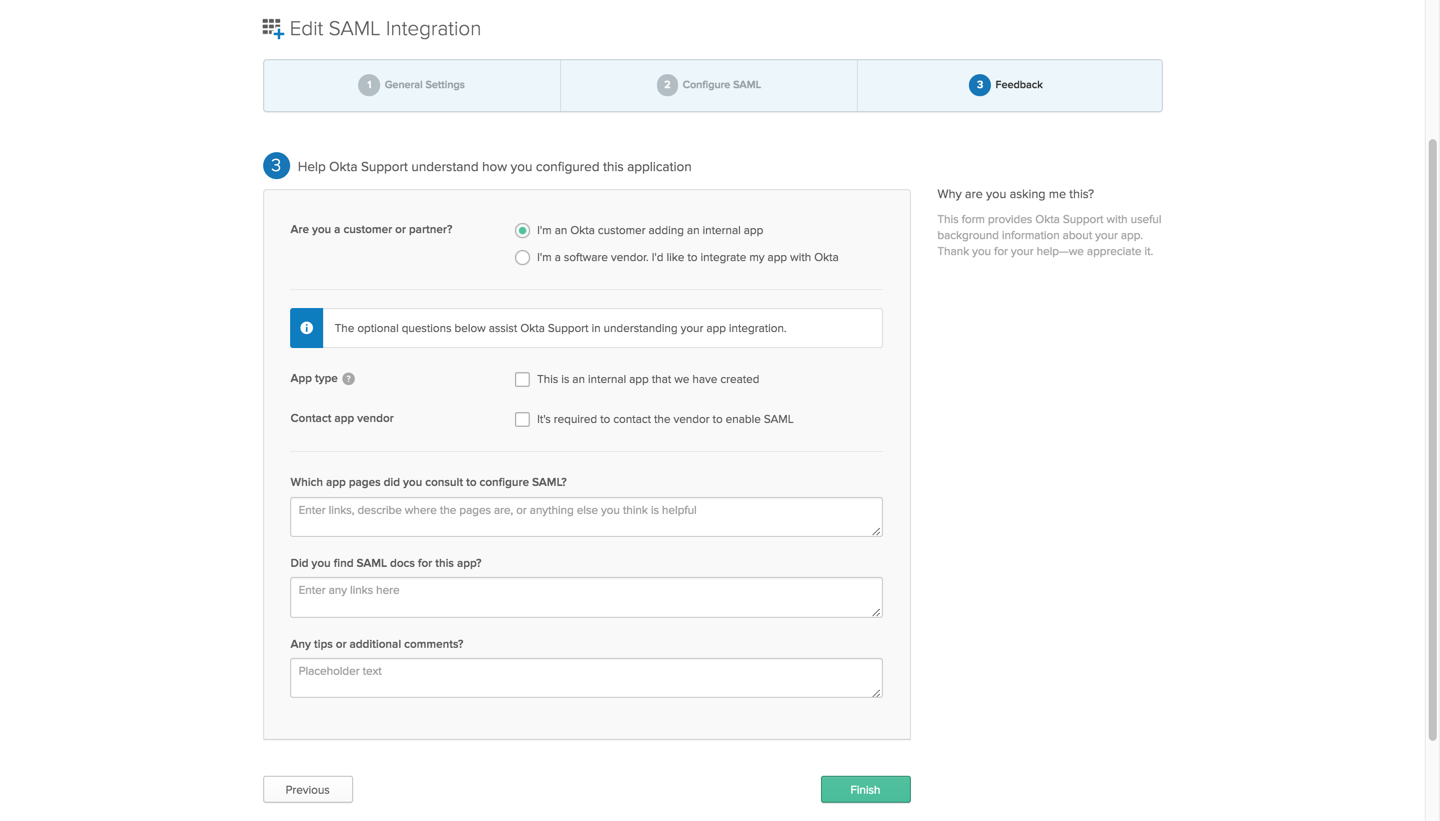
- Select I'm an Okta Customer adding an internal app.
- Click Finish.
- Users now see the Settings page where one can finish configuring SAML 2.0 on Okta. Select View Setup Instructions to open an additional tab:
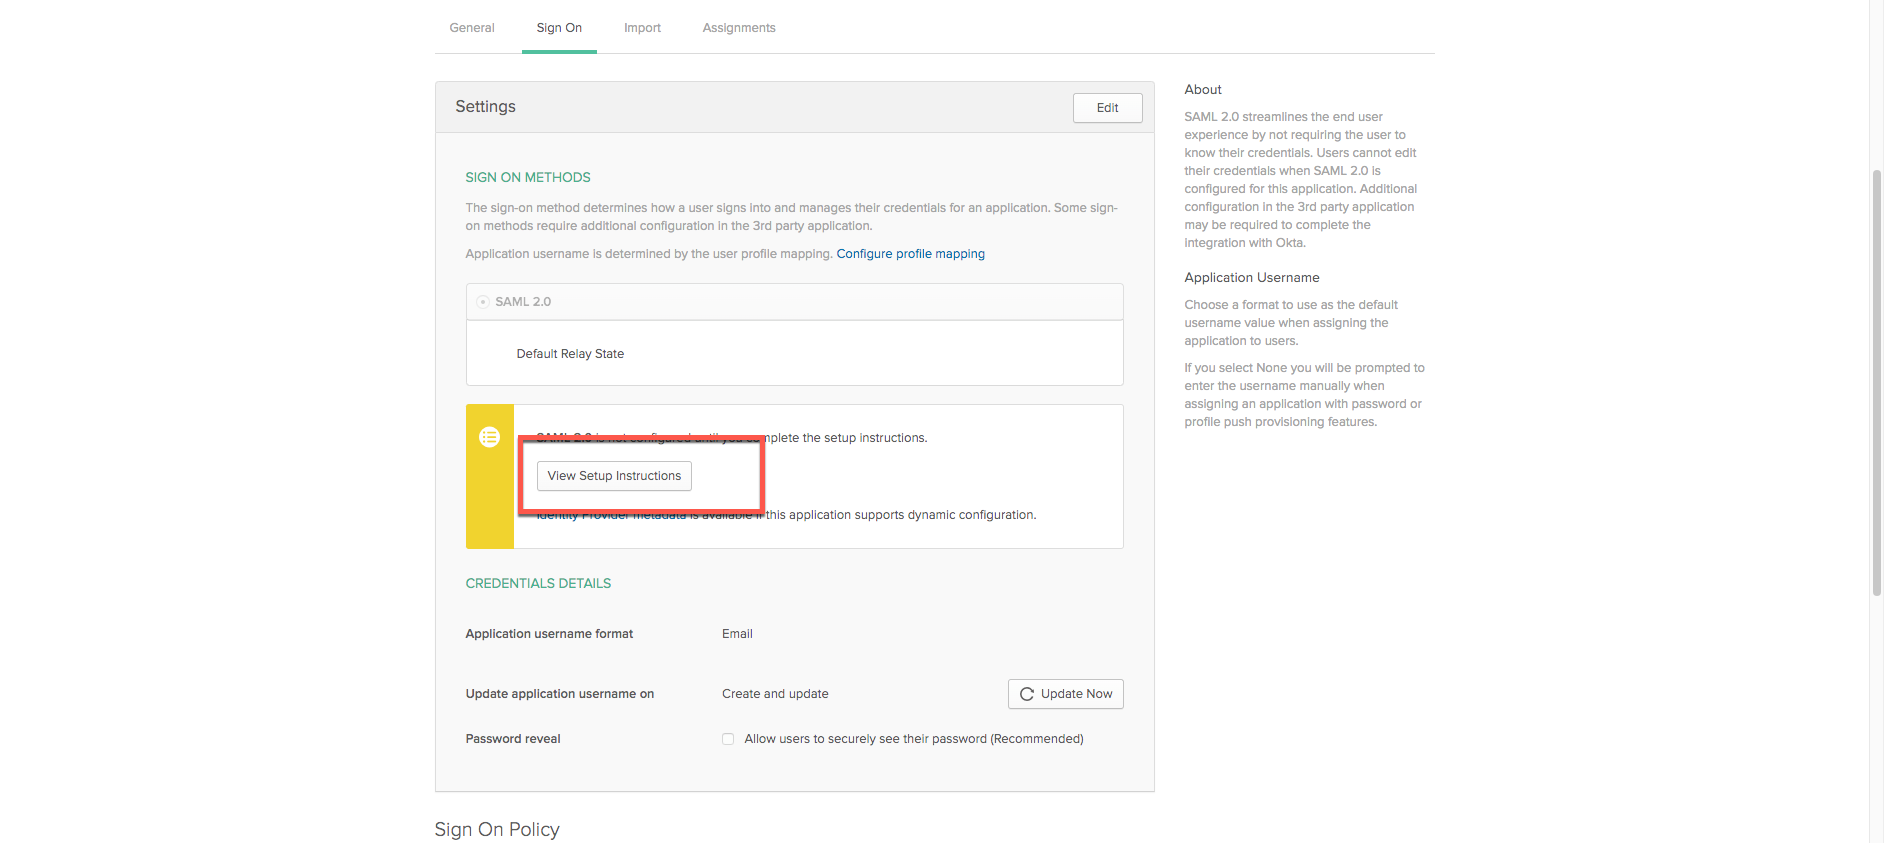
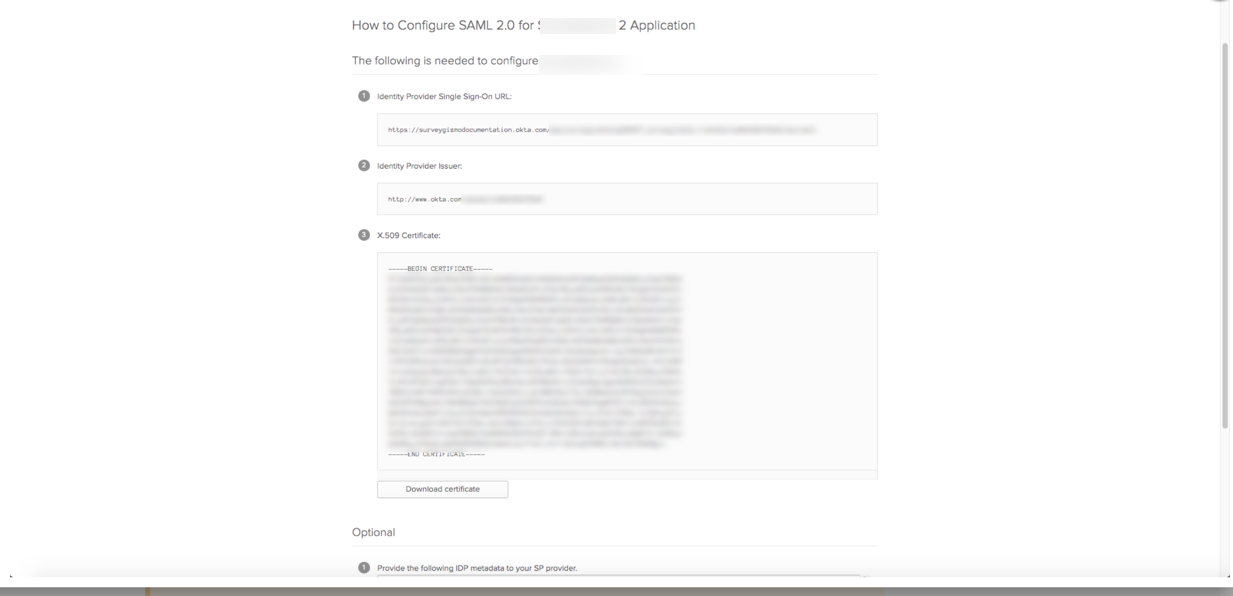
- In the tab that opens up, users have access to the Identity Provider Single Sign-On URL, Identity Provider Issuer, as well as the Certificate. These are unique to each setup:
Leave these Tabs open! To complete the integration, it is necessary to complete some actions in Alchemer and navigate back into Okta!
- Open a new tab in the browser of choice and log into Alchemer and navigate to Integrations > Data Connectors. From here, select SSO Users. Set the Authentication type to Allow Users to login into the Alchemer Application and the Status to Enable SSO. Leave Name ID Policy as Unspecified:
- Select Enter SAML Settings Manually below Name ID Policy.
- Paste the Identity Provider Issuer Link (found in step 11) from Okta in the Entity ID Field in Alchemer:
- Paste the Identity Provider Single Sign-On URL (found in step 11) from Okra in the Login URL Field that exists in Alchemer
- Next, navigate back to the Okta tab containing the SSL/Signing Certificate. Select Download just under the field where the certificate exists:
- Once the download completes, navigate back into Alchemer and upload that file for the SSL/Signing Certificate.
- When the file exists in Alchemer, select Save and Get Metadata. This provides the Raw XML data from the service provider.
- Right click the hyperlink Service Provider metadata URL and open this in a new tab:
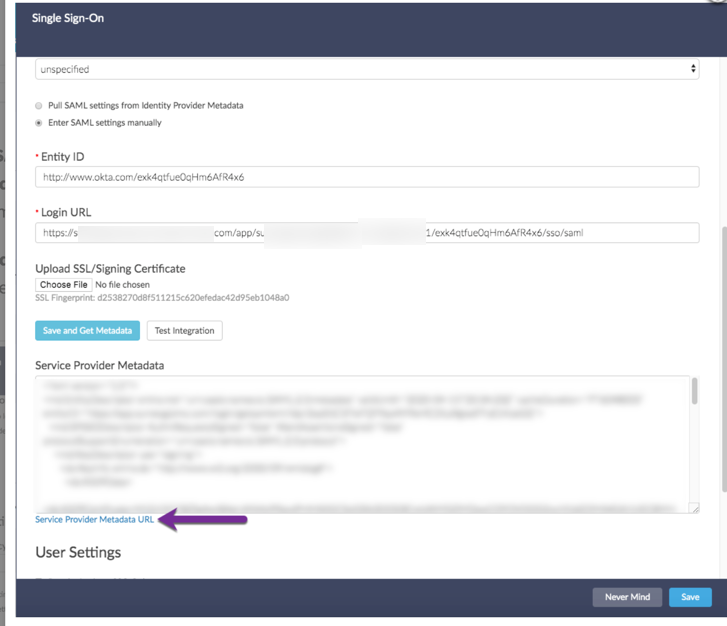
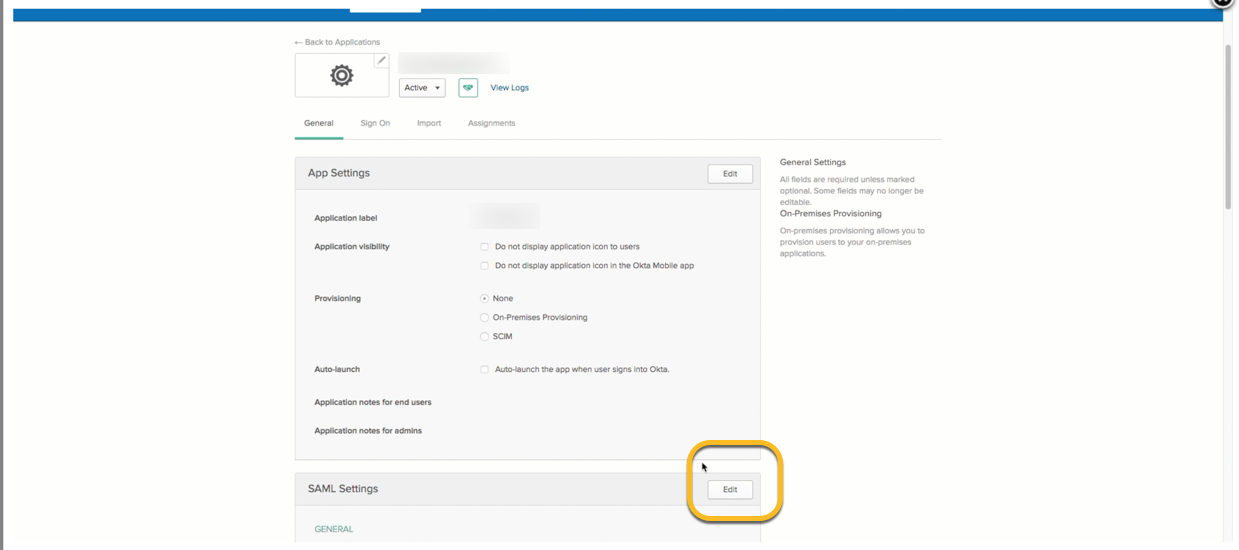
- After the XML file is accessible, navigate back to the SAML app within Okta, and select the General Tab, scroll down to the SAML Settings section, and select Edit. Navigate to the Configure SAML section by clicking Next:
- Populate the Single sign on URL with the Assertion Consumer service link that is found at the bottom of the XML file. This appears as an HTTPS link:
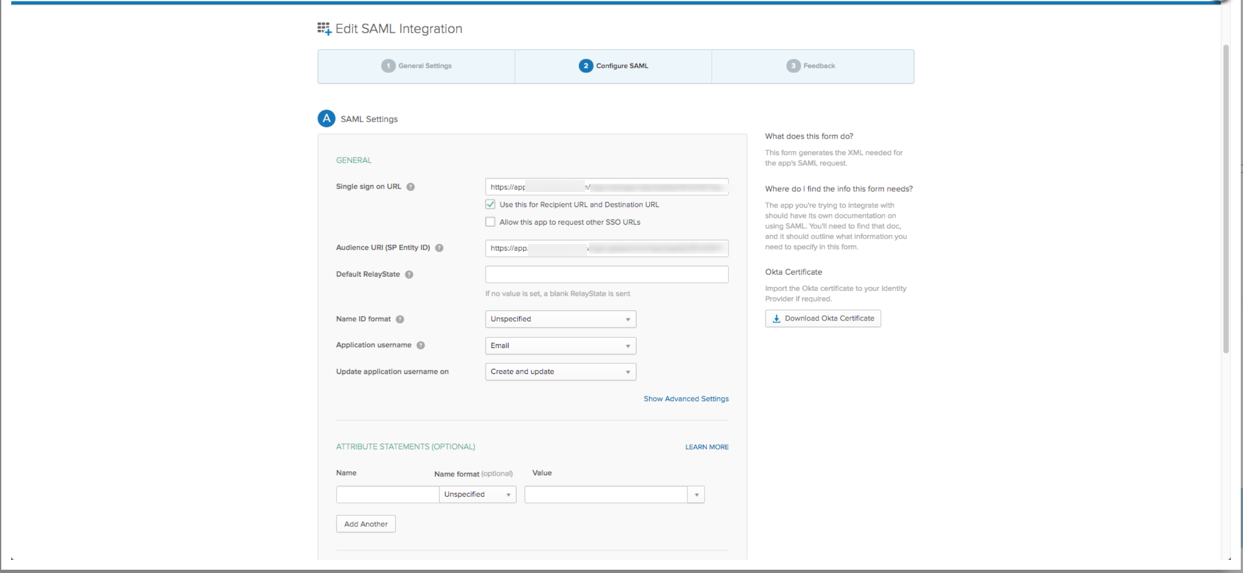
- Populate the Audience URI (SP Entity ID) with the Entity Descriptor entityID that is found at the top of the XML file. Click Next to move to the final page
- Select Finish at the bottom of this page to save:

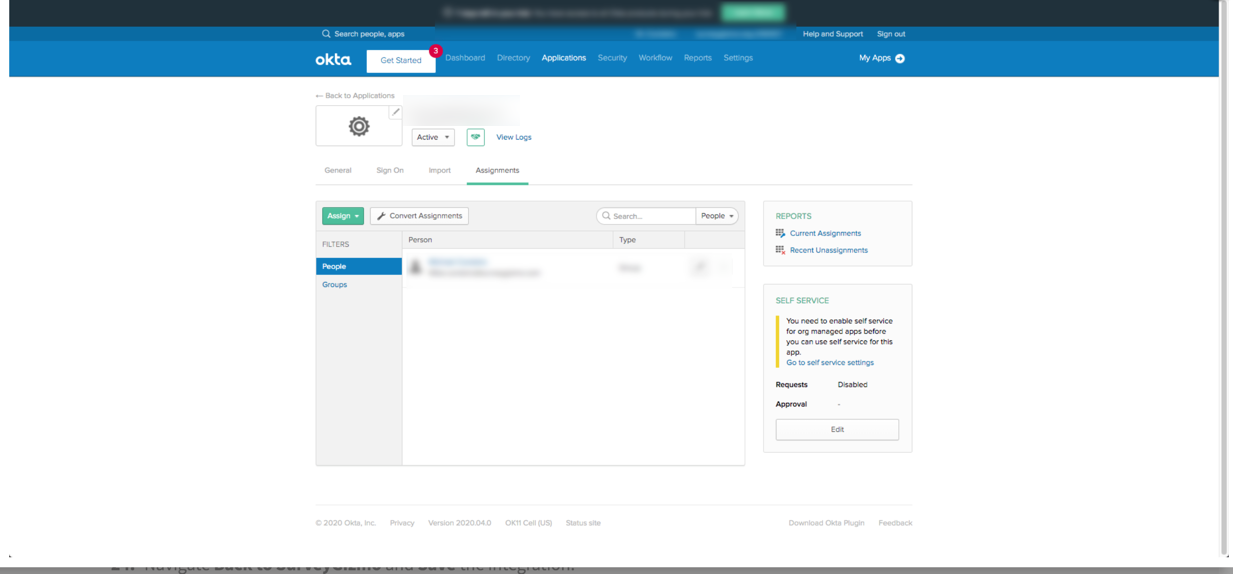
- The last step in Okta is to navigate to the Assignments Tab and select Assign.
- Select Assign to Groups. Each user in the group who is assigned here will have access to the application.
- Navigate Back to Alchemer and Save the integration.
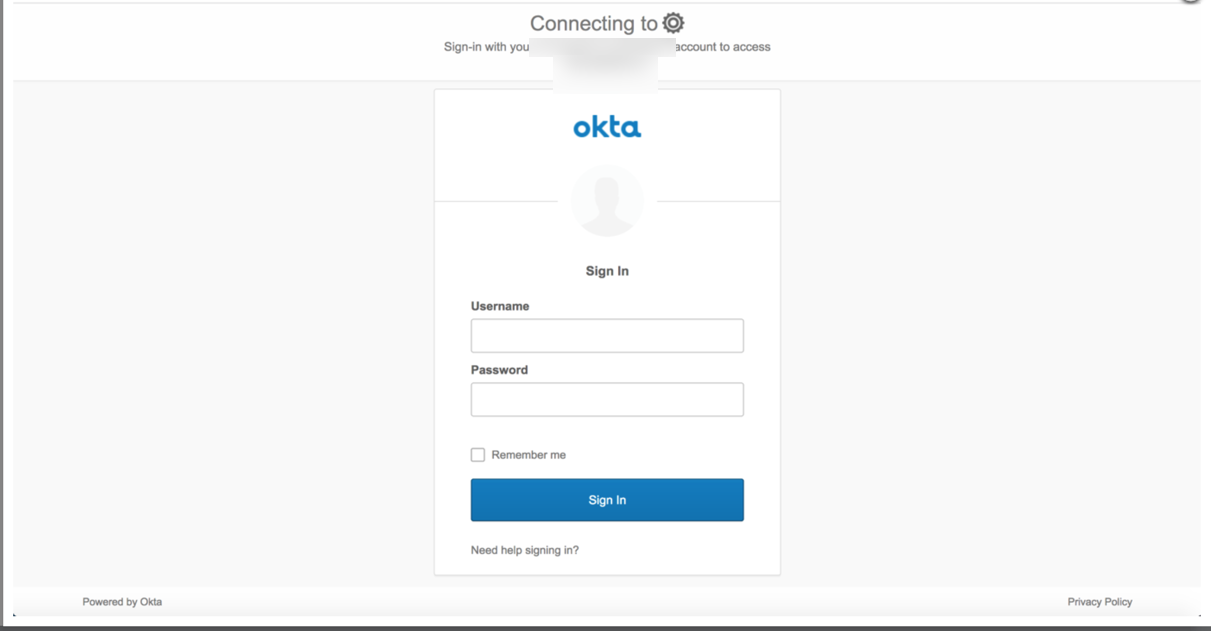
- Open the integration, and at the bottom is the unique SSO login link. Copy the link and paste it into the browser of choice. The link when opened displays as the screenshot below. Provide the login credentials for Okta and select Sign in. The user is brought into the Alchemer application.


See a step-by-step example of the IdP-side setup of Auth0 Alchemer SSO Integration
Auth0 allows for rapidly integrated authentication with several applications that are used for accessibility and security needs. Alchemer is integrated with Auth0 to allow users to login securely.
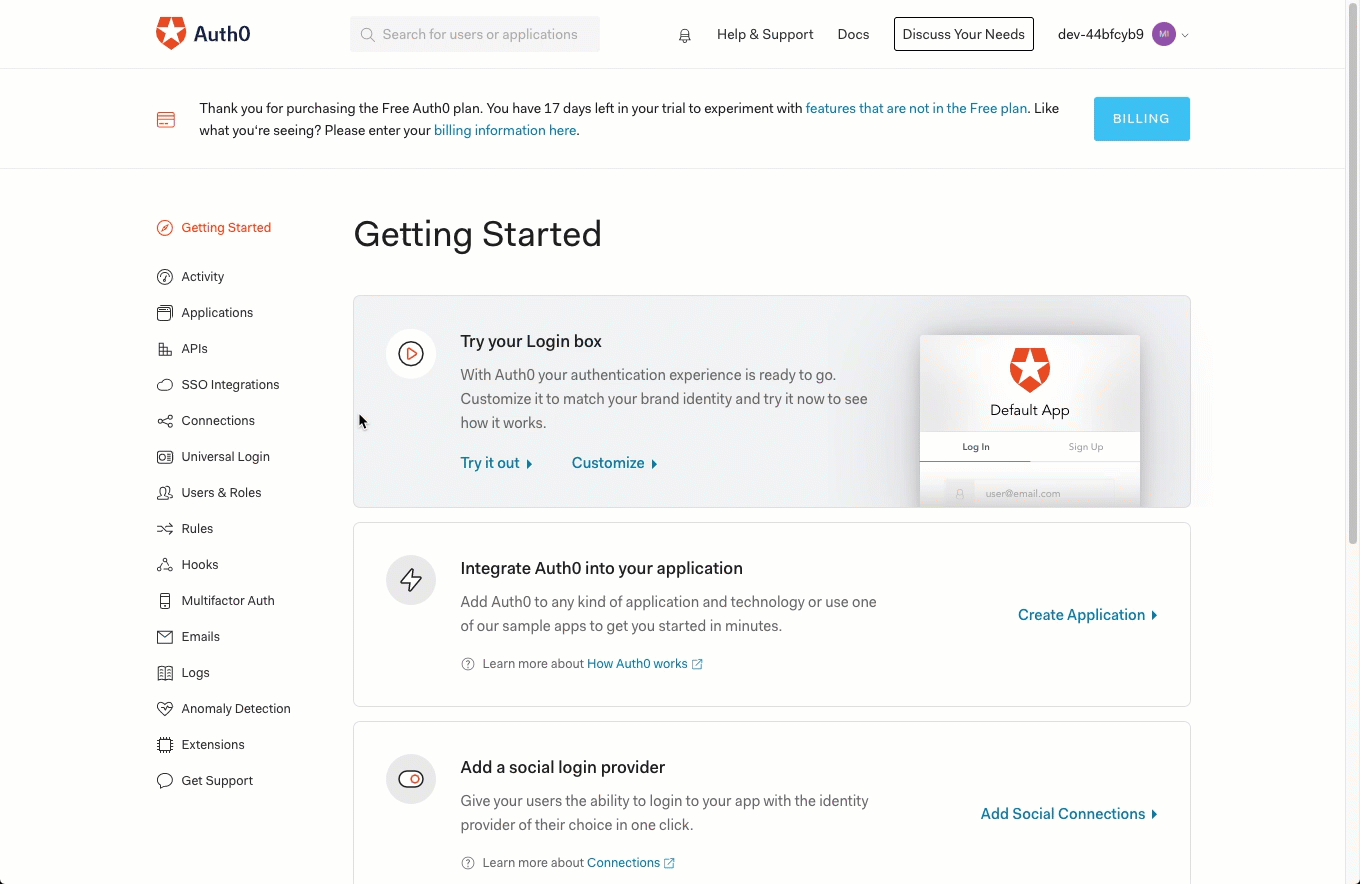
- Within Auth0, select Applications and Create application:
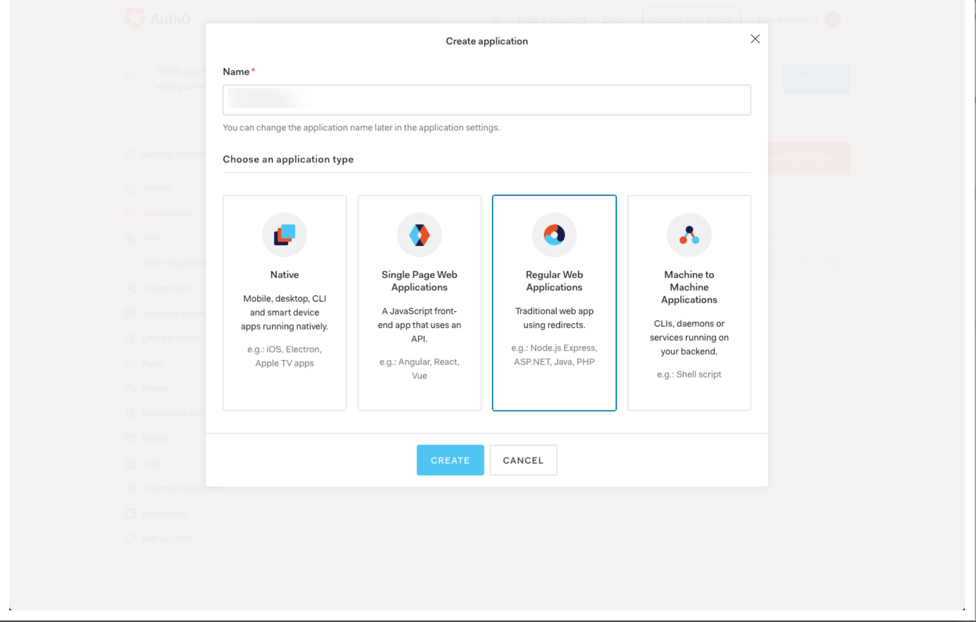
- Provide the intended App name and select Regular web Applications on the Create Application screen. Select Create:
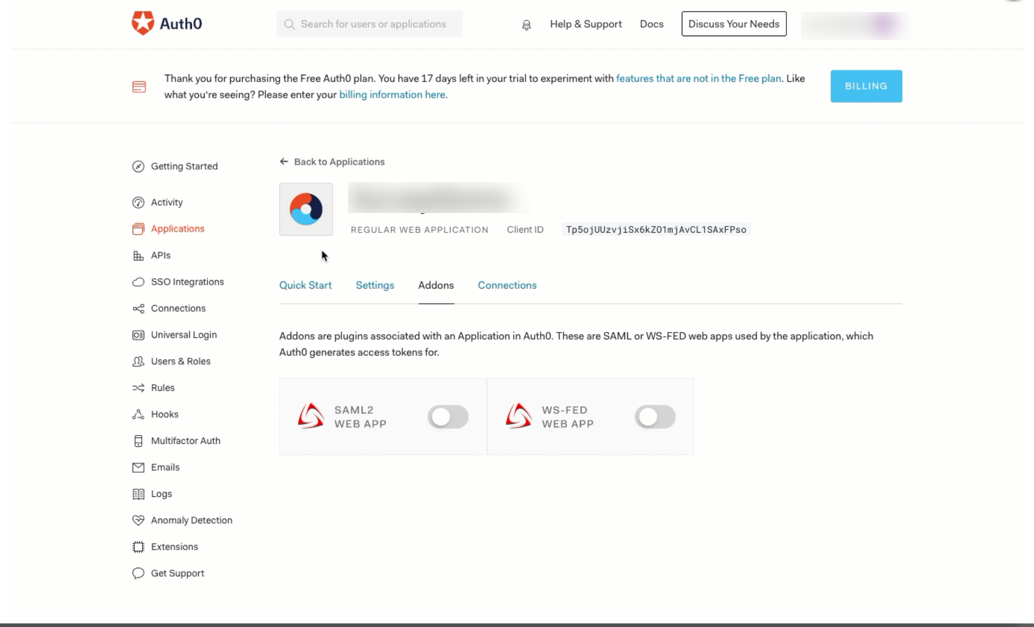
- Choose Add-ons and enable SAML2 WEB APP. Select Usage tab. From here copy the identity provider metadata download URL:
- Navigate back into the Alchemer application and select Integrations > Data Connectors.
- Select SSO Users and provide the Integration Name
- Paste in Identity Provider Metadata URL and select Save and Get Metadata.
- In the Service Provider Metadata field that populates, expand the Field from dragging the bottom right corner. Locate the AssertionConsumerService URL (best for FireFox users) and copy the URL for later use OR right click Service Provider Metadata URL and open the link in a new tab.
- If one opens a new tab, copy the AssertionConsumerService URL to be used later:
- Save the integration on Alchemer.
- Jump back to the Autho Addon:SAMPL2 Web App Screen. Paste in the AssertionConsumerService URL in the Application Call Back URL Field. In the settings field, Paste the following:
{

  "nameIdentifierFormat": "urn:oasis:names:tc:SAML:1.1:nameid-format:emailAddress",

  "nameIdentifierProbes": [

    "http://schemas.xmlsoap.org/ws/2005/05/identity/claims/emailaddress"

  ]

}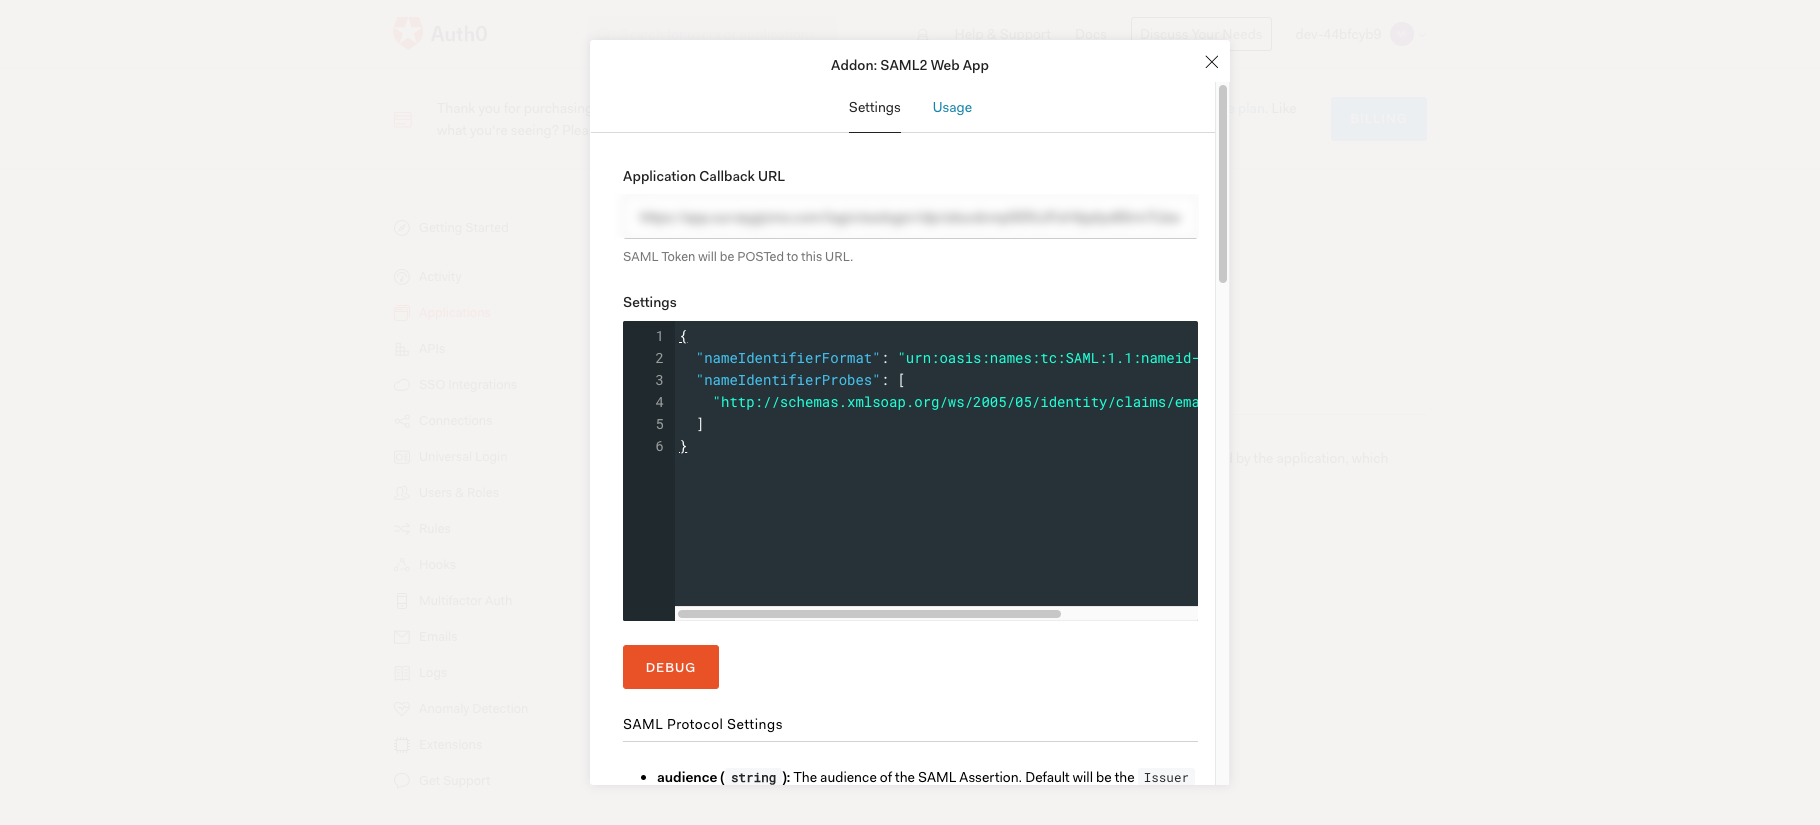
- Select Save at the bottom of the screen.
- Head back into Alchemer and edit the integration. Once there use the login link to authenticate via Auth0 into Alchemer:


See a step-by-step example of the IdP-side setup of OneLogin Alchemer SSO Integration
The OneLogin identity and access management solution allows users to securely be connected to Alchemer and other applications.
- First Log into OneLogin.
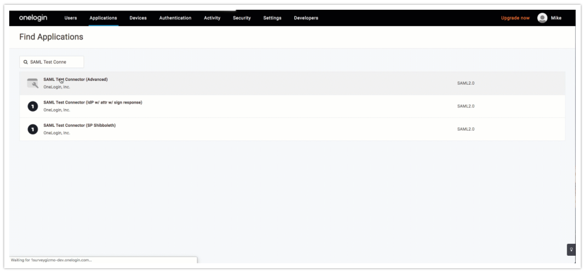
- Select Administration in the top right, then Applications > Add App > SAML Test Connector (Advanced) SAML 2.0:
- Populate a Display Name and select Save in the top right.
- Select SSO from the left menu, and copy the Issuer URL for later use in Alchemer. leave OneLogin open in a separate tab.
- Next Login to Alchemer and add an SSO Users Integration via Integrations > Data Connectors > SSO Users:
- Provide the Integration Name, For the Authentication Type choose Allow users to login to the Alchemer Application, and paste the Issuer URL in the Identity Provider Metadata URL field:
- Select Save and Get Metadata. In a new tab open the Service Provider Metadata URL and select Save at the bottom right of the integration window.
- Navigate back into OneLogin, and click Configuration.
- In the Audience (entityID) field paste the Entity Descriptor URL that is in the Service Provider Metadata tab opened from Alchemer.
- In the Recipient field, paste in the Assertion Consumer Service URL that is in the Service Provider Metadata tab opened from Alchemer.

- In the ACS (Consumer) URL Validator field paste the AssertionConsumerService URL that is in the Service Provider Metadata tab opened from Alchemer.
- In the ACS (Consumer) URL field paste the AssertionConsumerService URL that is in the Service Provider Metadata tab opened from Alchemer:
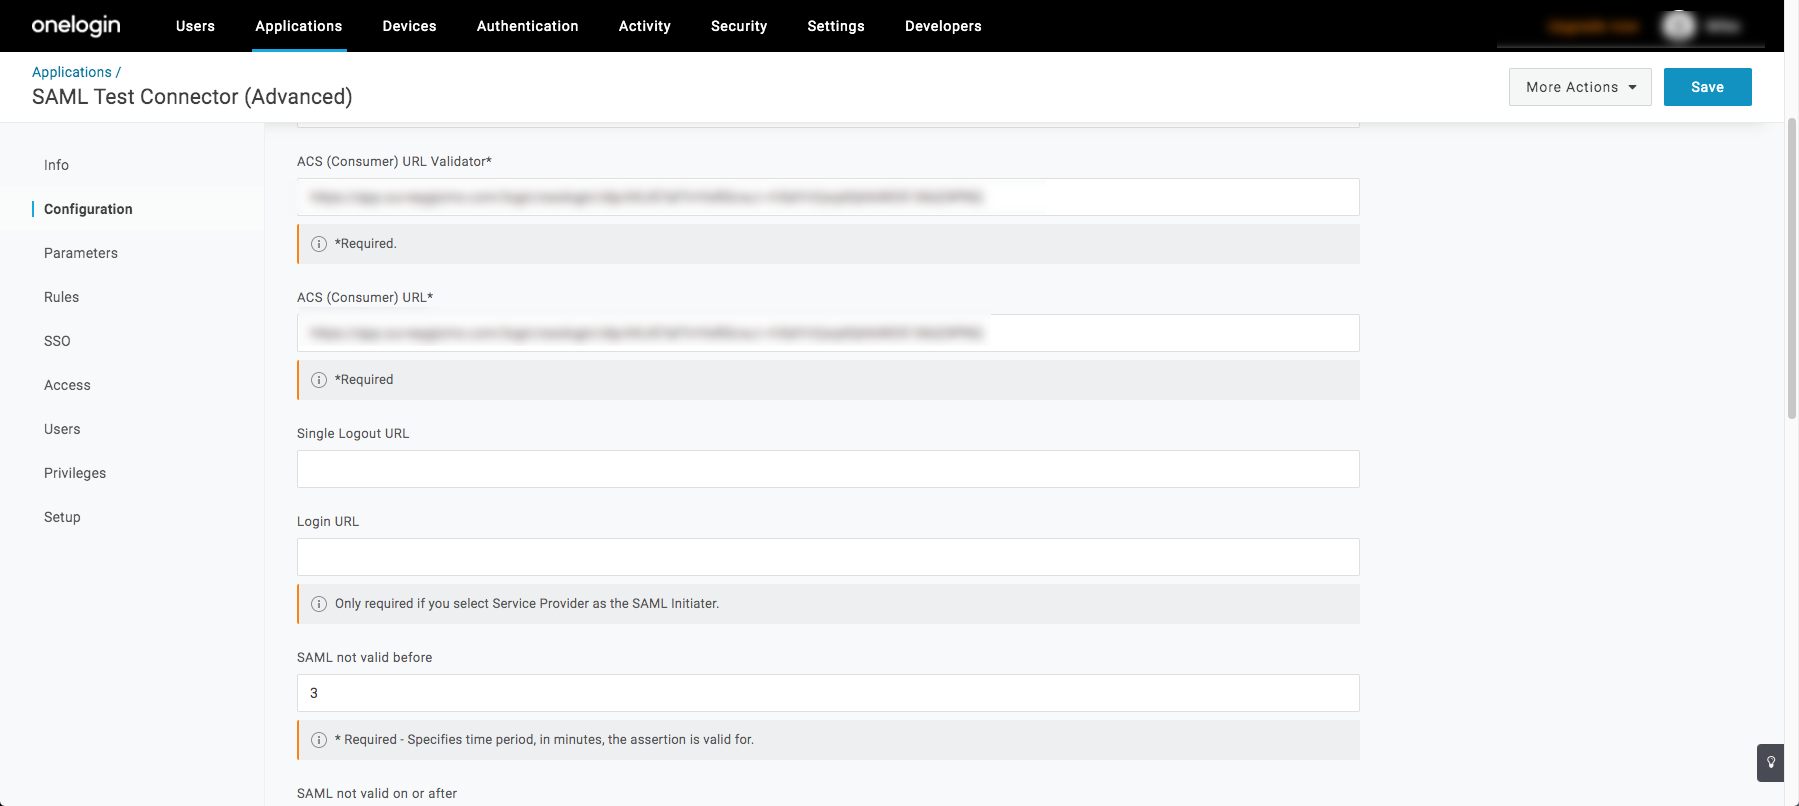
- In the ACS (Consumer) URL field paste the AssertionConsumerService URL that is in the Service Provider Metadata tab opened from Alchemer:
- Select Save in the top right. Navigate back to Alchemer and edit the OneLogin integration. Copy the Login Link at the bottom of the integration window to authenticate via OneLogin into Alchemer.


See a step-by-step example of the IdP-side setup of the Ping Identity Alchemer SSO Integration
Ensure that an Identity Repository has been set up in your Ping Account. For information how to do this please click here.
Ping Identity makes security simple with strong authentication for SSO. Within Ping Identity is the enterprise solution of PingOne, allowing for simple and intuitive SSO for a variety of applications.
Setup
- Log into PingOne as an administrator to build this integration. Select Applications on the toolbar across the top of the page.
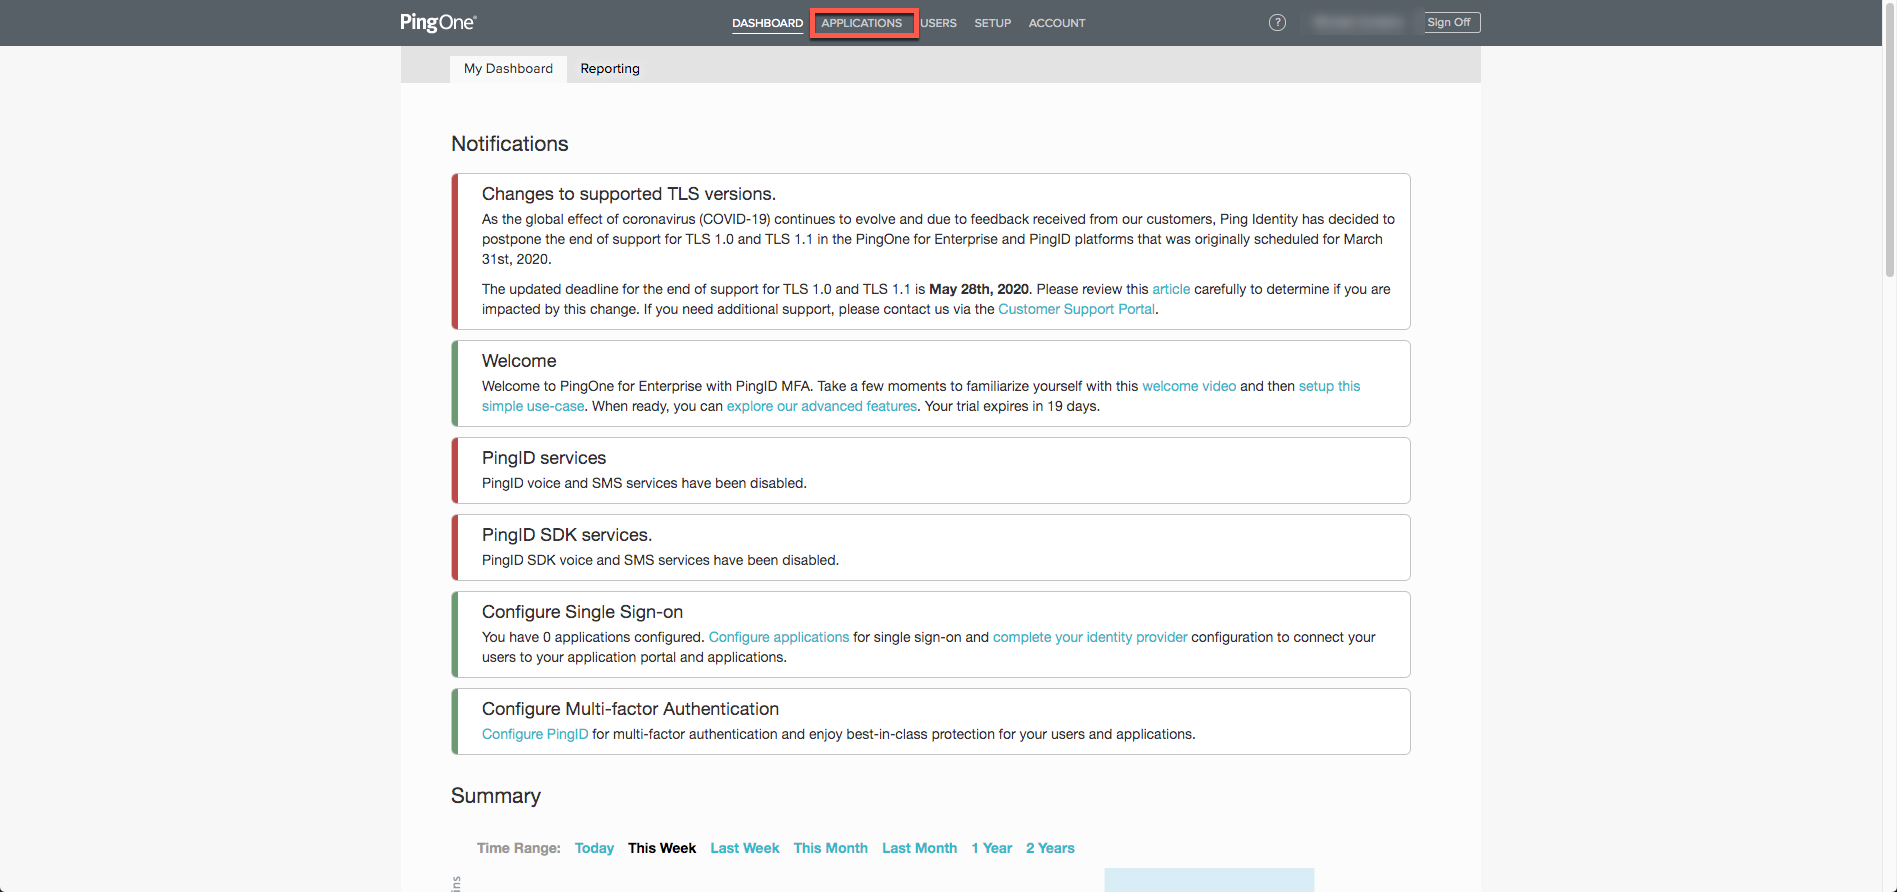
- Click the Add Application Dropdown and select Search Application Catalog. Locate Alchemer by typing in the search field:

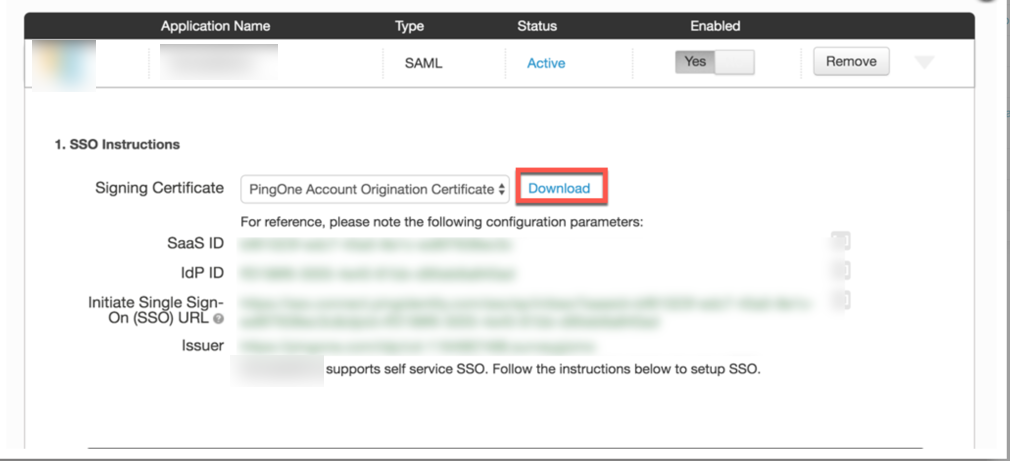
- Click Alchemer and select Setup to continue. This displays the SSO setup instructions needed to build out Single Sign-On. Download the Signing Certificate for upload into Alchemer. Leave this PingOne tab open:
- Open a new tab in the browser of choice and log into Alchemer. Navigate to Integrations > Data Connectors. Select SSO Users in the enterprise section and click Configure:
- The setup screen for SSO is displayed. Provide an Integration Name, select Allow user to login to the Alchemer Application, Enable SSO, and choose Enter SAML settings manually:
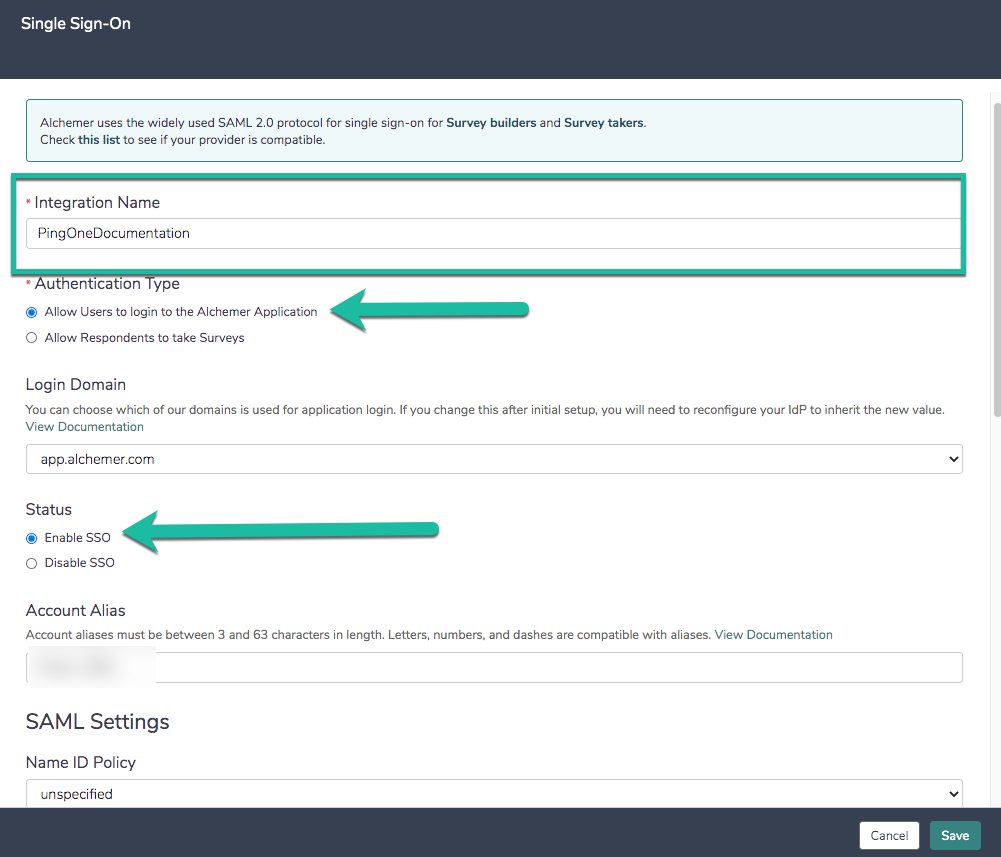
- In the Upload SSL/Signing Certificate field, Upload the Signing Certificate that was downloaded from PingOne in step 3. Click Save and Get Metadata. Right click the hyperlink Service Provider Metadata URL and open this in a new tab. Leave this tab open as information from this is needed for later steps in the set up.
- Navigate back to the previously opened PingOne tab and click the Continue to Next Step button to reach the Connection Configuration page:
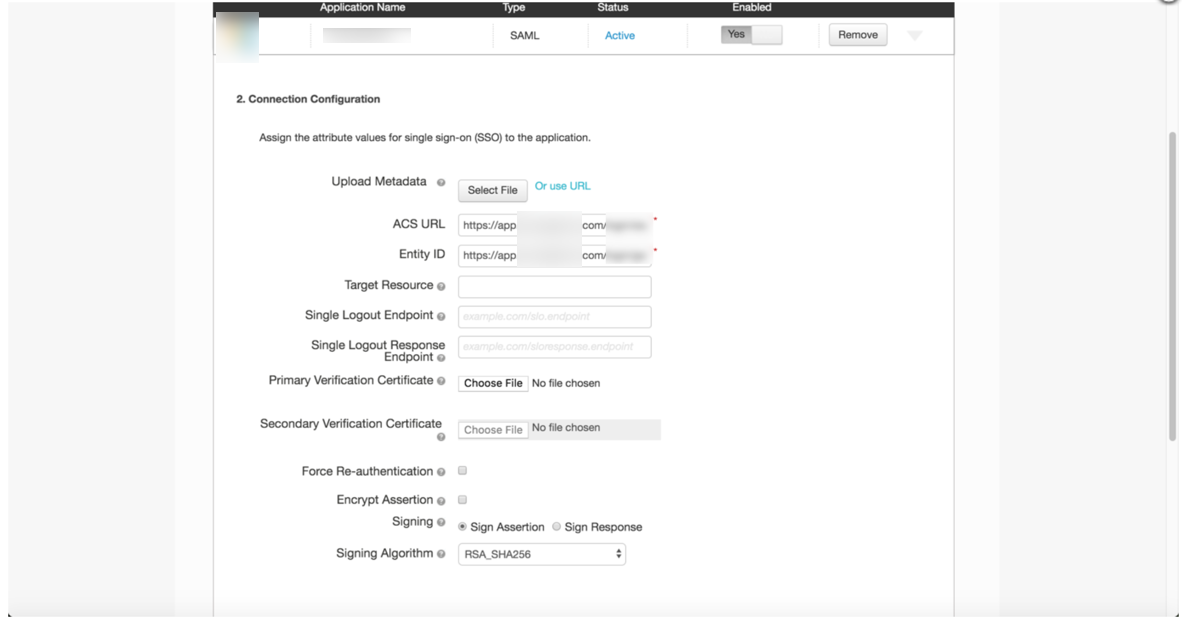
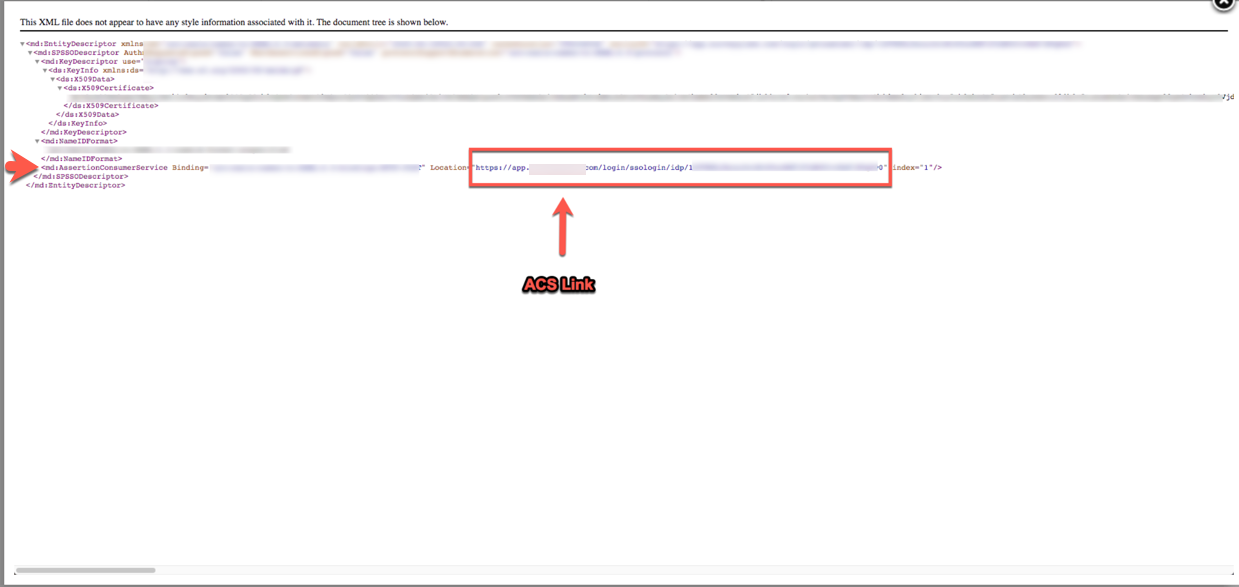
- Navigate back the tab opened in step 6. Copy the AssertionConsumerService from the XML tab opened from Alchemer and paste the link in the ACS URL field in PingOne. An example below shows where to find this in the XML file opened from Alchemer:
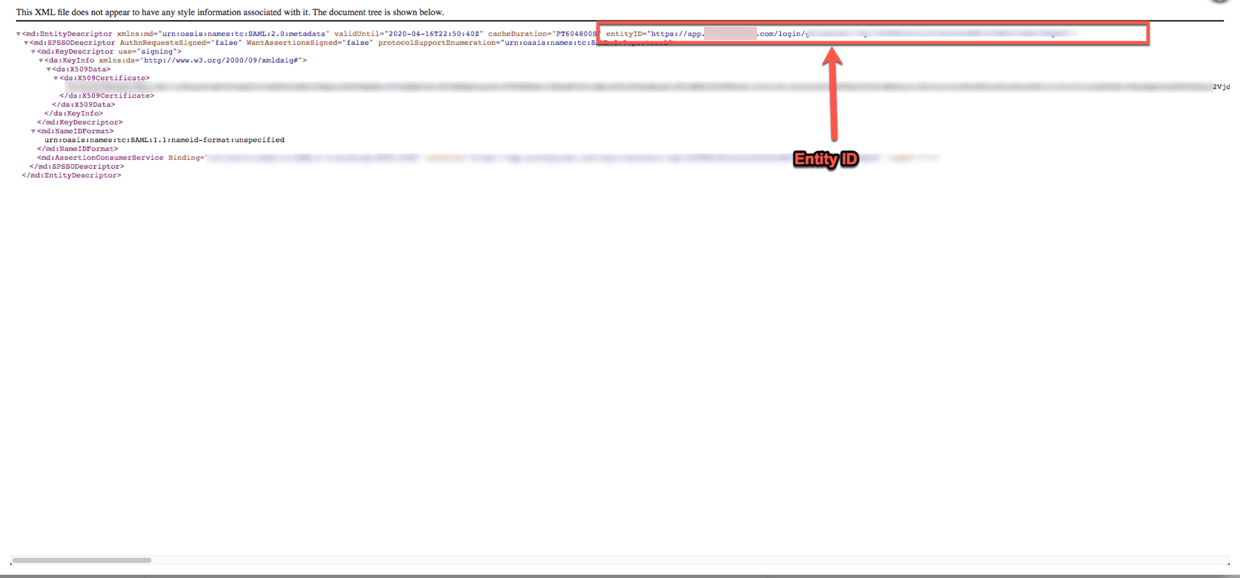
- Copy EntityID from the XML tab opened from Alchemer and paste that link in the ACS URL field in PingOne. An example below shows where to find this in the XML file opened from Alchemer:
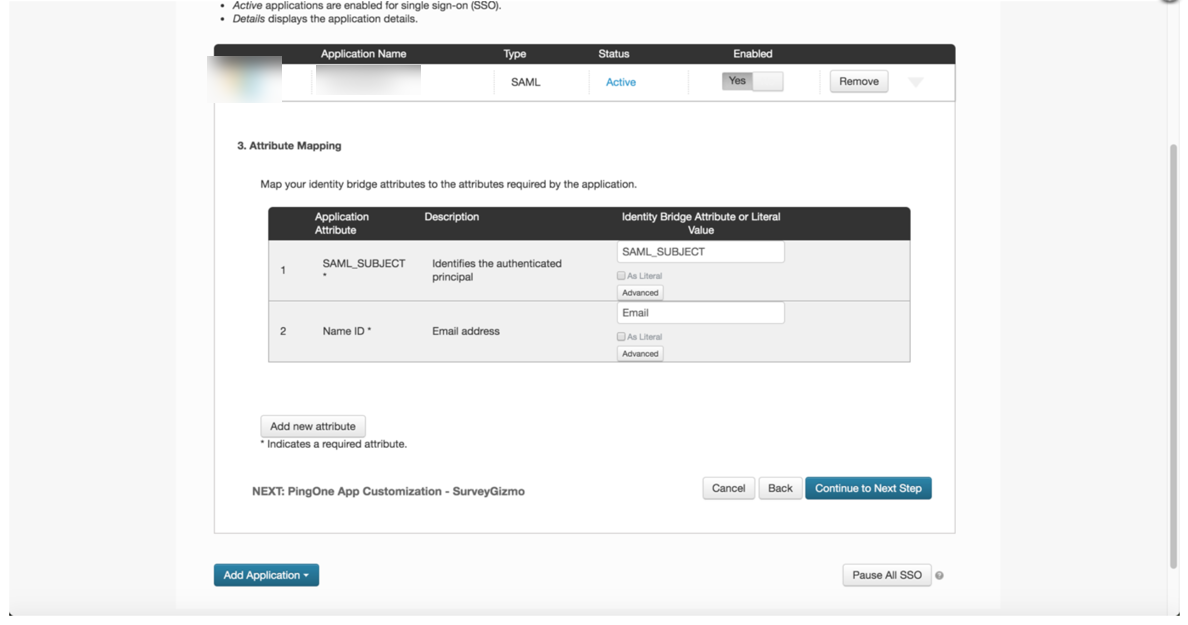
- Click Continue to Next Step. In the mapping screen select Email for the Name ID.
- Select Continue to Next Step. Provide any changes to the description and click Continue to Next Step to reach the groups page. Choose which groups in PingOne that can access Alchemer and click Continue to Next Step to reach the Review Screen.
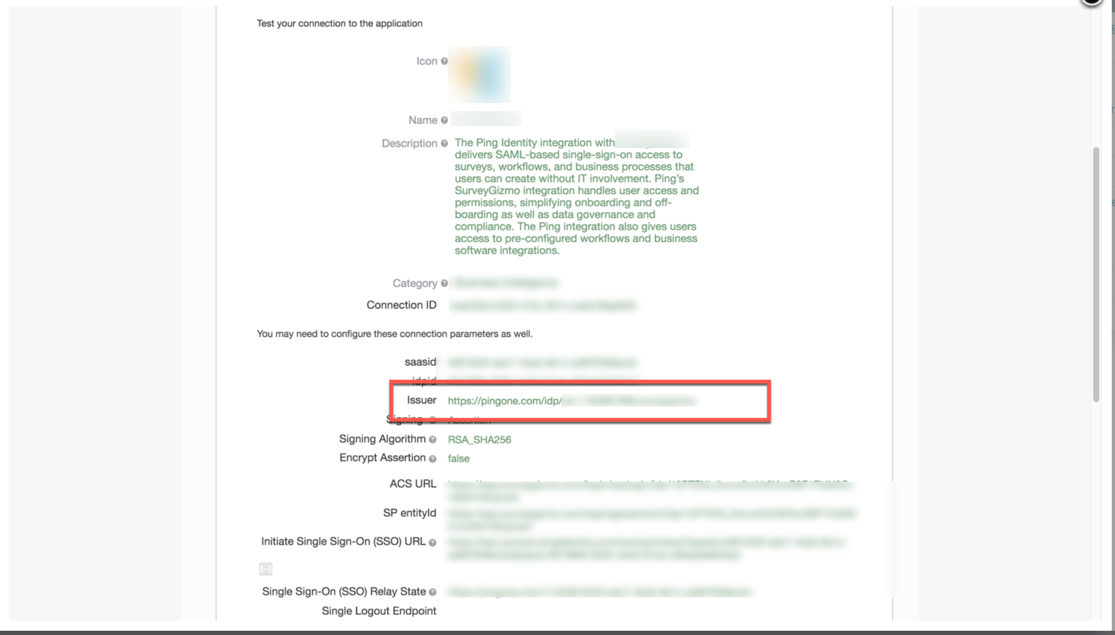
- In the Review Screen, copy the Issuer URL and paste this in the SSO integration in Alchemer in the Entity ID field:
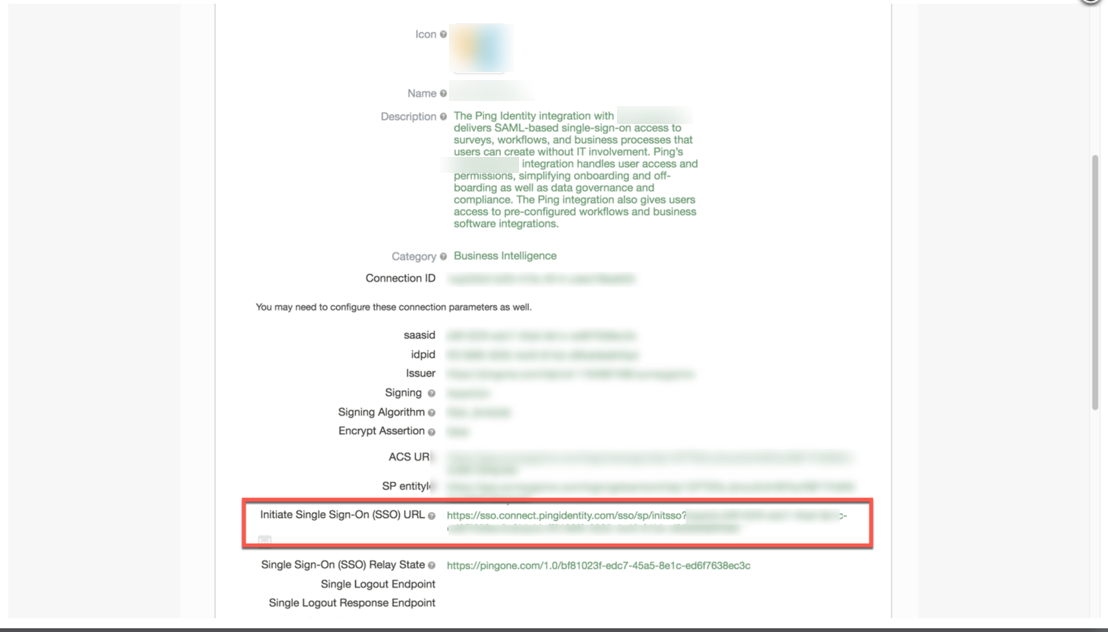
- Once on the review screen in Ping, copy the Initiate Single Sign-On (SSO) URL and paste this in the SSO integration in Alchemer in the Login URLfield:
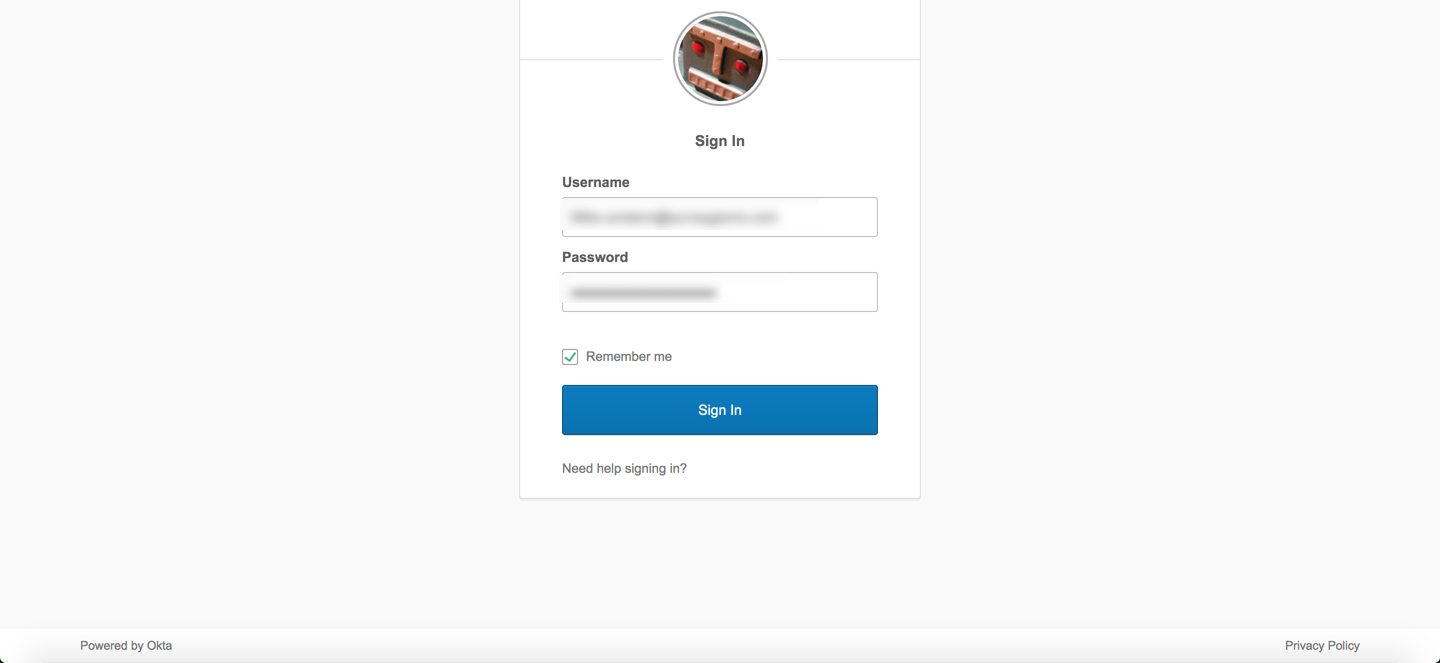
- Save the integration in Alchemer. Use the initiate Single Sign-On URL to log into Alchemer.


When logging into Alchemer via the standard Alchemer Login page (https://app.alchemer.com/login/) use the default Email and Password used when creating an account in Alchemer.
Account Alias
An Account Alias is set up during or after a IDP integration has been created successfully via the application of choice (Okta, Ping, etc.).
An Account Alias is utilized to identify a unique SSO connection within an application. Aliases allow a user who is set up with Single Sign-on in Alchemer to login from Alchemer through the identity provider that is being use. Simply, an Alias easily connects Alchemer to an identity provider for a simpler login.
An Alias is set up within the integration for Single Sign-On for the Alchemer account and is used on the Alchemer Login page by selecting Log In Using Your Identity Provider at the bottom of the login window:

Setup
Navigate to Integrations > Data Connectors to access the integrations using SSO:


Provide a unique Alias. An Alias must be between 3 and 63 characters long and only include letters, numbers, and dashes. All other special characters are not compatible with Aliases in Alchemer.
Special considerations:
- An Alias cannot start with a dash.
- An Alias cannot end with dash.
- An Alias cannot have multiple dashes in a row (--).
- An Alias must be unique (no duplicate Aliases).
- An Alias is not compatible across Data Centers (US, EU, CA).

Click Continue to your Identity Provider. This redirects the user to the Identity Providers login page for authentication via the Login Link that exists in the integrations setup page:
Creating New Users
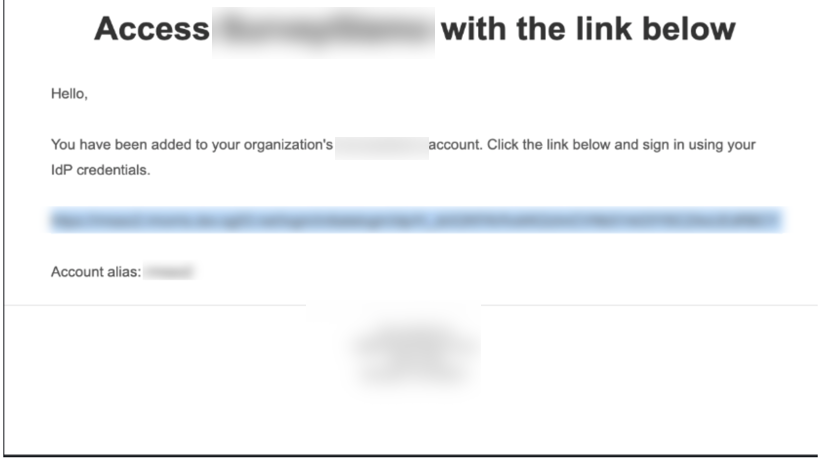
Accounts utilizing the setting of Restrict Login to SSO Only forces users to access the account via the Identity Provider in use. When a new user is created in Alchemer via Single Sign-On using the setting of Automatically create new users if they don't exist in Alchemer, an email is triggered to the New User Notification Email providing login credentials:
The email displays as seen below with the login link to access Alchemer directly through the Identity provider as well as the Account Alias which is used on the main login page using the Login using your Identity Provider button:
FAQ
How do I integrate with a sandbox environment?
You can set up as many SSO integrations as you wish under Integrations > Data Connectors. To test SSO using a sandbox environment simply set up a separate integration here.

What do I need to know to log existing Alchemer users into that user via SSO?
The Name ID that you pass into Alchemer to identify the user must be the same as their Email field in Alchemer. In the IdP setup above we added a rule to set Name ID = UPN (the users IdP email address).
Okta is rejecting the Login link
Check the login link to see if it contains a ~ character. If it does regenerate a new login link in Okta.
Will users still be able to log in with their login and password?
This depends on how you set this up. If you wish to allow your users to continue to login via the Alchemer with their username and password make sure to leave the option to Restrict Login to SSO Only unchecked.
Will my IdP login credentials work to log me into the Alchemer login page?
This depends on a couple of factors: (1) your Restrict Login to SSO setting and (2) how the user was created.
- If the Restrict Login to SSO box is unchecked all users will be able to login via both your IdP and Alchemer, with the exception of users created via SSO.
- If the Restrict Login to SSO box is checked, any users that attempt to login directly via Alchemer will not be able to and will see the following message:
This account is restricted to Single Sign-On only. Please contact your account admin for assistance. - Administrative users that were created in Alchemer will always be able to login via both your IdP and Alchemer regardless of the status of the Restrict Login to SSO option.
- Users created via SSO will only be able to login via the IdP.
What happens if users try to log into the Alchemer login page with IdP credentials?
This depends on a couple of factors: (1) your Restrict Login to SSO setting and (2) how the user was created.
- If the Restrict Login to SSO box is unchecked all users will be able to login via both your IdP and Alchemer, with the exception of users created via SSO.
- If the Restrict Login to SSO box is checked, any users that attempt to login directly via Alchemer will not be able to and will see the following message:
This account is restricted to Single Sign-On only. Please contact your account admin for assistance. - Administrative users that were created in Alchemer will always be able to login via both your IdP and Alchemer regardless of the status of the Restrict Login to SSO option.
- Users created via SSO will only be able to login via the IdP. If they try to login via the Alchemer login page they will receive a message letting them know that login is restricted to SSO only.
What happens if the IdP is unavailable? Typically you'll receive a browser message that the page cannot load.
We cannot throw an error in this case. Typically you'll receive a browser message that the page cannot load.
What happens when a Alchemer session expires?
Alchemer sessions expire after 2 hours of inactivity. If this happens the Continue Working link that displays in Alchemer will not work. Users will need to use the login link/button to log back into Alchemer.
Can I populate User Data Fields with SSO attributes?
You can! Data from attributes will populate User Data Fields by default as long as the following requirements are met:
- User Data Fields must already be set up. Learn more about setting up User Data Fields.
- Your SSO Attributes and User Data Field names must match exactly (case sensitive).
Can Alchemer supply a SAML Service Provider metadata file?
Yes. Here is an example of our metadata XML. Please note that the metadata will vary for each customer; when you set up SSO and enter your settings, the metadata file for your setup specifically will be generated.

How do I deeplink to a specific page in Alchemer?
Take your login URL and append a query string with r parameter like so:

Can Alchemer's SAML consume the SAML IdP metadata file?
Yes.
What attributes does Alchemer require within the SAML assertion?
NameID must be in the subject of the assertion.
Does Alchemer have a platform for testing identity federation?
No.
Does your SP support SAML Single Logoff?
No.
Does your SP support a logoff redirect following termination of the user session?>
No.
Does your SP sign the authentication (authn) requests that it sends to the SAML IDP?
No.
Does your SP require a signature and/or encryption of the assertions issued by the SAML IDP?
Yes, a signature is required. Encrypted assertions are not accepted.
Explain the user authorization mechanism employed by your SAAS application.
Username and password form or SSO.
Can your SAAS application accept authorization (role membership) data from the SAML assertion?
No, we assign it.
What happened to Automatic User Disabling?
This feature has moved and can now be found under Security > Settings. Visit the Automatically Disable Users documentation for additional information.
Troubleshooting
I entered by entity ID and Login URL, and uploaded my certificate and my integration was not set up. What am I doing wrong?
Often this is due to a invalid certificate. Make sure that you are uploading a valid .crt file. Files must be Base64 encoded and must include the the begin and end tags. The result should look like this:
-----BEGIN CERTIFICATE-----
(Your Primary SSL certificate: your_domain_name.crt)
-----END CERTIFICATE-----
Use this SSL Checker to validate your file.
If your Entity ID or Login URL are incorrect you will receive an error.
The content of this error varies so if you receive an error during set up check that both of these fields are populated correctly.
Glossary of SSO Terms
Active Directory Federated Services (AD FS)
Microsoft's IdP software.
Entity ID
This is the globally unique URL/string of your IdP entity. It's like a mailing address that we, the service provider, use to contact your IdP.
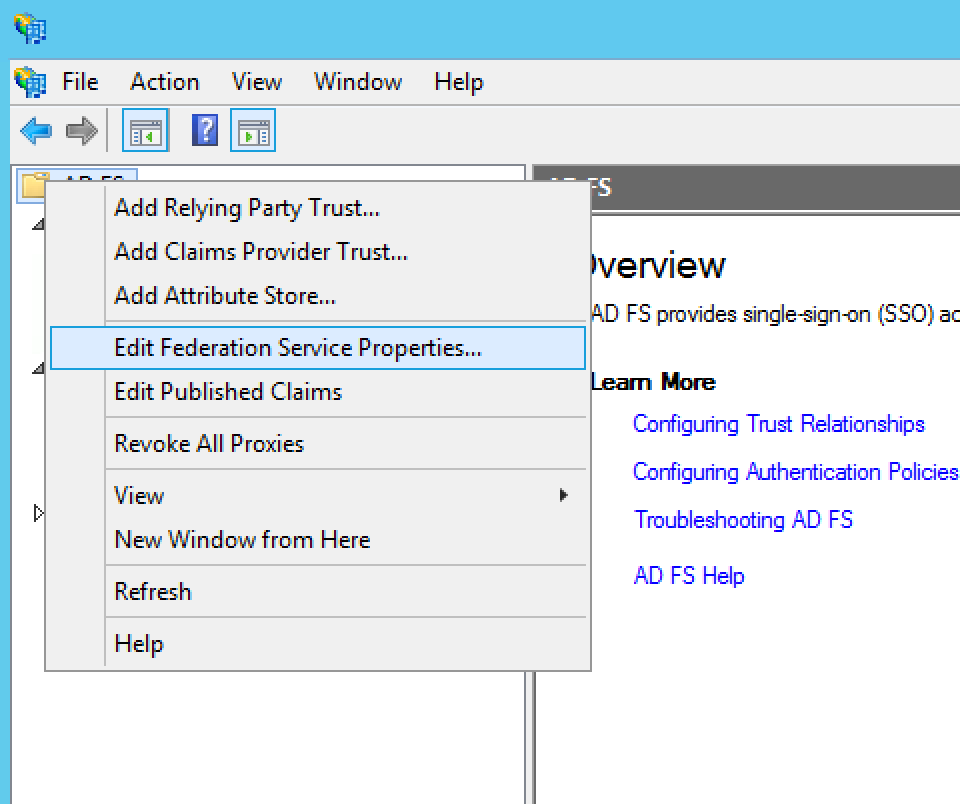
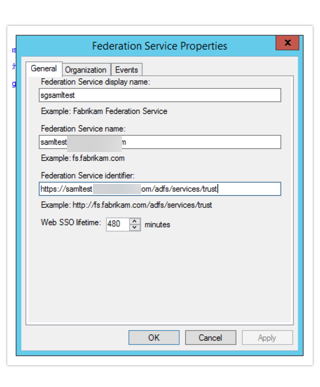
Your Entity ID can be found in your AD FS Management Console by right-clicking the AD FS Folder and selecting Edit Federation Service Properties.
The URL in the Federation Service identifier field.
Identity Provider (IdP)
The source of truth for usernames and passwords.
Login URL
This is the URL for logging in to your IdP. The Login URL is often very similar to the Entity ID URL. This is where we will send the SAML request.
Name ID
Unique string to identify users. When sending Name ID to Alchemer we recommend it be their email address.
Service Provider (SP)
The web-based application/s that are accessed via the IdP.
Security Assertion Markup Language (SAML)
an XML standard that allows secure web domains to exchange user authentication and authorization data. Using SAML, an online service provider can contact a separate online identity provider to authenticate users who are trying to access secure content.
Single Sign-On (SSO)
Provides partner companies with full control over the authorization and authentication of hosted user accounts that can access web-based applications.
SSL Certificate
This is your certificate file (.crt) for your IdP which can be downloaded from your SSL Issuer. We require base64 encoded files that include the begin and end tags. The result should look like this:
-----BEGIN CERTIFICATE-----
(Your Primary SSL certificate: your_domain_name.crt)
-----END CERTIFICATE-----
Use this SSL Checker to validate your file.
Note: If the file you have also has the ‘intermediate’ or ‘root’ certificate chains in them, that’s fine, as long as it has the main certificate for the domain included.
User Principal Name (UPN)
The Name of the system user in email address format.