Are you looking to have Alchemer generate a unique confirmation or coupon code that can then be utilized to link a respondent to an otherwise anonymous response? Here's an easy way to set this up!
- On any page before your Thank You page, click Action and add a Hidden Value. Call the Hidden Value something like ConfirmationCode* (so you can reference it later).
*Please ensure there are no spaces in your hidden value name in order to ensure that the counter works properly.
- Within the Populate with the following field of the Hidden Value, enter the below merge code for the survey counter which will insert a unique number for each survey. Save Action when ready.
[survey("counter")]
- On the Thank You page, feel free to edit the default Thank You messaging to include the merge code that will reference the Hidden Value (and as a result, your counter merge code).
Click the Merge Code option in the editor toolbar to find the name of your Hidden Value in the menu. Click on the Hidden Value name to insert it into the text. Make any other necessary edits to your text and Save to finish the setup process.
- Try it out! On the Thank You page, you will see the confirmation code that the respondents will see.


A Note on the Survey Counter Merge Code
The survey counter merge code uses a server technology called MemCache to store the IDs and guarantee they are unique. 99% of the time, this will be totally reliable, but sometimes MemCache is lost when a server has to reboot.
- You can make this unique number even more unique by adding the parameter "safer", which automatically adds in the numeric day of the year at the beginning of the output.
- Example: [survey("counter"), safer="true"], which will output 441, 442, 443... because today is the 44th day of the year.
- If you'd like control over the starting value, you can add the parameter "startat" to set a custom starting value for the counter.
- Example: [survey("counter"), startat="1000"], which will output 1001, 1002, 1003...
- Finally, if you need to use more than one counter in a survey, you can add the parameter "name=secondCounter", which creates a second counter that is unique from the first and referred to by the name "secondCounter". Make sure the name is unique, like "Counterx2" and if you've used the name and tested the survey, you will need to change the name to start the counter back at zero.
- Example: [survey("counter"), name="secondCounter"]
Using Your Own Coupon or Gift Card Codes
If you would rather use your own coupon code, you can accomplish this with a Login/Password Action!
Solution Overview
Before we get started, it's helpful to have a high-level understanding of this workaround. The following Alchemer features will be used in this solution:
Important! This solution requires two surveys:
- The first survey will be your normal survey consisting of all of the questions that you need to ask. This survey will redirect respondents who reach the Thank You page, to the second survey.
- The second survey will utilize the Login Action and Survey Counter Merge Code to output one of your unique coupon codes.
The two-survey solution allows you to make sure that coupon codes are presented to respondents that made it to the end of your original survey.
You will need to match each of your unique coupon codes with a password, for example:
| Password | Coupon Code |
|---|---|
| 1 | XFSF1FS |
| 2 | HTRSL78 |
| 3 | HJLL67O |
As each respondent is redirected to the second survey, a password is populated (by the Survey Counter merge code) into the password field of the Login Action* and the corresponding coupon code is fed from the Login Action into the Hidden Value.
*Typically a Login/Action is respondent-facing, in that the respondent manually enters a password that was provided to them ahead of the survey. In this case, the Login Action is executed behind the scenes to assign your coupon code.
Example Scenario:
The following example scenario uses the above Password/Coupon Code example table.
- The first survey respondent takes your survey. At the end of the survey a URL Redirect Action directs the respondent to the second survey.
- On the second survey, the Survey Counter merge code increments to 1.
- The number 1 is automatically populated into the password field of the Login Action.
- The Login Action looks up the Coupon Code that corresponds to the Password 1 and finds Coupon Code XFSF1FS.
- The XFSF1FS Coupon Code is then fed into and stored in a Hidden Value.
- The Hidden Value (which now contains the Coupon Code) can be referenced (via simple piping) and displayed to the respondent at the end of the survey.
- The next survey respondent takes the survey. The Survey Counter merge code increments to 2 and the process repeats.
Now that we have a high level overview of the process, let's follow the below steps to set up and configure the necessary pieces.
Setup
Setup Within the First Survey
Once you have created and finished your initial survey, you will need to create and redirect to a second survey. The second survey will handle the output of your coupon codes.
- In the second survey, access the Share tab and copy the second survey's Primary Link.
- Back in your initial survey, on the Thank You Page add a URL Redirect Action. Paste the second survey's primary link into the URL field of the Action and Save.
- The first survey will now redirect respondents who finish, to the second survey.
Setup Within the Second Survey
Now that you have created your second survey, it's time to implement the bulk of the solution.
On Page One of the second survey, start by adding a piece of text instructions. This is the last piece of text that respondents will see prior to submitting the survey and seeing their coupon code. Without this piece of text respondents will see a blank page which is not ideal.
Below your text (still on Page One), add a Hidden Value action. This hidden value will store your coupon code.
- To do so click the Action button at the bottom of a survey page and select Hidden Value from the available options.
- Name this Hidden Value something like ConfirmationCode* (so you can reference it later).
- You're going to populate this in the next step so just click Save Action for now.
*Note: Please ensure there are no spaces in your hidden value name in order to ensure that the counter works properly.
Next, you will use a Login/Password Action to assign the coupon codes, one per response.
Before you add the action, though, you will need to create a spreadsheet with your coupon codes. In your spreadsheet, you should have the following columns (the order is not relevant):
- One column with your list of your coupon codes
- One column with a list of passwords. The easiest way to set this up is to start with password 1 and assign passwords sequentially.
We will use the survey counter merge code (discussed above) to log each respondent in and assign them a coupon code behind the scenes. Confused? Hang in there. We'll take this step by step.

With your spreadsheet of passwords and coupon codes ready, add a Login/Password Action to the survey.
You will need to make sure your Login/Password action precedes your coupon code Hidden Value. Use our handy insert tool by hovering your mouse just above the Hidden Value to insert your Login/Password action.

- Select Login/Password from the menu of actions, give the Login/Password action a name, for example, "Assign Coupon Codes".
- Select Lookup ID/ Password in an uploaded spreadsheet and the sub-option for Single Use Password.
- Finally, click the Choose File button to upload your spreadsheet of passwords and coupon codes. Select your file and click Map Spreadsheet Data.

- On the Map Fields screen, start by selecting the option to Hide "username" field.
- In the Password field select the column from your spreadsheet that contains the password data.
- If your file includes a header row, check this option.
- Select the option to Use this spreadsheet to pre-populate survey questions and map the coupon code field in your spreadsheet to the coupon code Hidden Value you created.
- Click Start Uploading.

- When the file is finished uploading, navigate to the Display tab of the Login Action and enter the survey counter merge code in the Pre-populate Password field:
[survey("counter")]
This is the key! The survey counter merge code will increment for each response and will pre-populate the password field - logging the respondent in and assigning them a coupon code in the Hidden Value field you set up!
- Next, you can use the merge code for the "Coupon Code" Hidden Value to display the respondent's coupon code. We set this up on the Thank You Page in our example by editing the default message on the Thank You Page and including the merge code for the previously-created Hidden Value Action.


We recommend testing at this point to ensure that everything is working properly. You will need to use the live link for your initial survey (available on the Share tab) in order to check the entire workflow and that the password field is populated in survey two.

Also, make sure to check that your coupon code displays within the text on the Thank You Page of the second survey!

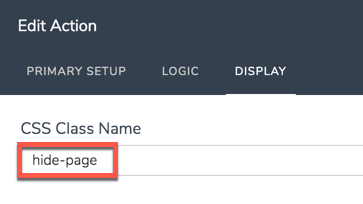
Once you have confirmed that everything is working, the last step is to hide the Login/Password action so all the magic happens behind the scenes!
- Edit your Login/Password action and go to the Display tab
- Enter the following in the CSS Class Name field: hide-page
- Navigate to the Style Tab > HTML/CSS Editor. Paste in the following snippet:
.hide-page {
  visibility: hidden;
}


Compatibility
- The survey counter merge code is not compatible with embedded surveys.
- The survey counter merge code is not functional via Preview/Test Mode
Considerations
- While an incentive can be a great motivator for respondents, you can run the risk of gathering bad data if respondents are simply motivated to get to the end of your survey and claim their reward.
- Furthermore, keep in mind that the incentive may compel some respondents to take your survey multiple times. In most cases, this is not what you want when offering an incentive. Consider using a from of Duplicate Protection on both the first and second surveys to mitigate against this behavior.