The Marketo initiator is available for purchase as an add-on. If you are interested in purchasing, please contact us for additional information.
Overview
Marketo is a marketing automation platform that automates lead scoring, email nurturing, landing pages, events, and social campaigns. With this integration, you can initiate personalized feedback Workflows in Alchemer after specific events occur in Marketo Smart Campaigns, ensuring the collection of timely and targeted feedback from prospects.
With Marketo and Alchemer, you and your team can:
- Initiate Workflows in Alchemer after events occur in Marketo Smart Campaigns.
The Marketo initiator uses webhooks. For detailed instructions on Marketo webhooks refer to the following Marketo articles:
Setup
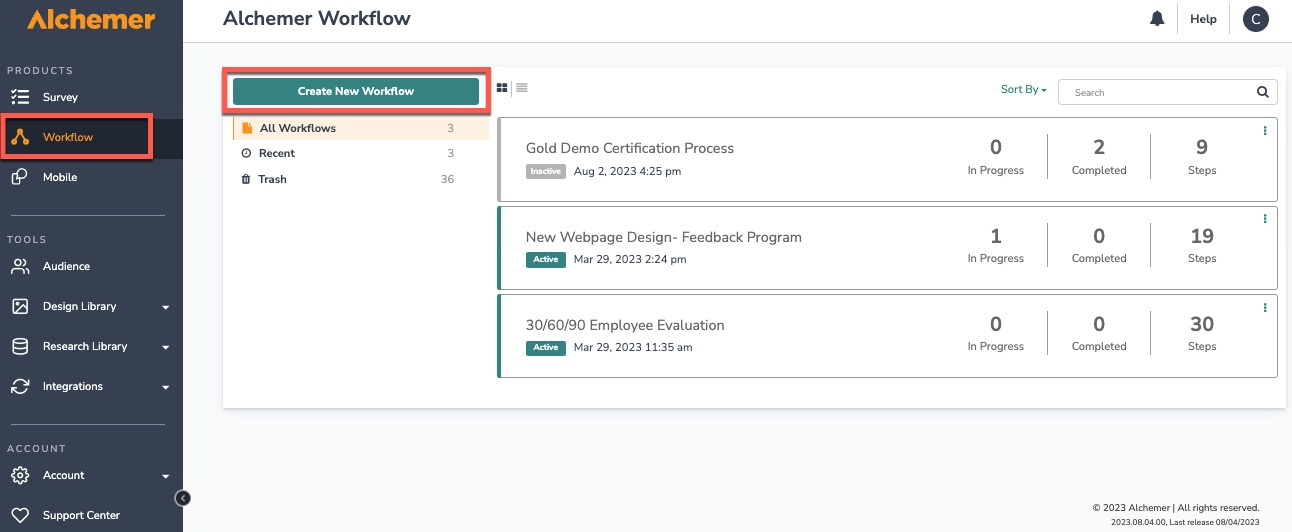
1. Create a new Workflow.  2. Name your Workflow.
3. After creating a new Workflow, select Marketo as your Workflow initiator.

4. Select Marketo Custom Webhook then click the "Next" button.

5. Click the "Next" button on the initiator overview screen.

6. Copy the public URL provided by Alchemer. You will need this URL to configure the webhook in Marketo.

7. In your Marketo account, navigate to the Admin area. Before using webhooks in Marketo Smart Campaigns, you need to first create the webhook.
For additional information on creating webhooks in Marketo, refer to their documentation.

8. Click Webhooks.

9. Click New Webhook.

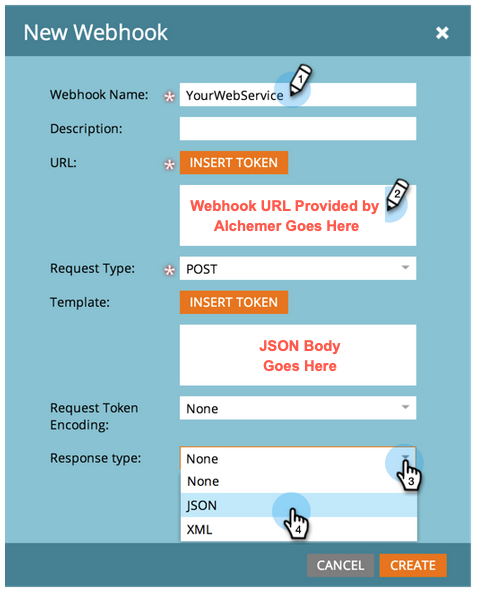
10. Name and configure your webhook.
- In the URL field, paste the URL provided by Alchemer in Step 6.
- If you wish to transmit information in the body of the request, enter that via the Template field. Example JSON body:
{
"email": "insert value",
"last_name": "insert value"
}
The fields included in the JSON body will also need to be defined in Alchemer, see Step 15 for details.
- Select JSON as the Response Type.

11. When done, click "Create". Now that you've completed the webhook, you need to add it to a Marketo Smart Campaign.
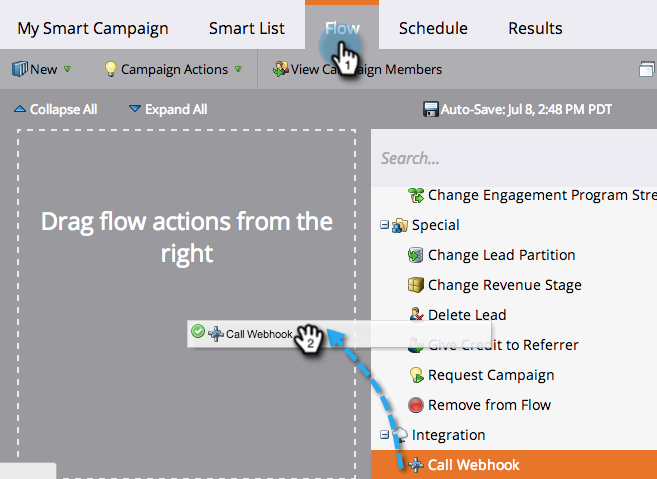
12. In a new or existing Smart Campaign, navigate to the Flow tab and drag in a Call Webhook flow action.

13. Select the new webhook you just created.

14. Now that the webhook has been created and added to a Smart Campaign, return to Alchemer Workflow.
15. In Alchemer, add the custom fields that you'd like Alchemer to accept. These fields can be used as merge codes in subsequent Workflow steps. When done, click "Add to Custom Fields".
The fields added in Alchemer must exactly match the fields you added to the body of the webhook request.

16. Click "Save" to complete initiator configuration.
Merge Codes
When the webhook fires, Marketo will pass any custom fields to Alchemer Workflow. After configuring this initiator, you can use these fields in merge codes, logic, and other Workflow features.
For more information on how to use these merge codes in your Workflow, check out this article.
FAQs
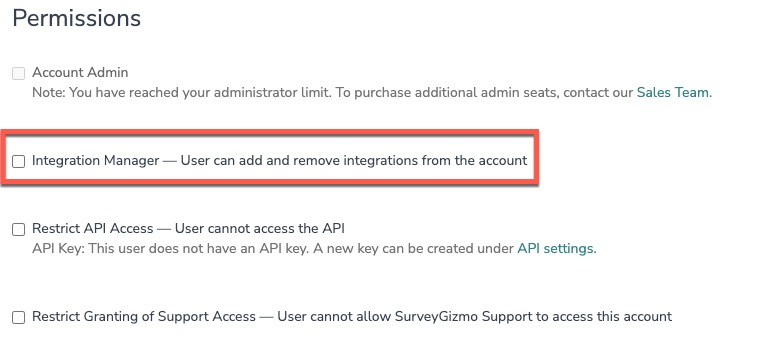
1. The Integration Manager Permission is required to set-up and use the Marketo initiator. If you don't have this permission, you will see the following message when selecting an initiator: 2. To grant this permission to someone on your team, go to the left-side product navigation and select the Account drop-down, then click on the User Management tab.
3. Then select the Users tab under User Management.
4. Click the username for another member of your team.
5. Scroll down to the Permissions section and check if the Integration Manager box is checked. If you are an admin you can check the box for other members of your team.
Yes, you can create an unlimited number of Workflows that listen to the same initiator. However, you will need to create a new Workflow and configure the initiator each time. You can reuse the same Marketo authentication.
Alchemer is committed to continuously releasing updates and enhancements to our Workflow initiators. If you have specific use cases, questions, or just general feedback, we would love to hear it. Contact us here!