If you are distributing your survey via an Email Campaign and using the Login Password Action for added survey security, you may want to include your survey respondents' login credentials in the body of the email message that they will be receiving.
No sweat! This article will cover the necessary steps for doing just that.
We will not get into the specifics of Email Campaigns or Login Actions in this article; if you need a little refresher on either topic, feel free to check out these tutorials!
Step 1: Set Up Login Action
For this implementation, we will be creating a Login Action and using the Lookup ID/Password in an uploaded spreadsheet password option. Check out our Login Action Tutorial to learn more about creating a Login Action.
In our example we have a very simple file formatted as follows that we have uploaded to the Login Action:

We have five sets of credentials that we have uploaded. We now want to email the credentials to five email addresses via an Email Campaign associated with the survey (we want to make sure that each contact receives their unique username/password combination within the email message).
Step 2: Set Up Email Campaign
All new Alchemer accounts created after January 25th, 2022 must be provisioned Email Action and Email Campaign authorization from the Alchemer Support team before scheduling and utilizing the email action or campaign features in the Alchemer platform. Alchemer users must have a completed survey prior to submitting an authorization request. Click here for more information.
For this implementation, the majority of the work is done on the Email Campaign side of things. We will be sending an email with a survey link to five uploaded contacts and want to include each contact's username and password in their email message.
Typically, we would upload a contact file to our Email Campaign containing, at the very minimum, an email address.
In our example we are starting with a file that contains the email address and a first name field:

We will be adding additional columns to our contact file prior to uploading this to our email campaign. We will be adding the usernames and passwords that we want to associate with each contact (the same usernames and passwords that we have uploaded to the Login Action).
When finished our file looks like this:

Now our file is ready to be uploaded to our Email Campaign.
Step 3: Upload and Map Fields
- Now that our contact file is ready, we can navigate to our Email Campaign and, under the Contacts page, select Add Contacts > Upload a Spreadsheet.
- We can then Map Fields as follows:
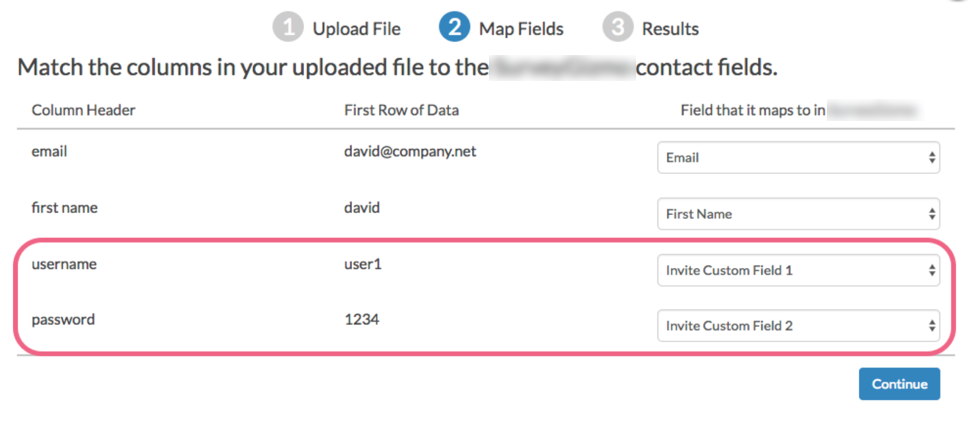
- We recommend mapping the username and password fields to our Invite Custom Fields. This allows us to use merge codes in our email message to reference the username and password fields and pull the information into the body of the email.
- Now that our file is properly uploaded to our Email Campaign, we can craft our email message to pull in the necessary username/password information.

Step 4: Customize Email Campaign Message
- Let's navigate to the Campaign Designer and click Edit Message.
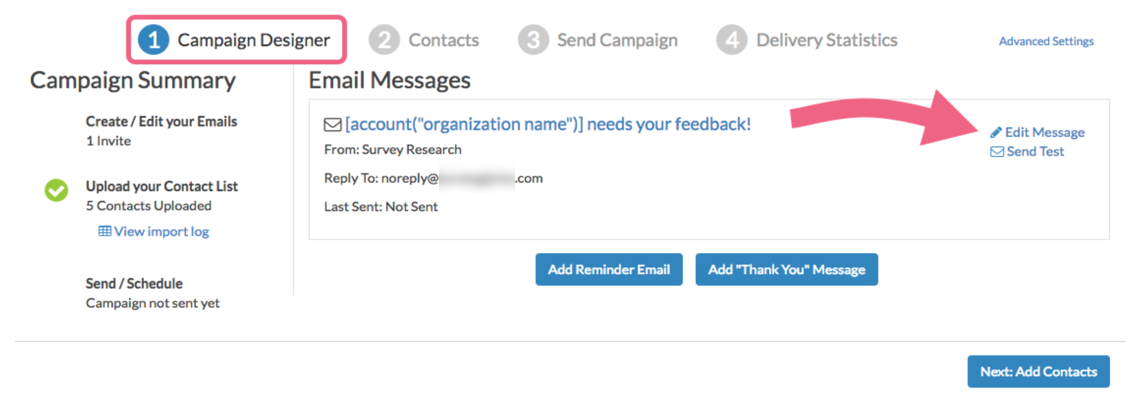
- Our initial invite message looks like the below. Note that we have included information about the login credentials and instructions for our respondents.
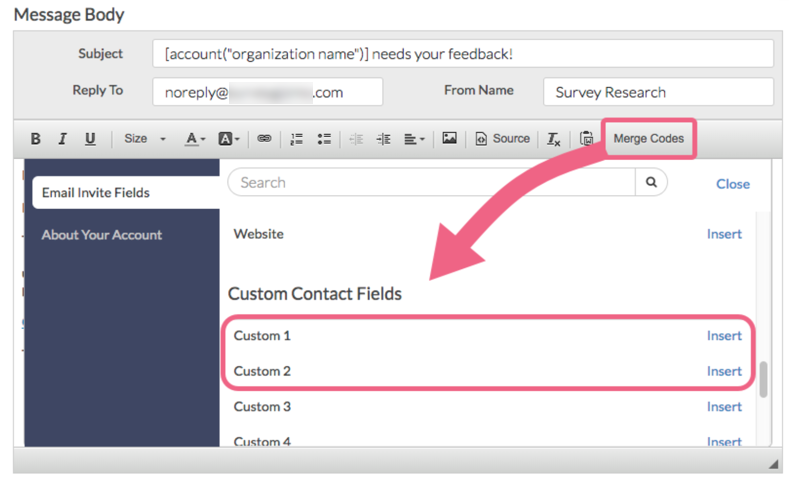
 At this moment we do not have any information being populated into the highlighted username and password fields above. We will need to use merge codes to dynamically pull information from our uploaded spreadsheet into the email message.
 - We will use the merge code helper to add merge codes to the body of our email. Since on upload we mapped our username and password fields to the invite custom 1 and 2 fields respectively, we will use the merge codes for those fields in our message.
- Our finished message will look like the below example.

- The message is now ready to send! Go ahead and schedule your message or Send Now. When your contact receives their email, it will look like this:
 Note that the merge codes that we added in the last step have been dynamically replaced by the actual username and password values tied to the email recipient. Your contact will now have their credentials in their email and can easily reference them when logging into your survey.

 At this moment we do not have any information being populated into the highlighted username and password fields above. We will need to use merge codes to dynamically pull information from our uploaded spreadsheet into the email message.

 Note that the merge codes that we added in the last step have been dynamically replaced by the actual username and password values tied to the email recipient. Your contact will now have their credentials in their email and can easily reference them when logging into your survey.
(Optional) Pre-populate Password from Email Campaign
We can take our setup from above in another direction. Because we have uploaded our password as part of the contact file, we can pre-populate the password field on the survey from that file. Using this option, respondents do not have to manually type in their passwords which reduces the possibility of an incorrect password being entered.
- Once you have your spreadsheet uploaded navigate to the Display tab of the Login/Password action and locate the Pre-populate Username and Pre-populate Password fields.

- Using the Select a Merge Code link, select Invite Custom 1 & 2 (these are the fields that we mapped our username and password to when we uploaded our contact file).

- Now that we have set this up, the respondent's experience would be as follows:
- Respondent receives an email invitation to take your survey
- Respondent clicks on the survey link and is taken to Page 1 of the survey which contains the Login Action
- The respondent's username & password is automatically pre-populated in the login field.


(Optional) Automatically Log Respondent In
A final customization that you may wish to make might be to automatically log the respondent in. This is pretty common if you are using the Login/Password action mainly as a method to pre-populate your survey as covered in Pre-populate a Survey from Another Survey: Login/Password Action Tutorial.
To set this up simply follow the steps above for pre-populating the password field. Then, make sure that the Login/Password action is by itself on the first page of the survey. Finally, set up the first page to automatically submit.