The Salesforce initiator is available for purchase as an add-on. If you are interested in purchasing, please contact us for additional information.
Overview
The process for initiating a Workflow from a Salesforce Flow differs from the other initiators for Salesforce, such as "Record Updated" or "Opportunity Closed Lost."
The key differences are:
- Initiating a Workflow via a Salesforce Flow does not require the extensive Salesforce permissions that the other pre-built initiators require.
- Initiating a Workflow via a Salesforce Flow gives the Workflow user more granular control over the trigger conditions because the conditions are built into the Salesforce Flow itself.
Because of these key differences, most Alchemer Workflow users will prefer to initiate Workflows via a Salesforce Flow rather than using one of the other initiators. If you still want to use a pre-built initiator action for Salesforce and have the required Salesforce permissions, refer to this document for more details.
Setup
The user who authenticates this Salesforce Integration with Alchemer must have the following Salesforce permissions:
- The ability to add and create Flows in Salesforce
- The ability to add HTTP callout actions to your Flows in Salesforce.
⚠️ Required Salesforce Permission for Tray.io Integration
Some customers are unable to authenticate with Salesforce via Tray.io because an additional Salesforce permission must be enabled in order for Tray to properly configure the connected app authentication.
To prevent authentication errors, ensure that the Salesforce user performing the Tray.io setup has the Approve Uninstalled Connected Apps permission.
This permission is required in addition to other standard Salesforce integration permissions and should be granted in your Salesforce profile or permission set before you begin the Tray.io connection process.
1. Create a new Workflow.
 2. Name your Workflow.
 3. Select the Salesforce button when choosing a Workflow initiator.
 4. Choose "Initiate from Salesforce Flow".

5. Click "Next" on the initiator overview screen.

6. Copy the provided webhook URL and paste that URL into an HTTP callout action in your Flow.
For more information on this step, refer to Salesforce's documentation.

7. To pass Custom Fields into your Workflow, define which fields the webhook should accept. Fields can be passed as any combination of query parameters, and/or as JSON in the body of a POST request. These fields can then used in Survey Invite steps, Send Email steps, or other workflow actions.

Important Information on Custom Fields
1. Custom Fields can be passed to Alchemer via POST or GET requests.
 Example GET Request
 Example POST Request
2. Field that are not configured in Alchemer, but are still passed by the external system, will be ignored.
3. The request must be in a flat key-value pair structure. Alchemer will ignore any nested objects and arrays in the JSON body.
8. OPTIONAL: As an added security measure, you also have the ability to add custom header names and values when setting up the Custom Events Workflow initiator. This ensures the Workflow only initiates when pre-specified HTTP header key/value pairs are passed in.
Upon receiving an initiation request, we verify the presence and validity of the specified header. Requests with missing or invalid headers are dropped and ignored.
If a request is invalid, we will return the following 400 error message:

Successful requests will return a 200 status code.

9. Click "Save" to complete the initiator setup.

Merge Codes
When the webhook fires, custom fields are passed to Alchemer Workflow. After configuring this initiator, you can use these fields in merge codes, logic, and other Workflow steps.
For more information on how to use these merge codes in your Workflow, check out this article.
FAQs
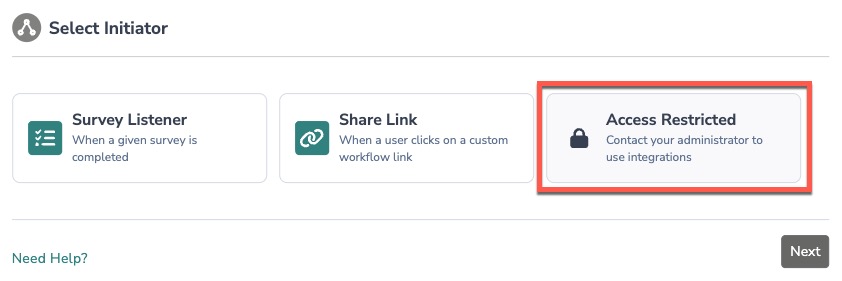
1. The Integration Manager Permission is required to set-up and use this initiator. If you don't have this permission you will see the following message when selecting an initiator:
 2. To grant this permission to someone on your team, go to the left-side product navigation and select the Account drop-down, then click on the user management tab.
3. Then select the Users tab under User Management.
4. Click your username or the username for another member of your team.
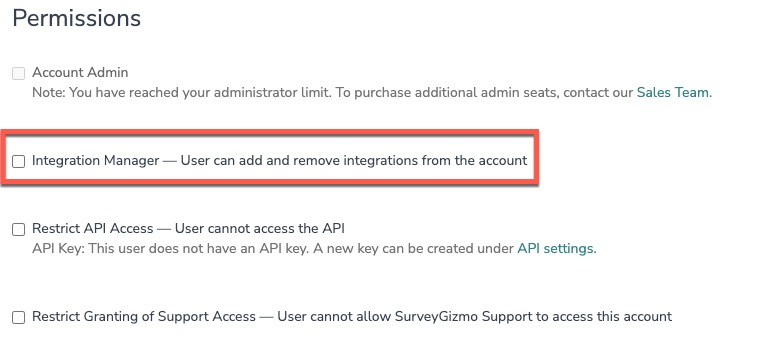
5. Scroll down to the Permissions section and check if the Integration Manager box is checked. If you are an admin you can check the box for other members of your team.

Alchemer is committed to continuously releasing updates and enhancements to our Workflow initiators. If you have specific use cases, questions, or just general feedback, we would love to hear it. Contact us here!