Most employees are familiar with the typical annual or semi-annual reviews that their supervisors routinely conduct. These reviews only involve the employee receiving feedback from a single perspective: their manager’s.
While those reviews are vital, they rarely provide feedback that leads to the professional development of the employee. Typically, a standard job review focuses on the employee’s level of success (or failure) in performing their current job duties and not much more.
360 reviews help people develop business and interpersonal skills. In particular, they focus on three key pieces of feedback:
- Identifying a starting point for the development of new skills.
- Measuring progress as the subject works on skills over time.
- Identifying the personal blind spots of behavior and the impact that everyone has but never notices.
They are a professional feedback tool designed to help anyone from a CEO to a store clerk develop and hone their professional skills. While a standard review is about the employee's job performance, a 360 review evaluates the employee themselves. That makes it very personal and very powerful; that's why we built a tool to easily conduct a 360 review using Alchemer!
Step 1: Create a Spreadsheet of all Employees
The first and the most complex step of creating a 360 Review Project in Alchemer is creating a spreadsheet for all of the employees in your organization. There are two spreadsheet formats that will be discussed below:
- Payroll Format - determines relationship by team and supervisors
- Review Format - relationships are defined in file
It's important to ensure that all of your email addresses are valid before you add them to your spreadsheet. Even one invalid email address can cause issues with your 360 Review.
Ensure that the spreadsheet does not include trailing spaces (extra spaces) before or after what exists in each cell. Trailing spaces can cause issues with accessibility to data.
You can check email address validity by first uploading your email addresses to a Alchemer Email Campaign. Any invalid email addresses will be included in the Import Log. Visit the Send Your Survey via Email documentation for instructions.
There are also a number of third party tools where you can verify the validity of email addresses, including NeverBounce and Verifalia.
Payroll Format Instructions
The spreadsheet for the Payroll Format should be set up with one row for each employee. This spreadsheet will be used in both the distribution of the 360 surveys and to establish the relationships between employees, their peers, and their supervisors.
Your Payroll Format spreadsheet must have the following columns (in the order listed below):
- Review Y/N - indicates whether the employee in that row will be reviewed
- Employee First Name
- Employee Last Name
- Employee Email
- Job Title
- Supervisor Email
- Supervisor Name
- Division
- Department
- Team
For example, let's discuss creating a spreadsheet for the below software organization:
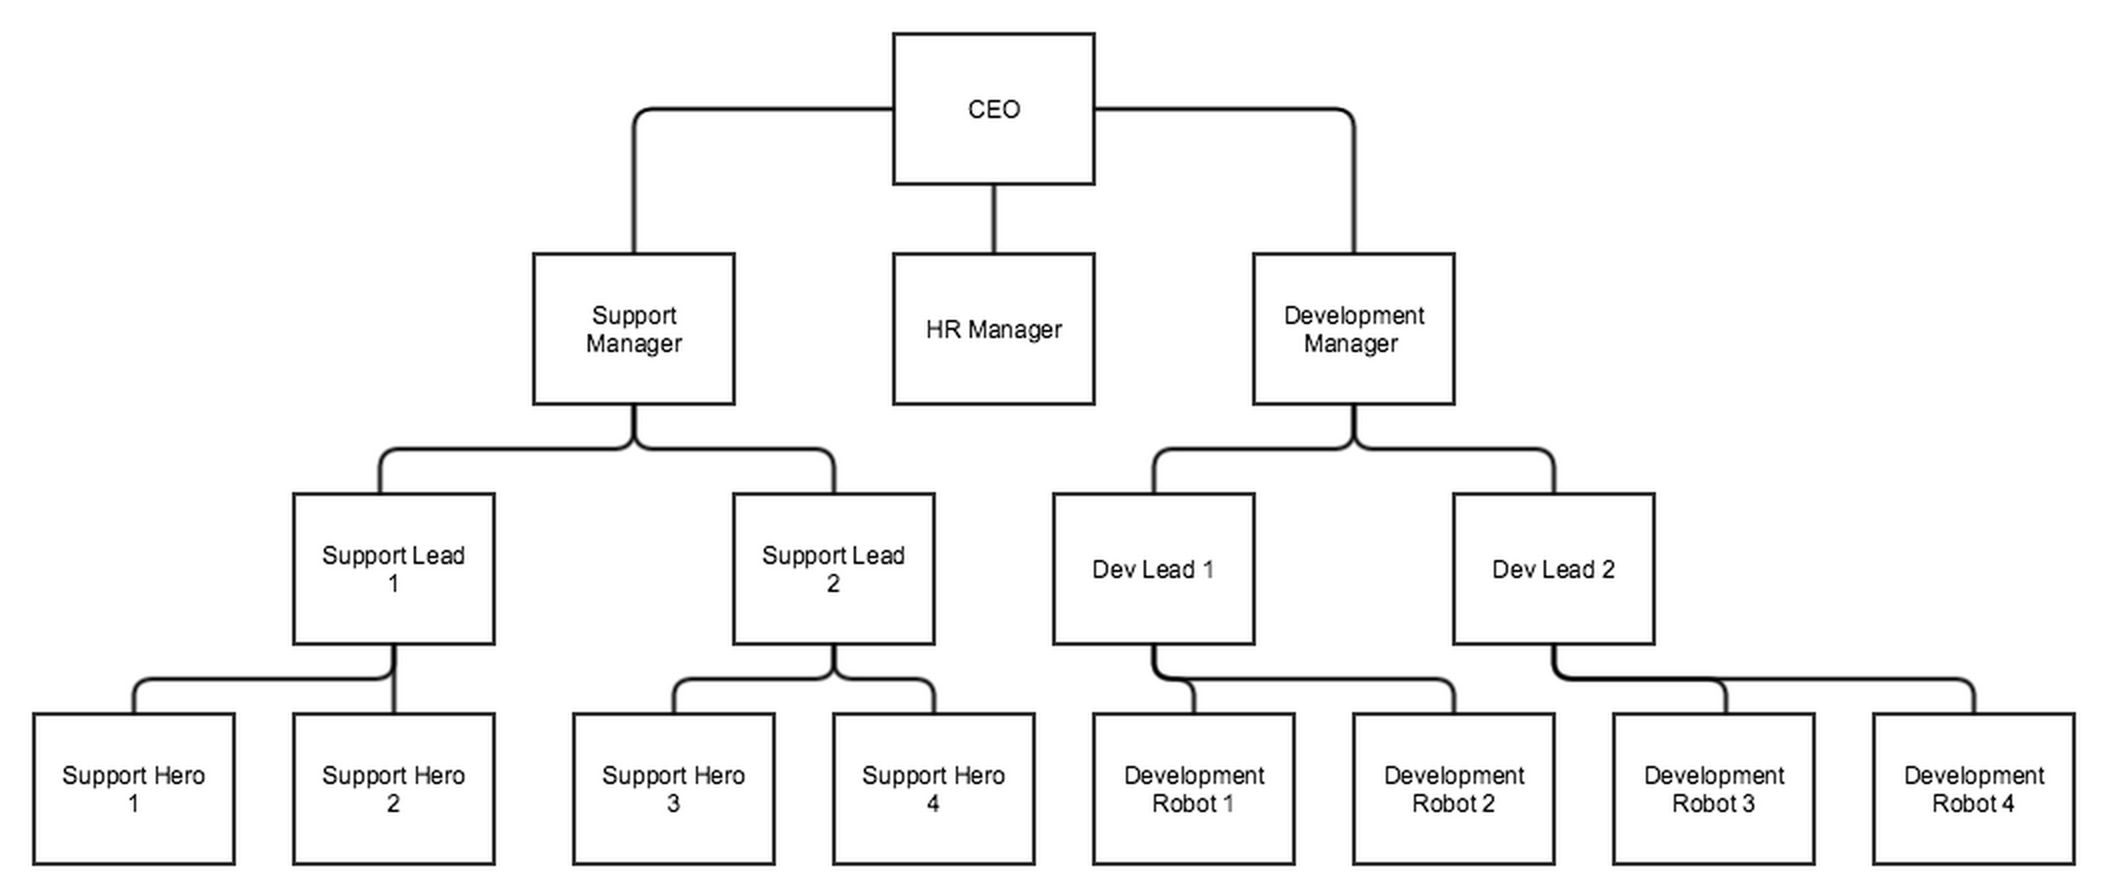
Before we start building a spreadsheet, it is important to understand our options for defining who a "peer" is as this can affect how you populate the 10 fields in your spreadsheet. Below are the options for defining a peer within the 360 review project:
- Anyone on the same Team (from spreadsheet, 'team' field)
- Anyone with the same Supervisor (from spreadsheet, 'supervisor email' field)
- Anyone with the same Supervisor and Team (from spreadsheet)
Looking at the example organization chart above, we can see how choosing option 1 versus option 2 would differ for Support Heroes and Development Robots when it comes to the peer reviews. If we wish to have all the Support Heroes review each other we would choose option 1 and make sure that the Team field is the same for all 4 Support Heroes.
Below is the resulting spreadsheet for our example organization (Payroll Format).

If you wish to see the complete Payroll Format spreadsheet for the example organization, you can download it here:
Payroll Format 360 Demo File.csv
Review Format Instructions
The spreadsheet for the Review Format should be set up with one row for each review. This spreadsheet will be used in both the distribution of the 360 surveys and to establish the relationships between employees, their peers, and their supervisors.
Your Review Format spreadsheet must have the following columns (in the order listed below):
- Reviewer Email
- Reviewer Name
- Relationship - reviewer's relationship to the person being rated - max of 5 different relationship categories - use self for self-evaluation
- Employee First Name - person being rated
- Employee Last Name
- Leader Y/N - is the person being reviewed as a leader
- Employee Email
- Job Title - Employee Job Title
- Supervisor Email - supervisor of person being rated - report will be sent to this email address
- Supervisor Name
- Division
- Department
- Team
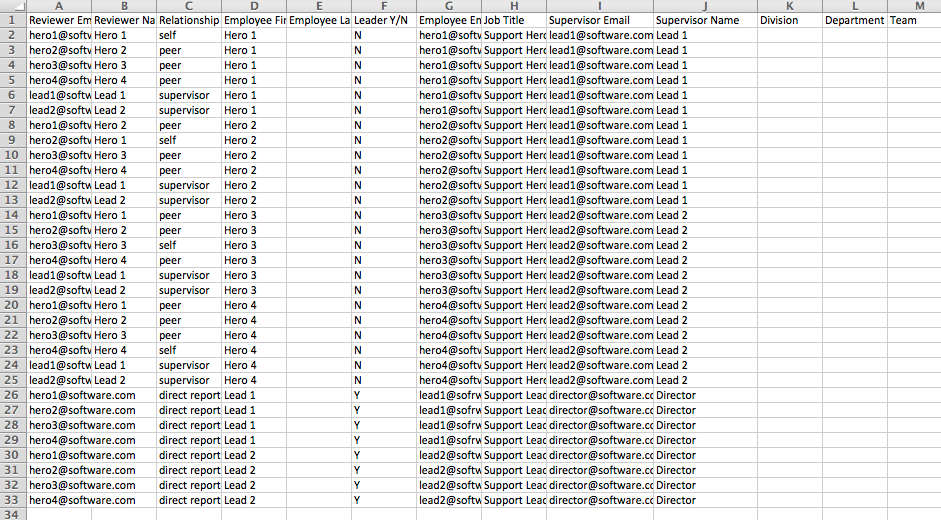
For example, let's discuss creating a spreadsheet for the below software organization (same as our above example).

In the above example, each Hero will need to rate themselves*, their peers (other Heroes), and their Leads (leads will be reviewed as leaders - indicated by the Y in the Leader Y/N column in the spreadsheet). Each Lead will rate each Hero as well. As such, each Hero will receive one self-rating, three peer ratings, and two supervisor ratings.
*If you wish to include self-evaluations for your employees, this will need to be accounted for in your spreadsheet. You will need to include a row for each employee that will be performing a self-evaluation with a status of self in the Relationship column, and the employee's email address in the Reviewer Email column.
Each lead will receive four ratings from their direct reports. Leads will be rated as Leaders (indicated with a Y in the Leader Y/N column of the spreadsheet).
Below is the resulting spreadsheet for our example organization (Review Format):
If you wish to see the complete Review Format spreadsheet for our example organization, you can download it here:
Review Format 360 Demo File
Step 2: Create a 360 Review Project in Alchemer
360 Reviews utilize a wizard-like process to create your project. While several customization options are available while creating your project, once you have elected to click the Finish > Create the Project option, you will no longer have an option to customize the survey content.
Please review your project at each step of the way to ensure that you are ready to proceed.
Now that you've got your spreadsheet ready to go, you're ready to jump into Alchemer to create your 360 Review Project.
The 360 Review Project is a Forward Only survey by default.
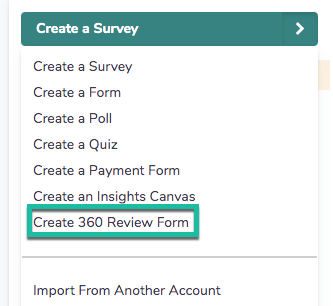
- Click the arrow to the right of Create a Survey and select Create 360 Review Form.
- Customize your Project Name; this will display at the top of the review form. You can change this later if you need to.
- Select the File Type (Payroll Format or Review Format) and upload your employee spreadsheet in CSV format.
- If using the Review Format, skip to #8.
- (Payroll Format) There are two options for Type of Review: 360 Degree or 180 Degree.
A true 360 Review includes subordinate reviews of their supervisors. If you do not wish to conduct subordinate reviews of supervisors select the 180 Degree review option. - (Payroll Format) Self-Assessments will be included by default. If you do not wish to have employees complete a self-assessment, uncheck the Self-Assessment option.
- (Payroll Format) Select the Definition of "Peer" option you wish to use:
- Anyone on the same Team (from spreadsheet, 'team' field)
- Anyone with the same Supervisor (from spreadsheet, 'supervisor email' field)
- Anyone with the same Supervisor and Team (from spreadsheet)
- (Payroll Format) Finally, customize the Language Used in the survey and invites for the words Supervisor, Peer, Employee, and Customer.
- (Optional) Change the Logo URL for your finalized reports. The Alchemer logo will be included by default.
- Click Next Step: Preview Relationships.
Previewing relationships shows only 1 peer for each category instead of the true number being displayed. During live reviews, the correct number of peers will display per category.
Step 3: Confirm Relationships
On the next page, you can confirm the relationships that were inferred based on your uploaded spreadsheet. Scroll through each Ratee and make sure that all relationships are accurate as this determines who reviews whom.
Click on the Details option to view specifics related to each Ratee. Once you have reviewed and confirmed all relationships, click Next Step: Measurement Attributes.
Step 4: Select Your Question Bank
Alchemer currently offers two options for adding questions to your 360 Review Project:
- Custom Question Bank
This option allows you to define and use your own competencies and ratings for your employees. While quite customizable, your questions are unique to your organization and thus the generated reports will not be compared to a normative database. - Copy from Past Custom 360 Survey
If you have previously created a 360 Survey using the Custom Question Bank, you can select this survey here.
Once you have chosen your question bank option, click Next Step.
Step 4a: Create Competency Label and Measurement Statements
If using your own Custom Question Bank, you will need to define each:
- Competency Label
- Each Competency Label can have up to 15 Measurement Statements.
- We strongly recommend that each Competency Label is unique! If you find that you need to have multiple labels share a category, make sure to differentiate these. For example, you might have Leadership (Part One) and Leadership (Part Two).
- the Measurement Statements corresponding to each competency label
Within each Competency, you have the option to determine which group will be presented the question. Under the Logic section, choose from:
- Ask for Leaders
- Ask for Individual Contributors
- Both
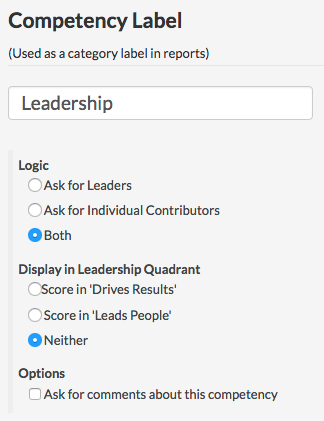
Use the Display in Leadership Quadrant section to determine whether a Competency will be scored under the Focus on Execution or Focus on People quadrants within the Two Factor Leadership Profile chart (see below). You can also choose Neither.
Finally, use the Options section to select whether to Ask for comments about this competency.
Step 4b: Define Scale Labels
Once you have created your Competencies and input your Measurement Statements, it's time to customize your Scale Labels.
- Each Measurement Statement will be scored on a 5-point scale ( 1 = Strongly Disagree to 5 = Strongly Agree).
- You can customize the labels if needed.

Important! Note that Alchemer 360 Reviews automatically include a Unable to Answer label on your survey. This label cannot be removed or customized at this point.
Step 4c: Open Text Questions
Here, you have the option to include default open-ended questions at the end of the review. Your options are:
- Yes, ask: What can employee improve? What are other afraid to tell employee? What does employee do well?
- No, do not add these questions.
After having customized your labels or settled on the defaults, click Last Step: Set Email Content.
Step 5: Customize Your Email Content
Now you're ready to customize the Email Subject, From Address, and Invitation Content for the Email Invitations that will go out to all reviewers.
You can customize to your heart's content but be sure to leave the [invite("survey link")] merge code as is, as this will automatically populate with the link to the survey!
Additionally, the [invite("custom 1")] merge code pulls in a comma-separated list of individuals that will be reviewed by the recipient of the email.
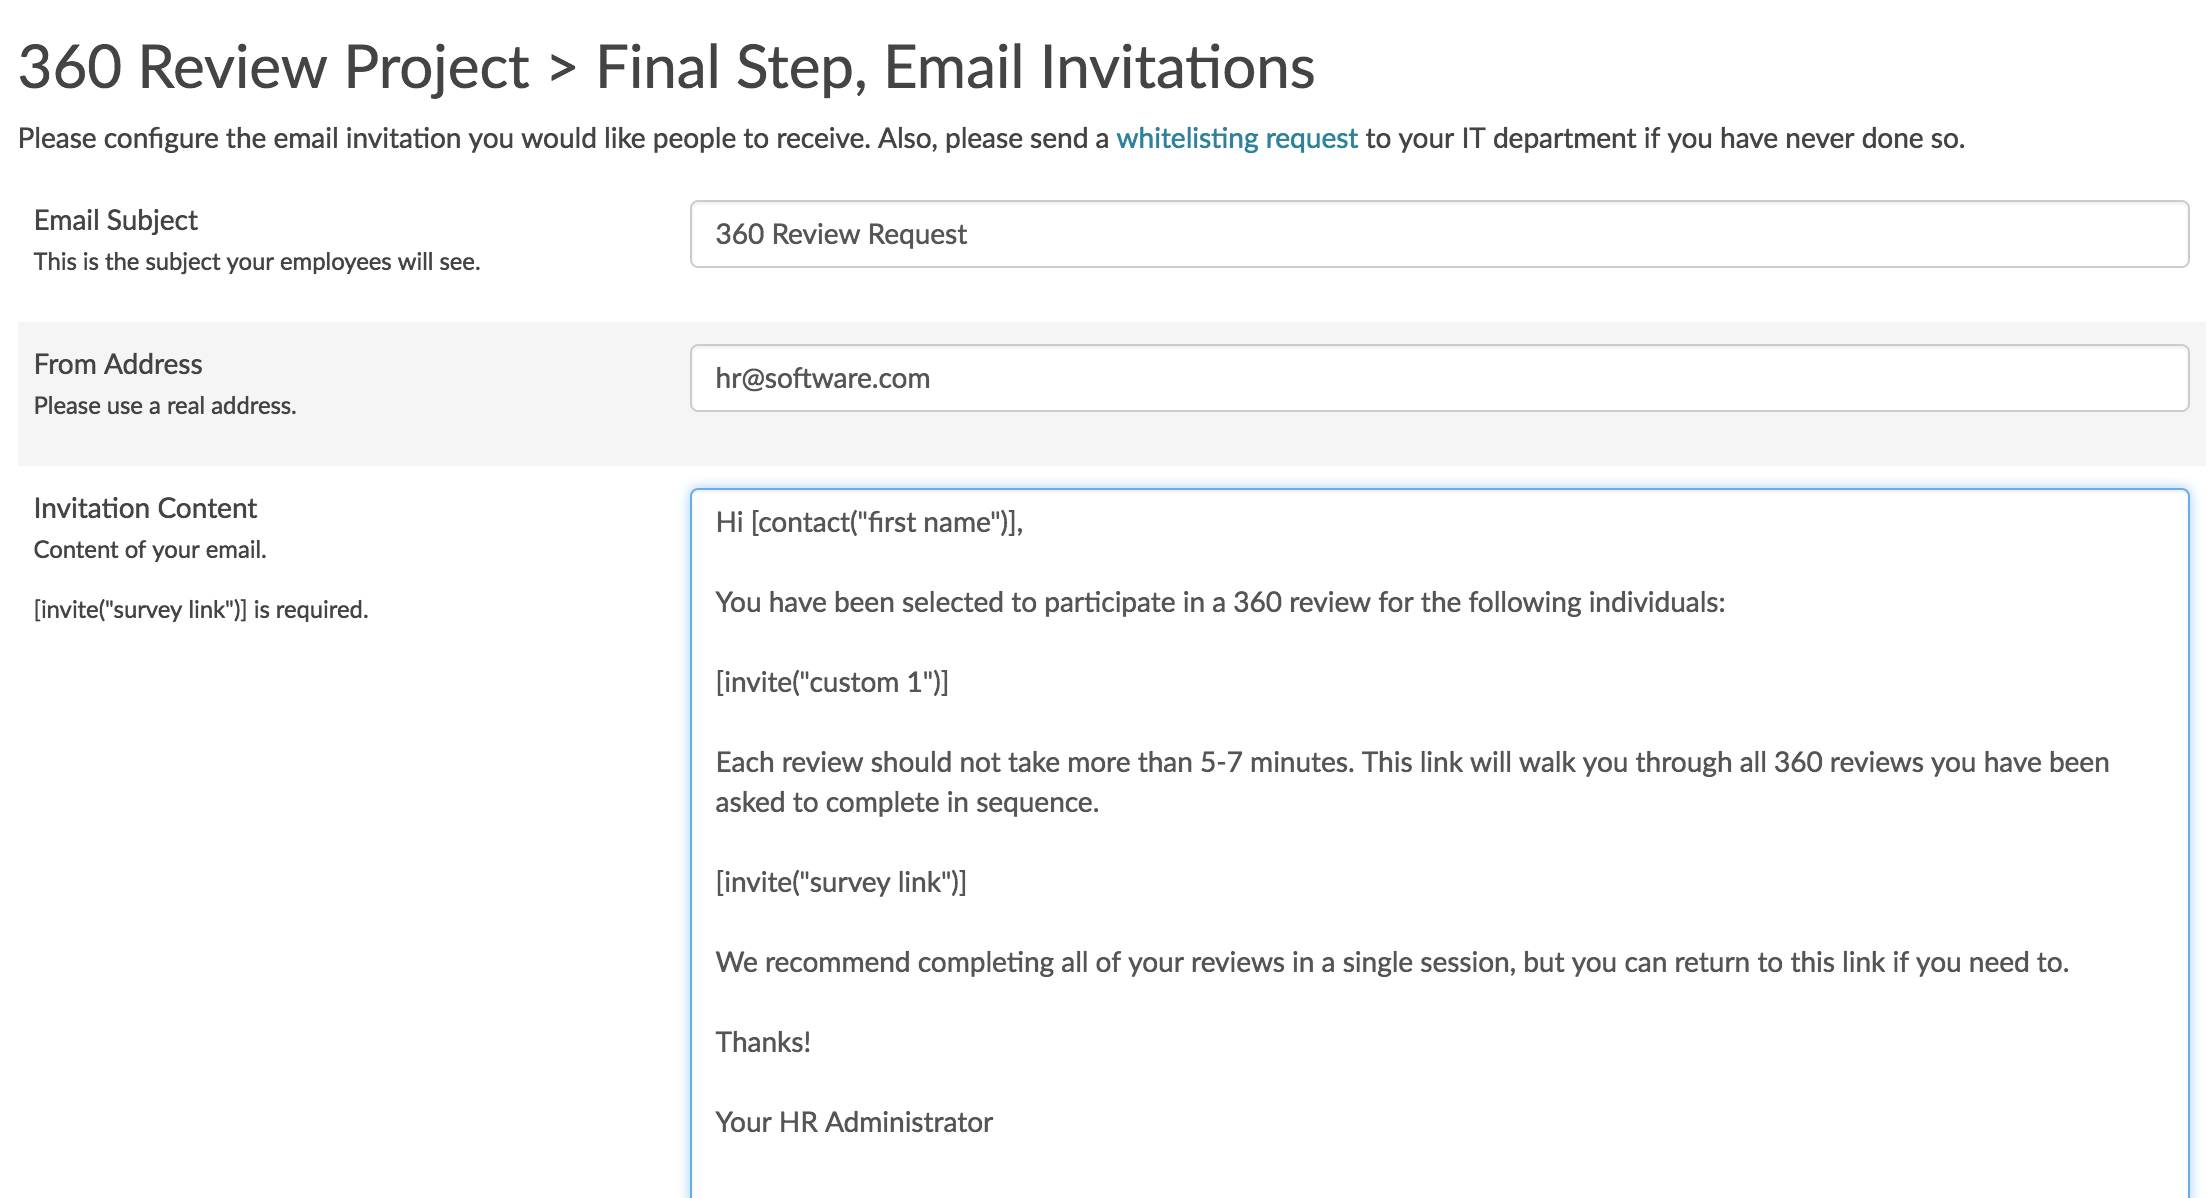
When you are finished customizing your email invitations, click the Finish > Create the Project button. Then click Go to Project.
Once you elect to click the Finish > Create the Project button, your project will be created and the content within it will no longer be available for customization. Make sure you are ready to proceed before creating the project.

Step 6 (Optional): Style Your 360 Survey
When you click the Go to Project button you will be taken to the 360 Project Home tab. Here, you can:
- Track the status/progress of your 360 Project
- Style your survey
- Send the initial invitation emails to your reviewers
- View your compiled reports.
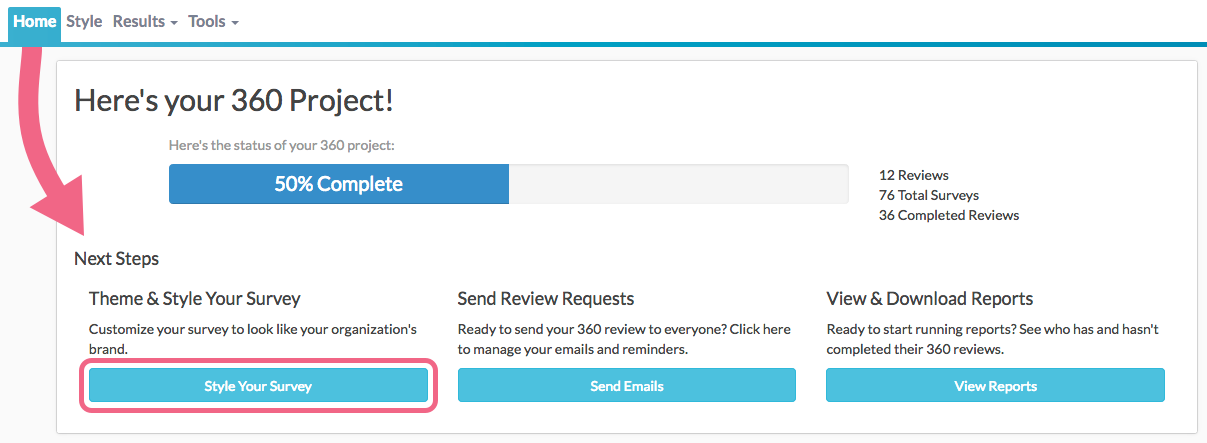
The Style tab allows you to preview what your 360 Survey will look like for reviewers. If you would like to customize the look and feel of your 360 Survey, check out our Style Your Survey Tutorial to learn how!
Step 7: Send Your 360 Survey Invitations
Now that you've customized and styled your 360 Survey, it's time to send it out! To do so, on the 360 Home page, click the Send Emails button. Here, you will have another option to customize your email content via the Campaign Designer step.
When ready to send, navigate to the Send Campaign step and click Send Now.
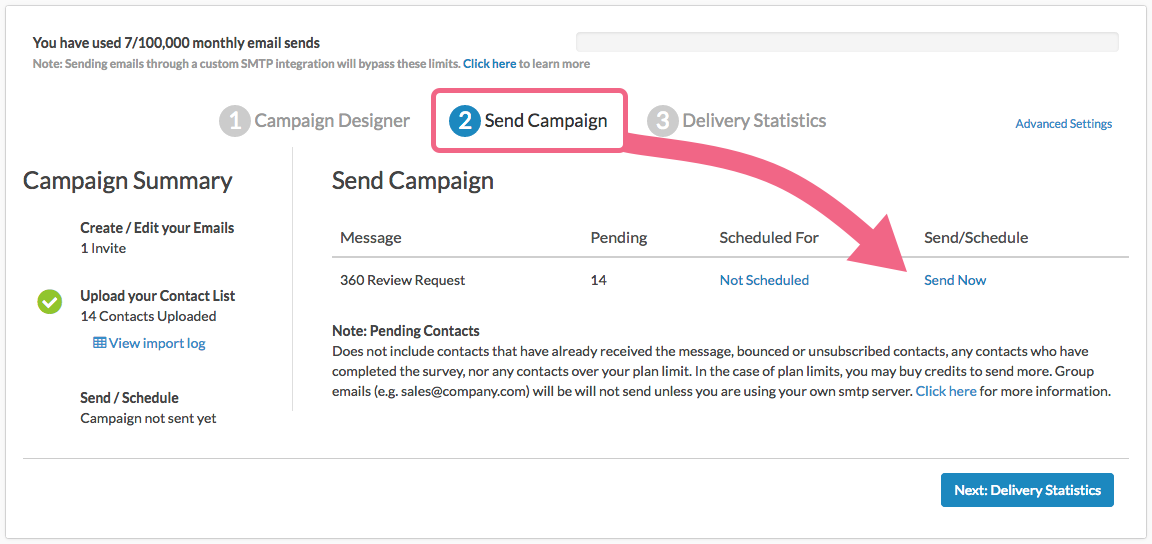
If you prefer to send your links via an email system outside of Alchemer, you can Export Contacts with Send Status from the Delivery Statistics page. This will provide you with a file that contains the unique links that will need to be sent to each reviewer.
Step 8: Review and Share Results
Once the 360 Review data starts coming in, reports will be automatically compiled for each employee. Each report will only display data for that employee.
The reports that are automatically generated for your 360 Project are not customizable. The content included in each report is explained below.
Reports for each employee can be accessed from the 360 Home page via the View Reports link or via Results > 360 Reports.
You can also access Advanced Reports where you will find reports like the Standard Report, Crosstab, Comparision Report, and the Raw Data Export.
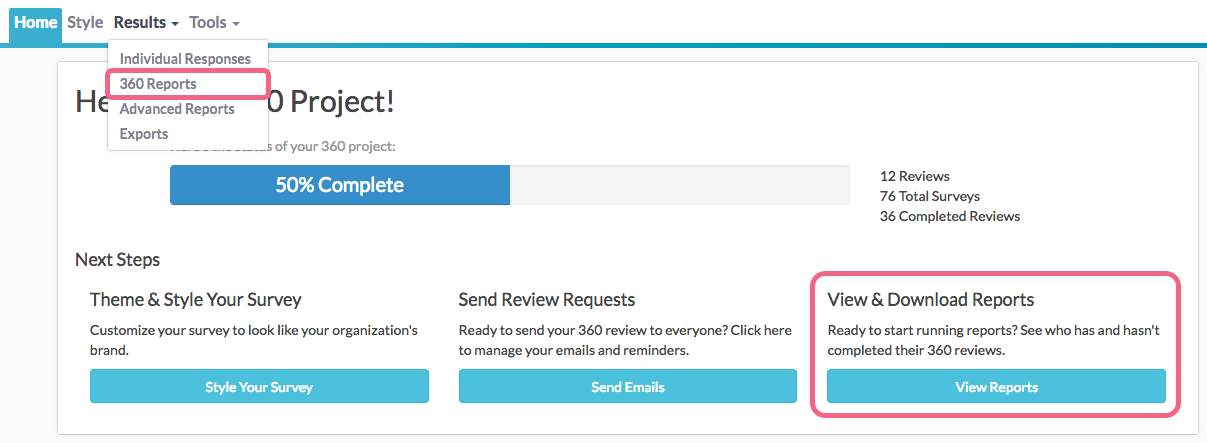
Once on the Reporting page, you can access each employee's individual report via the View Report button.
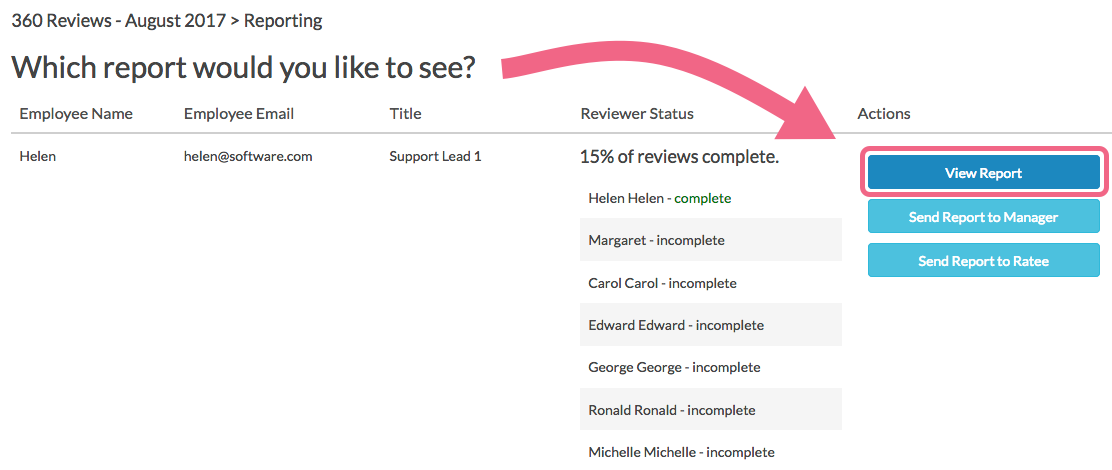
The main reporting page will display the Employee Name, Employee Email, and job Title (sourced from your original uploaded spreadsheet). You will also see the Reviewer Status (who has and has not reviewed the employee).
Here, you also have the options to send report to (email addresses sourced from your original spreadsheet):
- Send Report to Manager
- Send Report to Ratee
Clicking either of the Send options will trigger the email immediately.
Finally, the Download All Reports button (bottom of page) will output a .zip file containing all reports.
360 Reports
The report that is generated for each employee is comprised of several sections.
See a sample 360 Report.
The report will contain a cover page followed by information that will help you understand the data that is presented on the following pages.
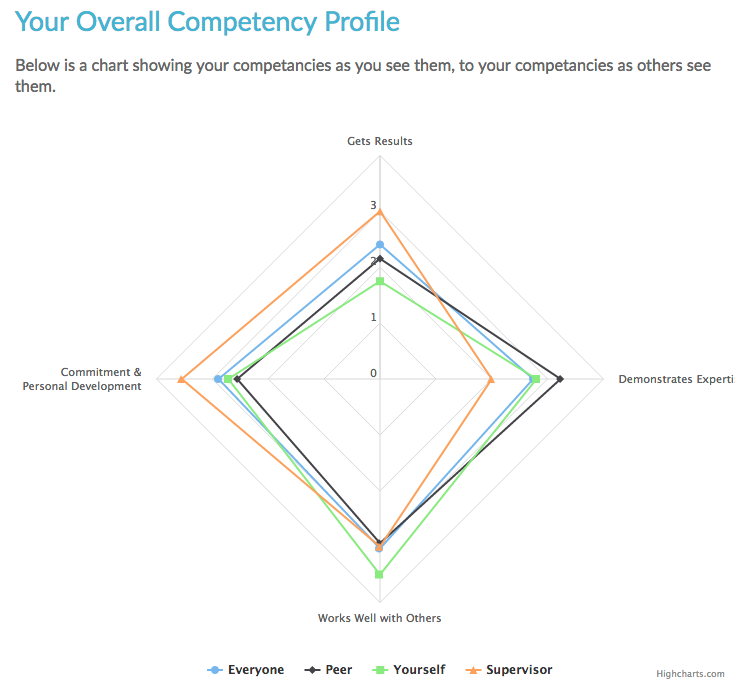
Competency Profile
The first part of the report is the employee Competency Profile (presented as a Spider Chart) - an overview that shows how the employee rated themselves across all competencies, versus how they were rated by their peers and everyone (including supervisors).
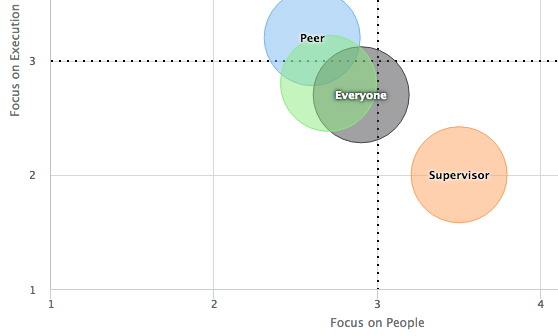
Two Factor Leadership Profile
This is a statistically derived overview of the employee's leadership style based on two primary factors of leadership: Focus on Execution and Focus on People. This chart also provides comparisons for how the employee rated themselves versus how they were rated by peers and everyone.
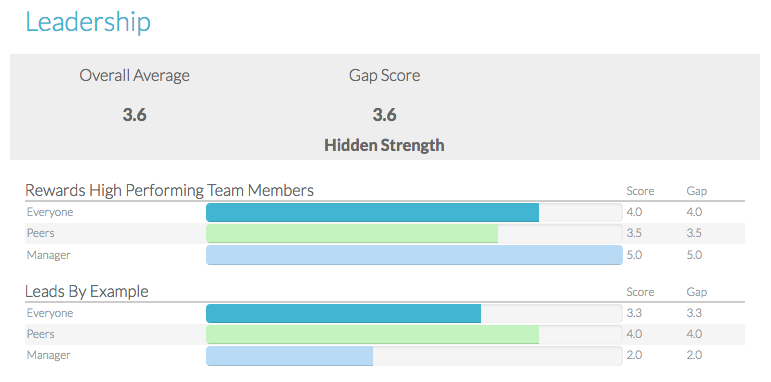
Category Scores
For each competency, the employee will be provided with the Score (average rating) for each category of raters (Self, Peers, Everyone, etc.). Items are rated on a 1-5 scale (Disagree to Agree).
The employee will also see Gap values for each category of raters (aside from Self). The gap value represents the difference between the score that the employee received from their self-assessment and the score they received from one of the rater categories.
A positive Gap value means that a category of raters provided a more positive assessment than what the employee provided in their self-assessment. A negative value means the employee rated themselves more favorably than they were rated by their peers, for example.

Competency Scores
The Category Scores are followed by detailed scores for each Measurement Statement (grouped by Competency).
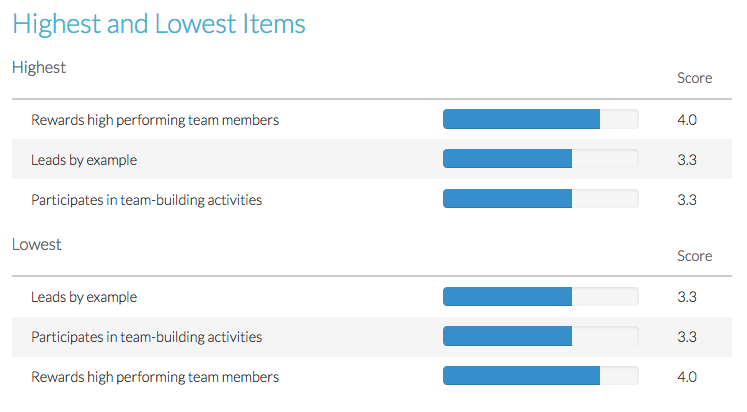
Highest and Lowest Items
The employee report highlights those Measurement Statements with the highest and lowest scores. The employee will be presented with up to 5 highest and 5 lowest scoring statements.
Written Comments
Finally, the employee will see the written comments that have been provided by their peers and superiors. Supervisor comments will be bolded.
Updating or Replacing Reviewers
If the original file that you used to create your 360 Project contained errors, or if you need to update any information prior to sending your invitations, you will need to create a new 360 Project to do so. As such, it is critical to review your file for errors prior to uploading.
FAQ
How do I copy an existing 360 Review to start a new project?
A 360 Review cannot be copied in the manner that a typical survey can; rather you can Copy from Past Custom 360 Survey while creating a new 360 Review project.
Can I edit the content of my 360 survey?
A 360 Review created using the Custom Question Bank allows for customization of the Competencies, Measurement Statements, and Scale Labels within your survey.
Important: Once you have created your project, the survey content can no longer be customized.
Can I change/edit the content of the reports that are generated for me?
The reports that are generated for 360 Reviews cannot be customized.
Will my 360 reviews be anonymous?
Yes! 360 Reviews are set up to be anonymous by default!
How do I send a link to an employee that did not receive an email?
If an employee did not receive the 360 invitation email or perhaps accidentally deleted it, you can get the employee's individual link and send it to them directly. To do so, follow these steps:
- On the 360 Project Home page, click the Send Emails button.
- Next, navigate to the Delivery Statistics step (Step 3) of the campaign.
- Click the link to Export Contacts with Send Status. This will download the Status Log file that contains the contact information for all email recipients.
- Locate the email address in question. The unique invite link associated with the contact will be located in Column H in the file. Copy this link and email it to the recipient.
Can I add an employee to a 360 survey after sending it out?
No, changes to the contact file are not permitted after creating a 360 project. If the original file that you used to create your 360 Project contained errors, or if you need to update any information prior to sending your invitations (including adding a contact), you will need to create a new 360 Project to do so. As such, it is critical to review your file for errors prior to uploading.
Can an employee have multiple supervisors?
While an employee may have multiple supervisors in, both 360 Review formats only support one supervisor per employee at this time.
Can respondents edit their entries after having submitted their surveys?
Yes! Visit our tutorial to learn about obtaining a respondent's edit link.
.sg-last-cell {
  visibility: hidden;
  position: absolute;
  z-index: -1;
}

