Option piping allows you to use the answer(s) (either those that were selected or left unselected) from a previous question as the answer options in a question on a later page. One of the limitations of option piping is that piped options are created dynamically and thus are not available to use in logic conditions to trigger later questions or pages.
Option 1: Use Answer Option Logic Instead of Piping
When you wish to base logic off piped options, the easiest solution is to not use piping at all! Instead, create your source question and piped question both with the same list of answer options. Then, in the follow-up, "piped" question set up answer option logic for each answer option such that it only displays if it was selected in a previous question!
To set up Answer Option Logic:
- Edit your question.
- Click the pencil icon to the right of the answer option you wish to set up logic on and go to the Logic tab.
- Set up the conditions for displaying this answer option under Option Logic Rule.
- First, select a question from the previous page that will be used in the IF part of the rule. In the case of a grid question, you will choose a specific row of the grid to use.
- Select the operator that will be used to evaluate the question. After you select your question, the system will apply the recommended operator for the question type you selected. For example, if the question you selected has preset answers, such as a radio button question, Alchemer will switch to the operator "is one of the following answers" along with a list of the possible answers from your selected question:
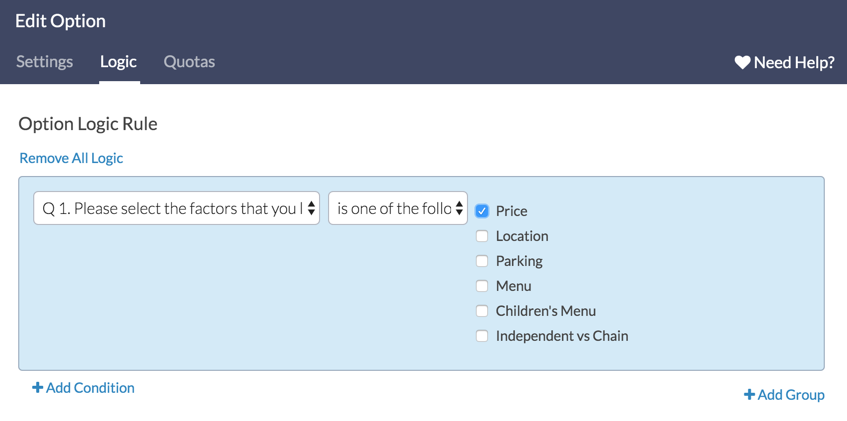
- Finally enter the value or values that are required to complete the rule. For example, the below logic rule is set up on the Price option in the follow-up "piped" question. Based on this rule the Price option will only display if price was selected in the previous question!
- Click Done and Save Question.
Because you are setting up multiple rules for each answer option, you must click Save Question and then re-edit the question to set up your next answer option logic rule, otherwise, the logic will not save.
When you are finished setting up answer option logic for each option, the result will be twofold:
- First, respondents will experience the second question just as they experience an option-piped question; that is, only the options they selected in the first question will display in the follow-up question.
- Second, the follow-up question and its options will be available in the logic menu in subsequent pages and questions!
Option 2: Set Up a Hidden Question for Use in Logic Conditions
Below is another common workaround for the logic limitation with option-piped questions.
This workaround uses advanced Alchemer features such as Piping, Merge Codes and the JavaScript Action. We recommend having a good understanding of these features before proceeding. Check out the linked tutorials below to brush up on these features!
The following Alchemer features are used in this workaround:
- Answer Option Piping
- Copy a Question
- Reorder a Question
- Default Answers
- Merge Codes
- CSS Class Names
- Question Logic
- Text/Instructions
- JavaScript Action
We will take the following steps:
- Set up answer option piping
- Copy the source question for your piping
- Move the copied question
- Use a merge code as the Default Answer in the copied question
- Add logic to follow-up questions based on the copied question
- Hide the copied question
- Add JavaScript to automatically submit the page containing the copied question (if necessary)
- Add instructional text to the page containing to copied question to alert of auto submission (if necessary)
Let's get started!
1. Set up Answer Option Piping
In our example, we have a very simple survey with a source question, a follow-up question where selected answers from the first question are piped in, and several more follow-up questions that are based on the answers selected in the question we are piping into.
The first step is to set up the option piping on our follow-up question. The answers selected in our first question will be piped into the second question so that we can ask a follow-up question using only the selected answers.
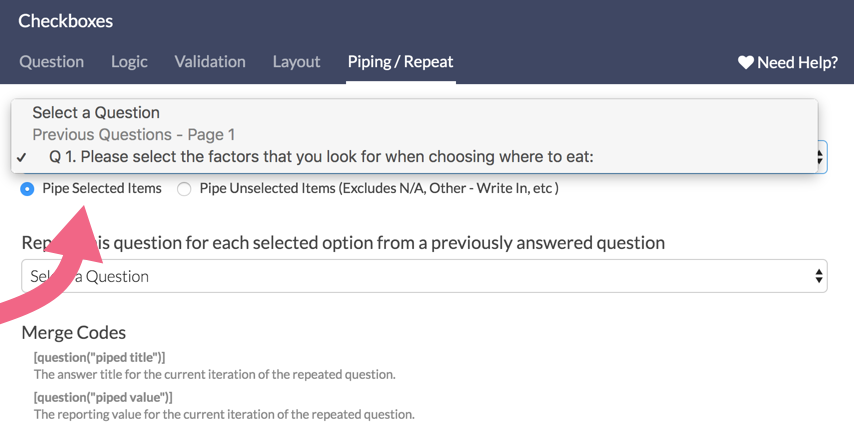
- Edit your follow-up question and click on the Piping/Repeat tab.
- Select the source question from the Pipe Into Options menu.
- When finished, Save Question.
Ok, now that we have the Option Piping configured, we are ready to proceed with the next step.
2. Copy the Source Question for your Piping
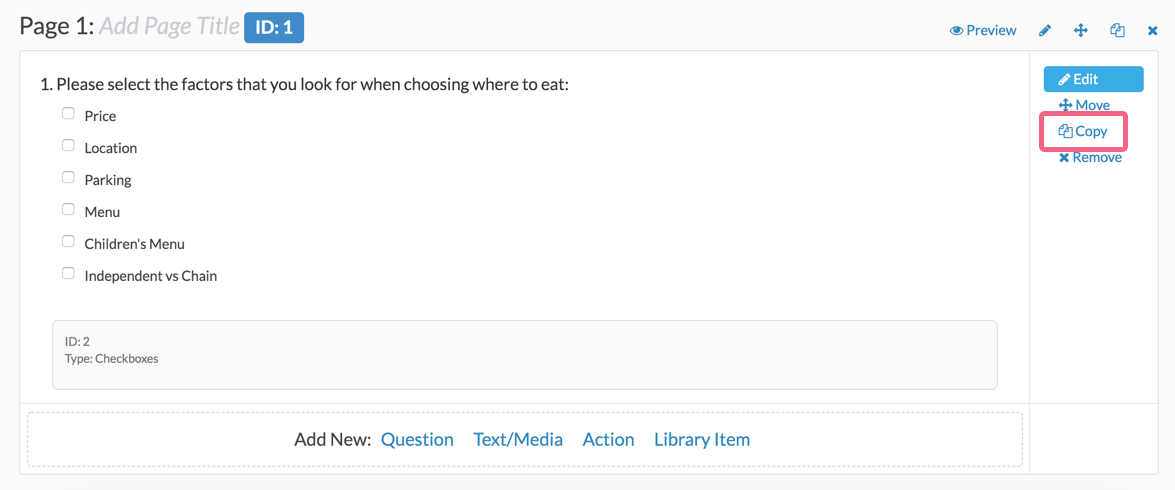
The next step is to make a copy of the question that you are piping from. In our example above, we selected Question 1 as the source of our piping. This is the question that we will now need to copy.
Now that we have a copy of our source question, we can move on to Step 3.
3. Move the Copied Question
Our next step is to move the copied question. It is important that our copied question is on a page that follows the question we are piping into. In our example, the source question is on page 1, our follow-up question is on page 2 - so we will move our copied question to page 3.

Moving right along! We are ready for the next step.
4. Use Merge Code as Default Answer for Copied Question
This is where we really get into the nitty-gritty of this workaround. We will be using the Default Answer field to pre-populate the answers in our copied question with those answers selected in our follow-up question.
Since we cannot base logic on the options from the piped follow-up question, we are automatically answering our newly copied question with the same answers selected in the piped question. This will provide us with static options that can be used for logic.
- Edit the copied/moved question and go to the Layout tab and scroll down to the Default Answer field.
- Click the Select a Merge Code link and use the merge code helper to select the follow-up question (Question 2 in our example). Click Insert and Save Question.
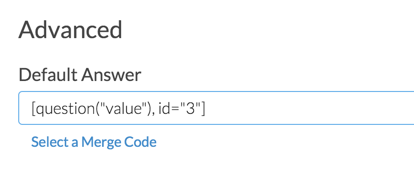
We just told Alchemer to look at Question 2 (which is ID 3); so, whatever answers are chosen in that question, find those answers in the question 3 and select them here as well.
Let's recap what we have accomplished so far:
- We are piping the answers selected in Question 1(source) into Question 2 (follow-up)
- We cannot base logic on Question 2 answers because those answers are piped in are are not available for logic set up.
- We created a copy of Question 1 (which also conveniently contains all of the possible answer options for Question 2).
- We moved the Copy so that it appears on a page after Question 2.
- Using the Default Answer field, Question 3 (the copy) we'll pre-select answers based on whatever answers are selected in Question 2
Ok! We are almost done! Next Step.
5. Add Logic to Follow-Up Questions
This is the whole reason we went through the first 4 steps.
In this example, we have several questions that follow Question 2 (our initial follow-up question). In our example, Question 1 has six possible answers - this means that up to six options can be piped into Question 2 and, as a result, any of the six options can be pre-selected in Question 3 (the copied question).
Since we will be basing logic on our copied question, we need to build logic for each option.
- Edit your first follow-up question and navigate to the Logic tab.
- Select the option to Only show this question based on answers to previous questions or other logic conditions.
- Select the copied question and the first option in the question.
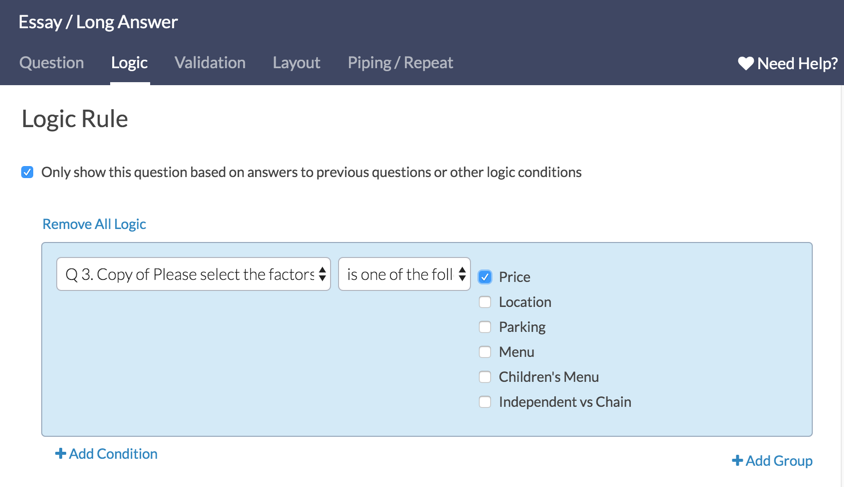
- When finished, click Save Question.
In our example we will repeat this process for each of the follow-up questions. In your case, you may not need to set up logic based on every answer option.
6. Hide the Copied Question
Since Question 3 (the copied question) is an exact replica of Question 1, we do not need to display this to our survey respondents as this would be redundant and confusing.
We will use one of Alchemer's built in CSS classes to hide the copied question.
- Edit the copied question (Question 3 in our example).
- Navigate to the Layout tab and scroll down to the last option: CSS Class Name.
- Type in
sg-hideand click Save Question.
7. Add JavaScript to Automatically Submit Page Containing Copied Question
This step may not be necessary for your use case.
Since, in our example, the copied (and now hidden) question is the only question on Page 3 of our survey, we want to make sure that we do not display a blank page to our survey respondents.
- Click Add New: Action at the bottom of the page containing the copied question.
- Select JavaScript from the Action options. Give the action a Description/Name.
- Paste the following piece of code into the JavaScript Action field and Save Action:
$(document).ready(function(){
$(".sg-button-bar").hide();
$("#sg_NextButton").click();
$("#sg_SubmitButton").click();
});
The above code will automatically click either the "Next" or "Submit" button depending on which button is present on your page to automatically advance to the next page.
8. Add Instructional Text to the Automatically Submitted Page
To make the flow of our survey cleaner, we will be adding a Text / Instruction Element to our automatically submitted page to let the respondent know that the survey is "working". Again, this may not apply to your use case.
- Click Add New: Text/Media on the automatically submitted page.
- Select the Text/Instructions option (default) and type "One moment please..." or something along those lines.
- Click Save Text/Media.
Great! We are finished with the setup! Now let's take a look at how this works step by step.
The Result
Let's take a look at how a respondent will interact with our survey and discuss what is happening behind the scenes.
Page 1
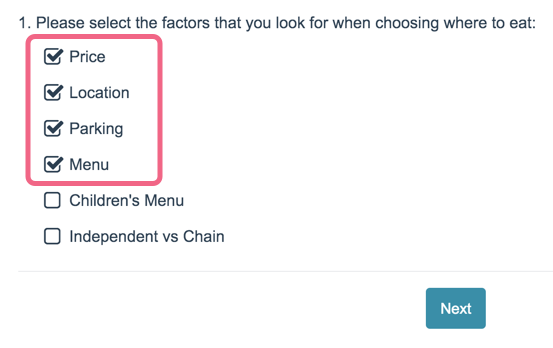
The respondent accesses our survey and answers Question 1 with the following choices: price, location, parking and menu. The respondent clicks Next to move to the next page of the survey.
Page 2
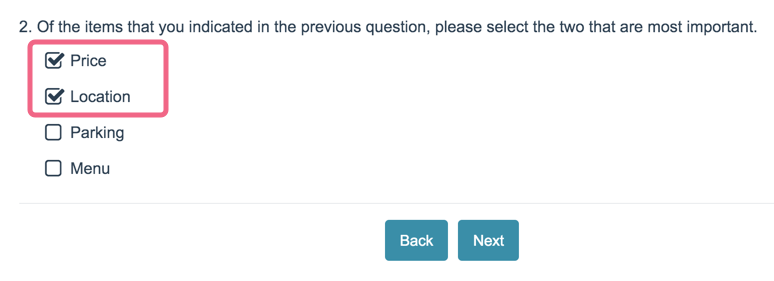
The items selected above are piped into Question 2 while the items that were not selected are omitted. The respondent then selects price and location in the follow-up question and clicks Next to move to the next survey page.
Page 3
Page 3 contains our copied/hidden question. Remember that we used the Default Answer feature to pre-select answers in our hidden question based on the answers chosen in Question 2 (price and location in this case).
Page 3 is also the page where we used the JavaScript action to auto-submit the page and where we added a piece of Instructional Text reading "One moment please...".
The respondent sees the above page for a split second. Behind the scenes our copied/hidden question is pre-populated with the answers selected in Question 2 - price and location. The auto-submit script is being executed and we jump to page 4.
Page 4
Page 4 contains several questions. We applied logic to these questions in Step 5. The logic is based on our copied/hidden question which in turn is pre-populated by the answers from Question 2 - price and location.
As a result, we only see the follow-up questions triggered by our logic conditions.
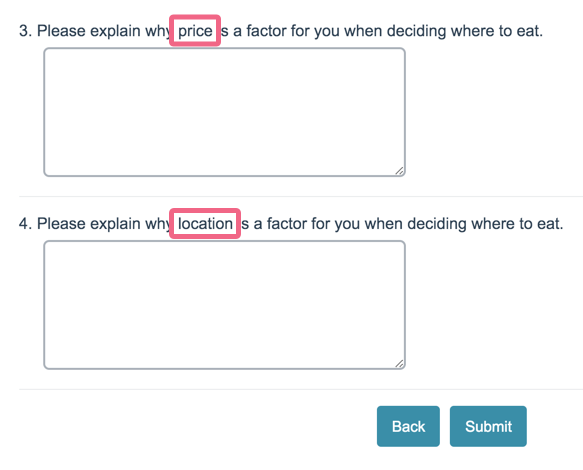
The respondent clicks Submit and they are all done with their response!
Considerations
- When using this workaround, it is critical to keep in mind that the Default Answer feature matches answers based on Reporting Values. This is why we copy our source question - so that the question using the Default Answer feature remains identical to the original question. If after copying your source question you update the reporting values on your source question - you will need to update the reporting values on the copied question to match.
- The copied question will be part of your survey's data set - feel free to remove it from your reports and exports as it is redundant.
- Test your survey thoroughly after setting this up to ensure that you are getting the desired behavior.


