Scripting and Other Custom Solutions
We’re always happy to help you debug any documented script that is used as is. That said, we do not have the resources to write scripts on demand or to debug a customized script.
If you have customization ideas that you haven't figured out how to tackle, we're happy to be a sounding board for Alchemer features and functionality ideas that might meet your needs. Beyond this, check out our Professional Services; these folks have the scripting chops to help you to achieve what you are looking for!
CSS Class Names allow you to set up a CSS Class on a specific question (or action) that you can then apply CSS to in your survey's theme settings.
More technically speaking, a class is a text string that is added to the question's outer-most div that you can then use to apply CSS to anything inside the question. With a little CSS knowledge you can take control of the way your survey is formatted on a question by question basis.
What is CSS?
CSS or Cascading Style Sheets allows you to customize the way your web page appears. It is called "cascading" style sheets because you can add as many as you'd like as long as they do not conflict with one another.
Use a CSS Class Name for:
- Removing (or adding) borders
- Changing Text Size or Color
- Hiding Elements
- Formatting Tables
- Etc...(The possibilities are endless!)
Setting Up a CSS Class Name
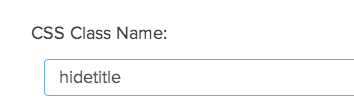
In this example, we'll be walking through how to hide a question title. First, edit the question you'd like to affect with CSS and go to the Layout tab. Enter your class name in the CSS Class Name field and click Save Question.
Your class name can be anything in plain words. If you're trying to hide your question title, you might want to call it "hidetitle" -- anything that means something to you! It's really just a reference point for the CSS in the theme to connect to.
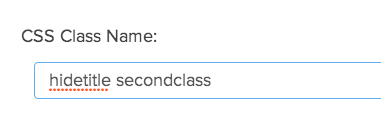
You can have multiple hooks in one question, separated by a space. So if you have two hooks, "hide" and "another hook" you'd have:
We also have some pre-built CSS hooks available for you to use.
Adding Your CSS Code
Go to the Style tab and scroll to the bottom of the survey preview and click to access to HTML/CSS Editor. Enter the CSS code you wish to apply in the field on the Custom CSS tab. Start off your CSS with your CSS class name; replace xxx with whatever class name you created.
.xxxIn this instance it would be the following:
.hidetitleFrom there, you can add the CSS you wish to apply. For this example, we're going to be hiding the question title, so we'll need to add a selector (in this case this will be the div class for question title), and declaration (to learn more, please visit: http://www.w3schools.com/css/css_syntax.asp)
.sg-question-title {display:none;}When finished, it will look like this:
.hidetitle .sg-question-title {display:none;}After you've added your CSS, click Save. Preview your survey and your question title should now be hidden.
CSS Syntax
If you're adding multiple CSS styles, be sure to end each value with a semi colon and separate your property and value with a colon.
For example:
.selector {
    property:value;
    property:value;
    property:value;
}
How To Find the CSS Selector
If you work with CSS a lot, you most likely have a web developer tool installed to find these selectors. We recommend using either FireBug (Firefox) or WebDevelopers (for Chrome or Firefox).
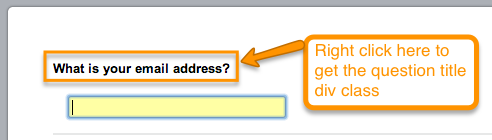
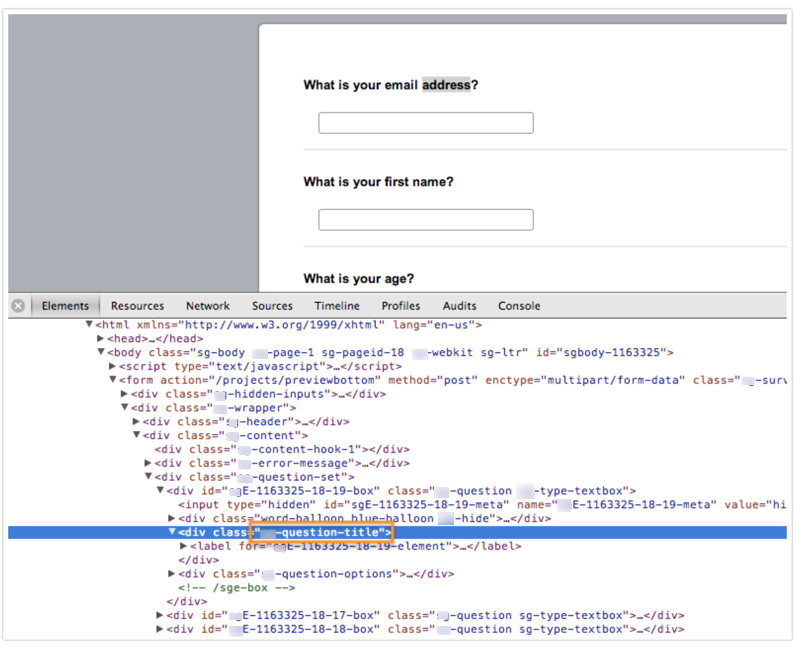
Using one of these tools, you can find the selector by previewing your survey. Next, right click the element you want to find the selector for (in this example, the Question Title), and select Inspect Element.
The div class should automatically highlight. This is how you determine what element you'll need to use as your selector. In this instance it is sg-question-title. Always make sure when creating your selector to only use a period '.' for class and a pound sign '#' for ids.
Terms and Reference Materials
w3schools CSS Guide: http://www.w3schools.com/css/default.asp.
Class: This is used to designate a style for a group of elements. (To learn more, see: https://www.w3schools.com/cssref/sel_class.asp).
ID: This is used to designate a style for just a single element on your site. (To learn more, please see: https://www.w3schools.com/cssref/sel_id.asp).
Selector: This is the HTML element that you're looking to style. This is generally a class or id.
Declaration: This is what defines the styles you're applying. It consists of a property and a value in the following format: {property:value;}
Property: This is similar to an HTML tag, it is what defines how the styles in your CSS should look to the web.
Value: This section defines what you'd like the property to do. So for example, if you are trying to change a color (property) to red, you'd indicate: {color:red;}