Incentives can be a great way to attract respondents to take your survey, but often cannot be given to every survey respondent. Alchemer's quota features allow you to control which respondents receive your incentive.
While typically quotas are used to ensure that your survey collects a specific amount of responses (and no more), Alchemer's advanced quota controls provide added flexibility when working with quotas. Here, we will explore using quotas to offer incentives to a limited amount of respondents.
Setup Your Quota
In our scenario, we want to offer an incentive (in the form of a coupon code) to the first 100 complete survey respondents, but we also do not want to cap our survey at a specific response count.
1. Access your survey's quota controls via Tools > Quotas.
2. Click the Create Quota button and select Overall Quota. This process can be applied to a Logic Quota as well (if you want to incentivize respondents who answer a question in a specific way).

3. Set the quota Limit equal to the amount of incentives that you are offering (100 in our example).
4. Important! Within the Quota Complete section, make sure to select Continue collecting responses. This will ensure that once the first 100 respondents have completed your survey (and were offered your incentive), any additional respondents will be allowed in (though will not be offered an incentive).

5. Make sure to Save Quota once you have finished the above steps.
Configure Quota Based Logic
Now that your quota has been configured, the next step is ensuring that only eligible respondents are presented with your incentive. In our example, we want to present a coupon code to the first 100 complete responses.
As such, we have added a Text Element with our coupon code to our survey's Thank You Page. Placing our coupon code on the Thank You page ensures that only those respondents who complete the survey can see it. Once you have added your incentive to your survey, you are ready to configure the quota based logic.
1. Access your survey's Build tab and navigate to the survey element that contains your incentive. In our example, we navigate to the text element that we have added to our Thank You page.
2. Edit the element that contains your incentive and click on the Logic tab.

3. Select the Only show this element based on answers to previous questions or other logic conditions option to enable the logic builder.
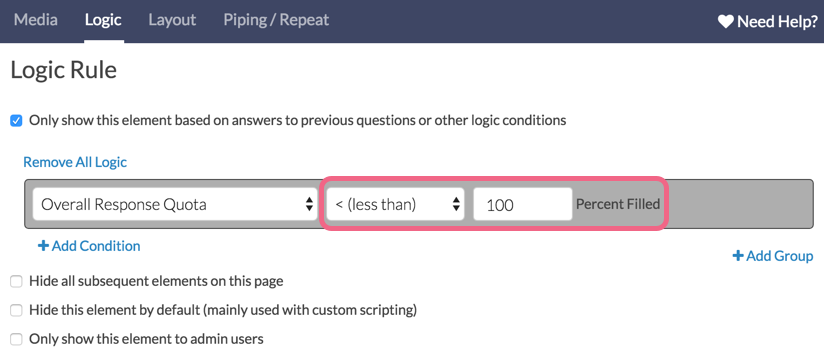
4. Click the Select a Condition drop-down menu and locate the Quotas section. Select the quota that you set up in the first section of this article. For our example, we will select Overall Response Quota.
5. Finish setting up the condition that will determine when your incentive is displayed. For our example, we want to show the Text Element that contains our coupon code to every respondent before our quota of 100 is 100% filled.
Our resulting logic condition reads:
Show Text Element if Overall Response Quota is less than 100% filled

6. Make sure to Save your text element once you have configured you logic rule.
Now that our logic rule is configured, the Text Element that contains our coupon code will show as long as the Overall Response Quota is not 100% filled. Once the first 100 respondents complete our survey, the Text Element will no longer show because our logic condition will not evaluate as true.
The survey will continue to collect responses in excess of 100 but no more respondents will be shown the coupon code.