The Microsoft Teams Integration is available to enterprise customers. If you are interested in this integration, please contact us for more information!

The Microsoft Teams integration allows you to send data from your Alchemer surveys to Microsoft Teams channels.
It sends real-time, customized messages to those that can take action or conduct analysis — accelerating your time to action on feedback and preventing valuable data from slipping through the cracks.
You can also add card actions, which allow message recipients to take action directly from the message — making it easier to collaborate on the build, test new projects before launch, and monitor project progress.
Overview
Before we dive into the finer details of this integration, let's take a high-level look at what you're building. Inside the survey builder, you'll add an action to the survey. This action will have customizable components that trigger a message to send to specified people when the designated criteria are met.
This article will show the steps taken to build this exact NPS® Response message.

You can see this message contains:
- A custom image
- A Message Title & Subtitle
- A Message Body with relevant survey data
- Actions to take related to the data
The remainder of this article will go through step-by-step instructions on how to effectively setup and use this feature. Use the In This Article menu at the top right to skip to the sections most relevant to you.
Add A Microsoft Teams Action
Microsoft Teams and Alchemer are integrated via Webhook. To establish this integration, you'll need to generate a Webhook URL through Microsoft Teams. Before building the action, we recommend grabbing the Webhook URL from the Teams channel you'd like to send the message to. Follow Microsoft Team's documentation on how to generate this URL.
Now that you have your Webhook URL, lets build the Microsoft Teams Action.
- On the survey page where you want to add the action, click Add New Action.
Note that this action cannot be added to the first page in a survey. Microsoft Teams actions are set up based on data collected within previous pages.
We recommend that you add this action to your survey after you are finished with the survey build. Make sure that you add the action on a page after the last question you want to pull data from.
2. Locate the Microsoft Teams Action in the Integrations section and click the corresponding + Add button. If the Integration has not yet been purchased, you'll see a lock icon next to the add option in the integrations list.
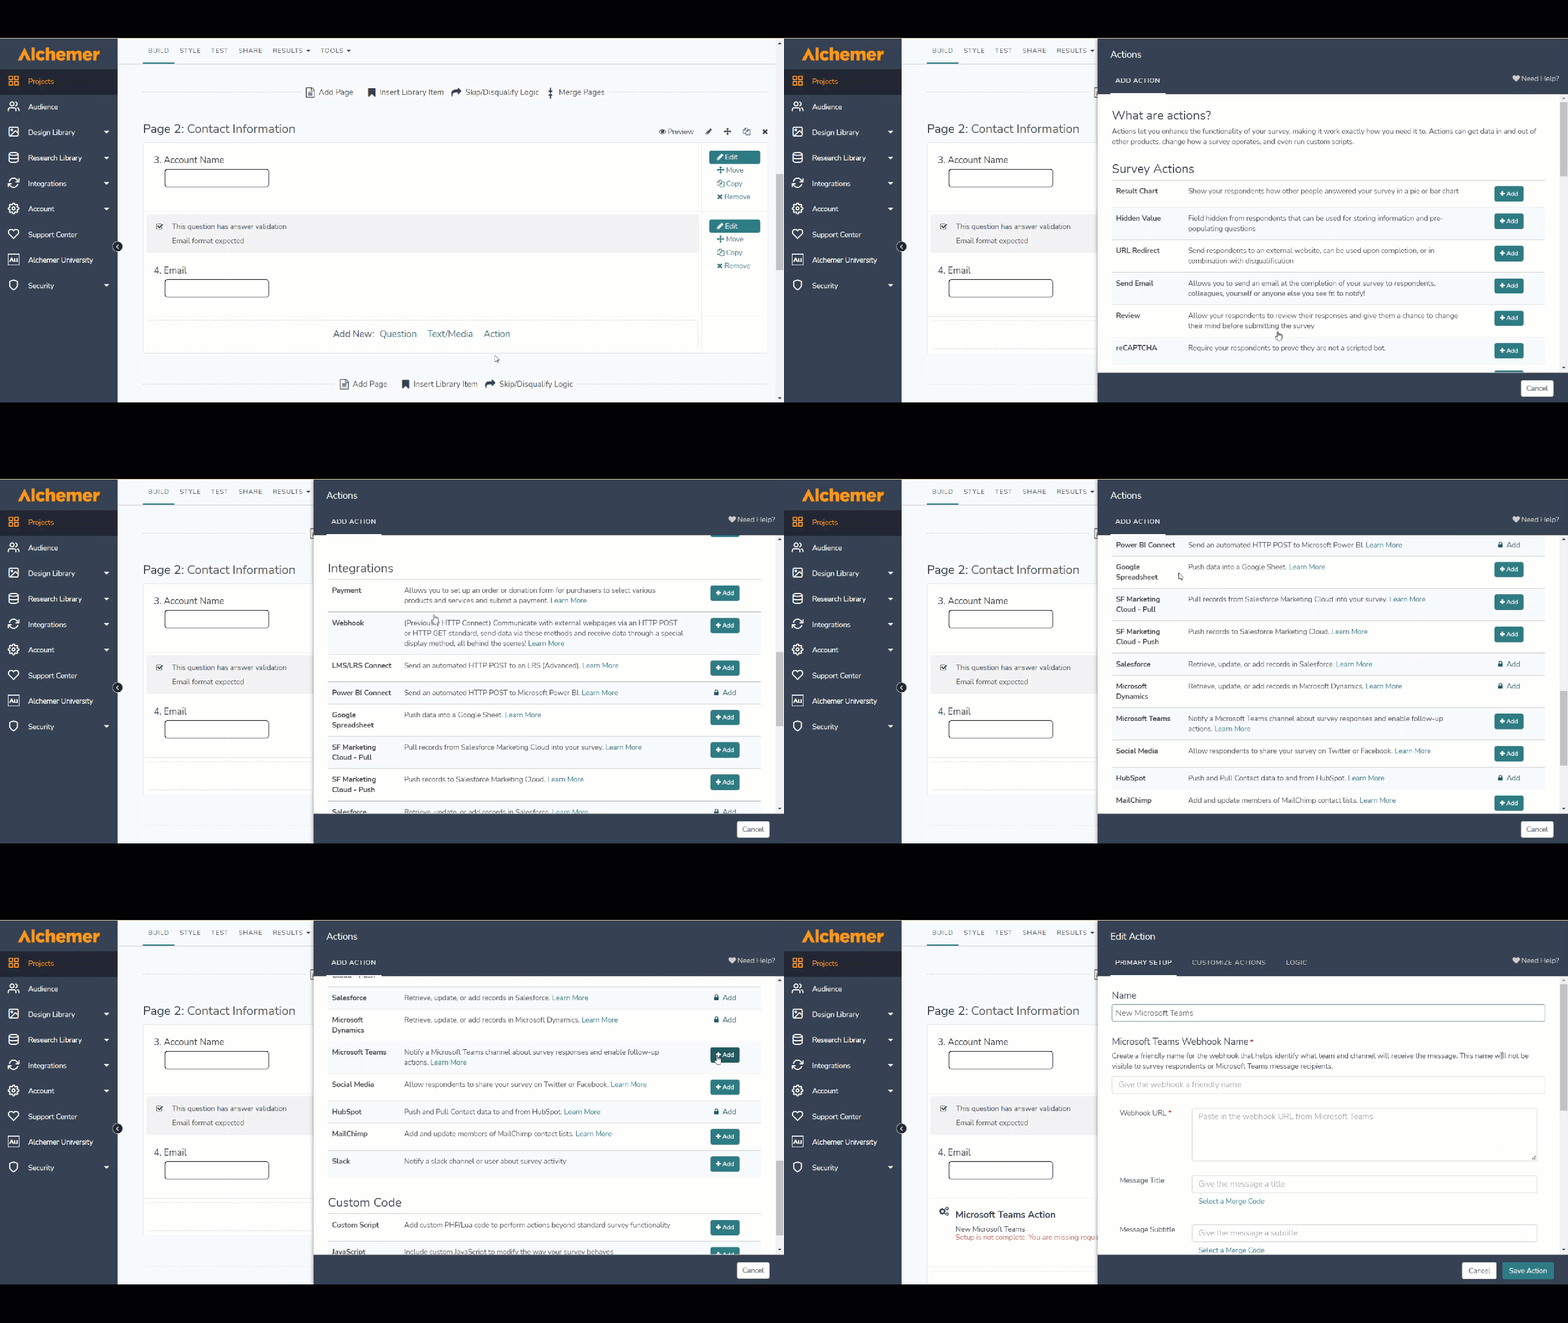
3. Once you add the action to your survey, the editor will open up.
4. The first page within the editor is Primary Setup. This is where you configure where and when to send the message, and what it will say.
In this example, we are configuring data from a customer feedback survey to route to the Support Team in their NPS Feedback channel.
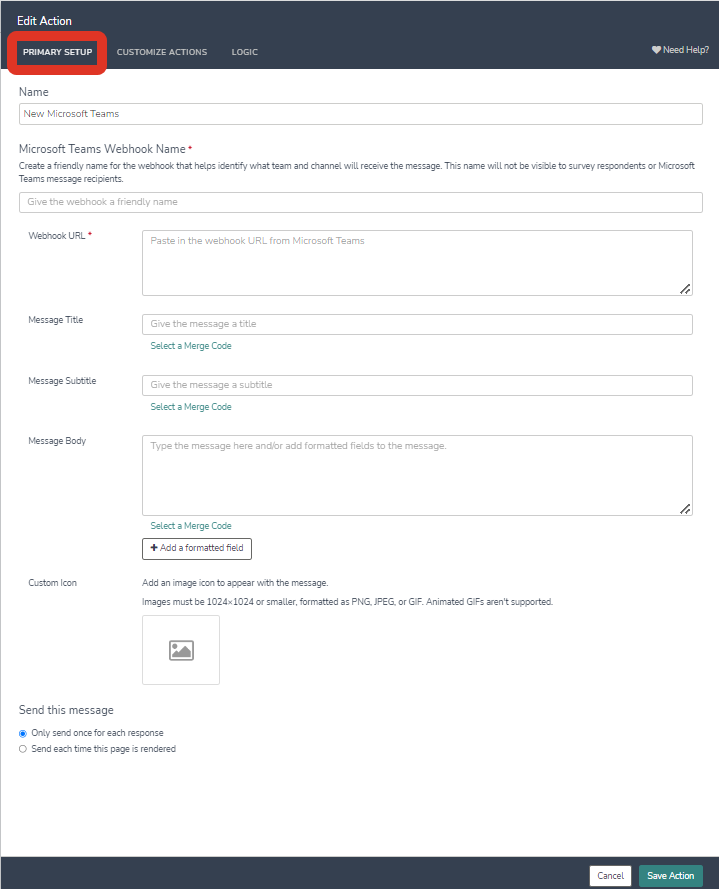
Name
This is where you name the action. This name is internal, and displays within the survey builder as well as in the individual response data. Enter a name that helps identify the purpose of this action. The action name will default to New Microsoft Teams if you do not enter a name.

Microsoft Teams Webhook Name
Next, create a friendly name for the webhook that helps identify what team and channel will receive the message. The name will not be visible to survey respondents or Microsoft Teams message recipients. This step is required in order to set up the action.

Webhook URL
After you've named the webhook, you'll paste the URL that was generated during the integration setup in Microsoft Teams. This URL directs where the Microsoft Teams message will send. This step is required in order to set up the action.

Message Title, Subtitle, and Body
After the integration is named and configured, you'll customize your message content. This information is what sends to the Microsoft Team Channel when the action is fired.
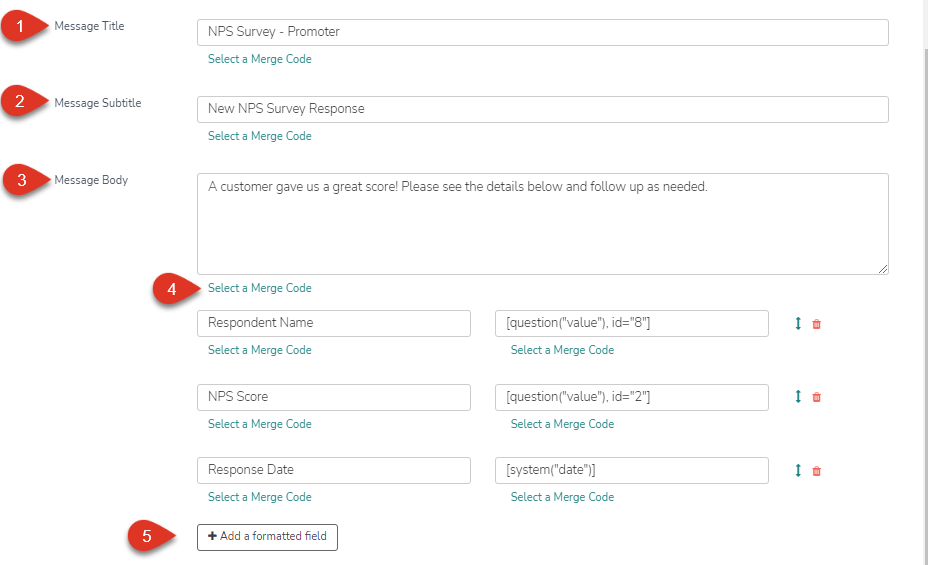
- Add a Message Title to clearly identify the contents of the message.
- Add a Message Subtitle for your message. This often describes the specific purpose of the message, such as a New Survey Response.
- Edit the Message Body to include any information or data from the survey that you would like to send.
Merge Codes can be used in any open text field within this action to populate messages with data collected from within the survey.
4. Add formatted fields. Rather than showing up in the message body, these fields will be organized below the message in an easy to read list. You can add up to 10 formatted fields per message. Once you create the fields, you can use the arrows next to the field to re-order, or click the trash can to delete.
In the example message, we added 4 formatted fields: Respondent Name, NPS Score, Response Date, and NPS Comment. In the screenshot above, you can see 3 of these added to the message.
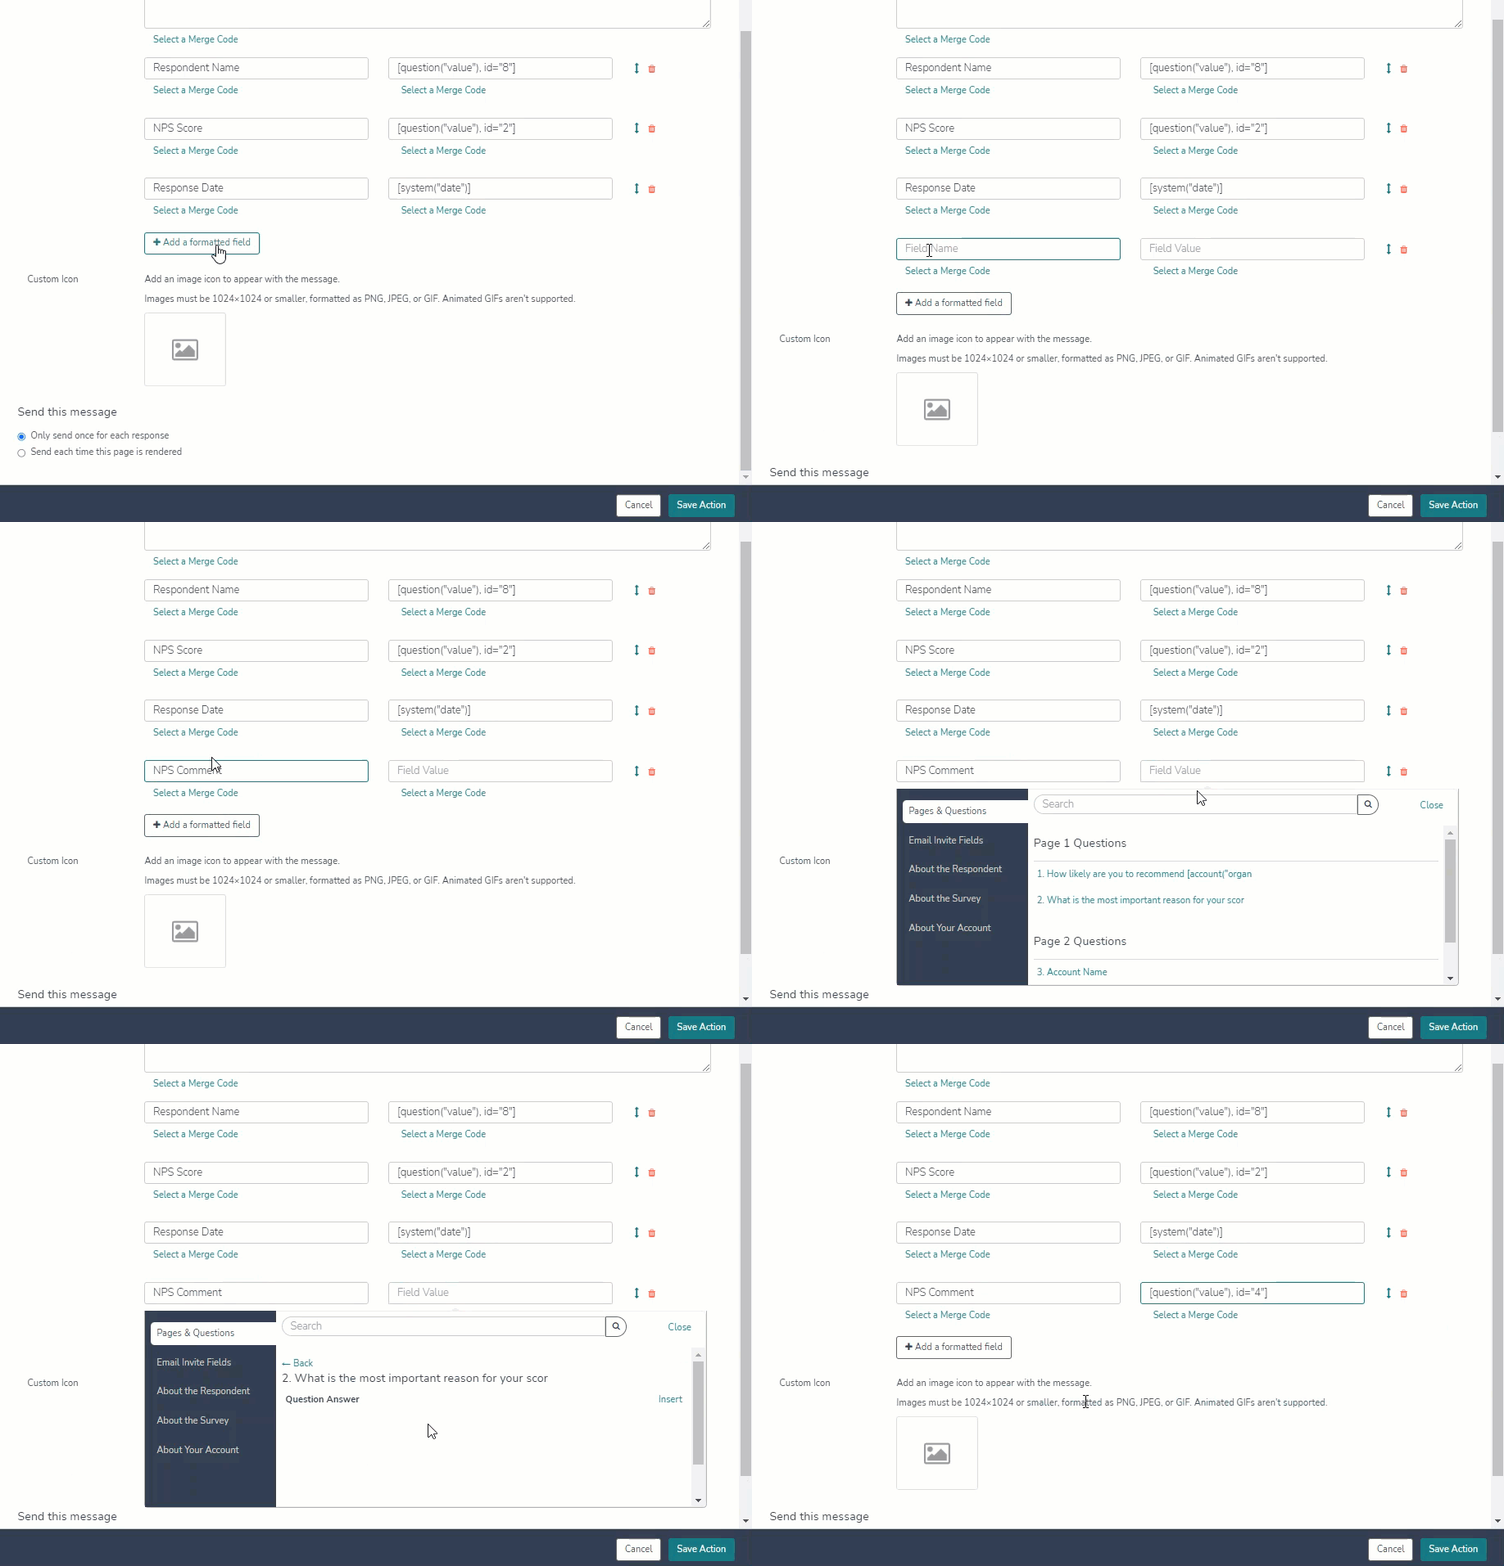
To add a new field, click Add formatted field. Then enter your desired title Field Name and Field Value. You have the option to Select a Merge Code to populate survey data into either field. Once completed, you'll see the new formatted field within the editor.
In this example, We'll add the formatted field for NPS Comments.
When crafting your Message Title, Subtitle, Body, and formatted fields, keep in mind the following character limits:
| Field | Constraint |
| Message title character count | Less than or equal to 500 after the translation of merge codes |
| Message subtitle character count | Less than or equal to 500 after the translation of merge codes |
| Message body character count | Less than or equal to 500 after the translation of merge codes |
| Formatted field name character count | Less than or equal to 500 after the translation of merge codes |
| Formatted field value character count | Less than or equal to 500 after the translation of merge codes |
Custom Icon
You can add an image or icon to appear with the message. Images must be 1024x1024 or smaller, and formatted as PNG, JPEG, or GIF. Animated GIFs aren't supported.
Click on the add image icon to add your image.

You can upload a new image, or select an existing image from your library. If you're uploading a new image, once it's uploaded, you'll need to select it from the library to add it to your message. Once you've selected the image, click Insert Image to add it to your message. You'll then see the image has successfully been added.
![]()
To remove the image, click the existing image and then select No Image to remove it. To change your image, click the existing image, and select or upload your desired image.
Send This Message
Finally, you can chose how many times the action is fired per response. 
- Only send once for each response - this will send the message once for each survey respondent (assuming that the respondent reaches the page that the action has been added to).
- Send each time this page is rendered - this will send the message each time a respondent visits the survey page that contains the action. If the respondent navigates back through the survey, and forward again, the action will trigger again.
Customize Actions
The second tab within the editor is Customize Actions. Microsoft Teams card actions allow the message recipient to directly interact with and take action on the survey data once they receive the message.
You can add up to five card actions to a Microsoft Teams message. These actions will display as clickable buttons within the message. Once five card actions have been added to a Microsoft Teams message, the option to add more will be disabled.
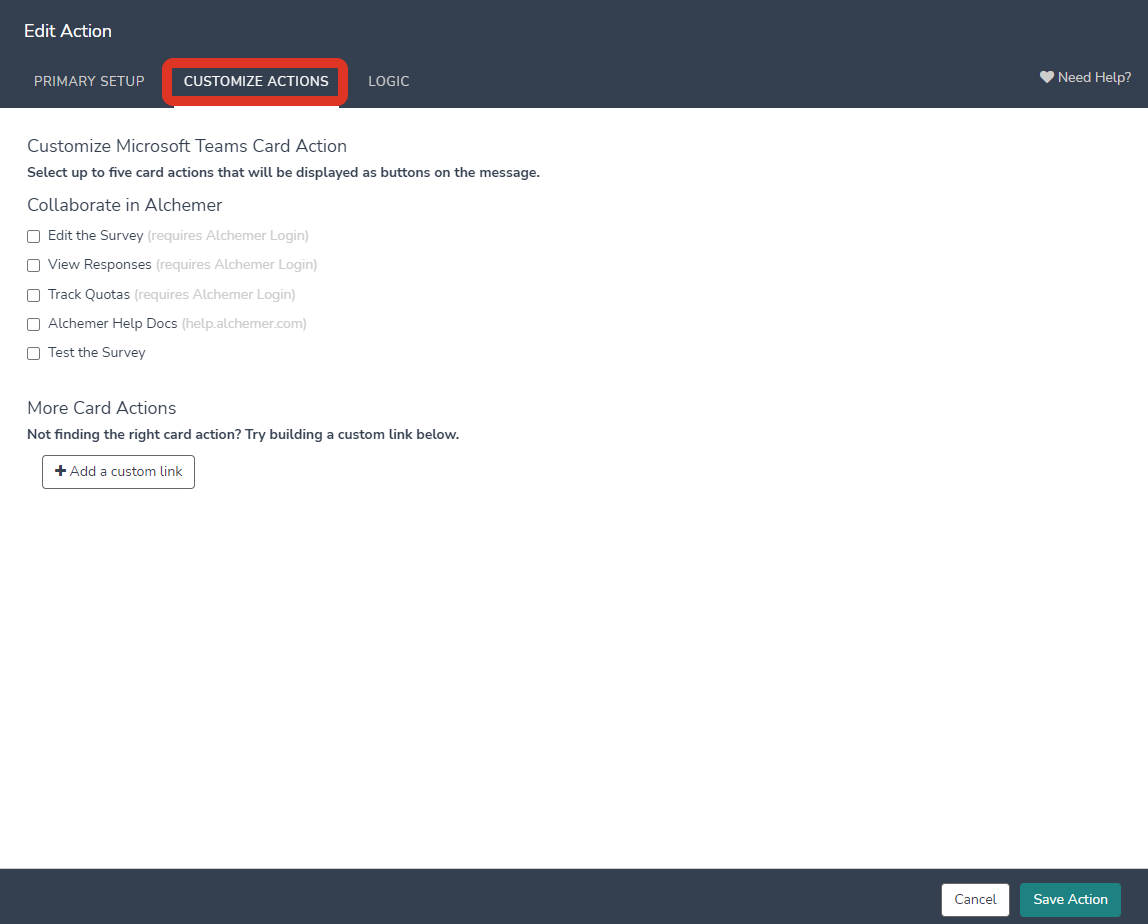
Collaborate in Alchemer
These card actions allow you to easily access Alchemer functionality directly from the teams message. Available card actions include:

Message recipients are required to have an Alchemer login and assigned permissions to access the survey and perform any card actions where "Requires Alchemer Login" is indicated. Make sure all message recipients have the appropriate permissions assigned before sending messages with these card actions.
- Edit the survey
- This action links the message recipient to the survey builder, allowing them to edit the survey. After clicking this action, message recipients will be prompted to log in to their Alchemer account, then will be taken directly to the build page of the survey.
- Requires an Alchemer login and survey access.
- View responses
- This action links the message recipient to the individual responses page of the survey so they can view the data for each response.
- Requires an Alchemer login and survey access.
- Track quotas
- This action links the message recipient to the survey Quotas page under Tools so they can monitor progress on set quotas.
- Requires an Alchemer login and survey access.
- Alchemer Help Docs
- This action links message recipients to Alchemer's Help Documentation site, help.alchemer.com
- This action does not require an Alchemer login.
- Test the survey
- This action links the message recipient to a test link for the survey, allowing to test and comment on the survey.
- This action does not require an Alchemer login.
To add these card actions to your message, click the check box next to the desired Microsoft Teams card action.
More Card Actions
Here, you'll be able to add custom links to your teams message. You can configure up to 30 custom links per individual Action. Custom links configured within one Microsoft Teams Action will not persist across multiple actions.
To add a custom link
- Click +Add a custom link
- Provide a card action name that describes the purpose of the link.
- Enter the URL that the card action will lead to.
- Check the box next to the custom link to add it to your message.

When adding a custom link, the URL specified must contain the scheme http:// or https://
In addition, you can use merge codes within the URL to populate it with previously collected survey data. Learn more about how to use merge codes to configure a custom link suited to your unique needs.
This is particularly useful if you are collecting individual identifiers or account IDs within your survey, as you can populate them within URLs so that the links lead directly to the respondents account.
In this example, the survey was previously set up with a Salesforce Pull Action to populate the customers Salesforce ID into the survey data. A URL Variable merge code was then used to append the customers Salesforce ID to the URL. When creating your custom links, be sure to check and make sure that the merge code selected populates the correct data into the appropriate place within the URL so that the link leads where it's intended to.
Save Action
Once you've finished customizing your message, click Save Action.
You'll see the action within the survey builder. If any of the setup is not complete, you'll see a red error message below the action indicating that you're missing required information.

Use Logic to Trigger Microsoft Teams Message
Logic allows you to use survey data to set conditions for when Microsoft Teams messages are sent. Visit our Question Logic documentation to learn more about logic!
To add Logic to your Microsoft Teams Action, click Edit next to your action within the survey builder, then navigate to the Logic tab at the top of the editor.
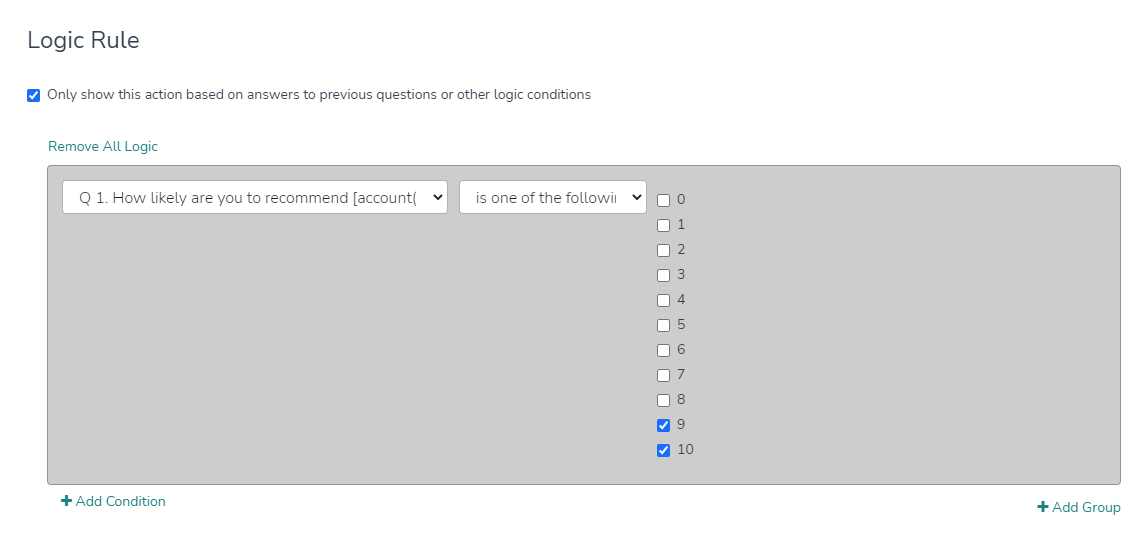
 Click Only show this action based on answers to previous question or other logic conditions to build your Logic. Select the condition based on data that was captured by the survey. In the example below, we set up a rule so this action only fires when the NPS score is a Promoter.
Disable Action
You can also choose to disable the action. This is valuable if you'd like to keep the action configured for later use, but stop the action from firing for now.
Individual Response Data
Once the Microsoft Teams Action is added to your survey, you'll be able to confirm whether the actions fired successfully or not, within the Action Log inside each Individual Response.
Navigate to Individual Responses within the Results Menu. Click into a response, and then click Action Log.

This log will inform you when the message was sent, to what channel, and if it successfully attempted to send or not. You can also select to Re-fire this action from this tab.
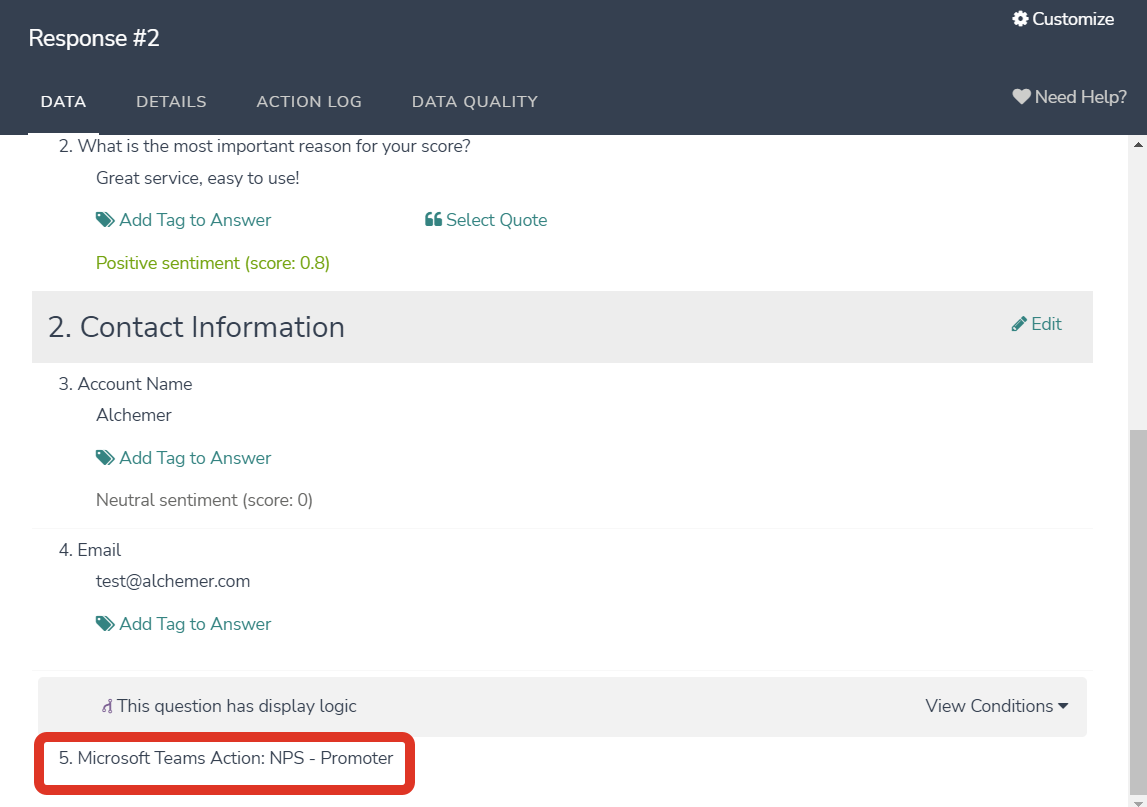
This action will display as an element of your survey, similar to a question, inside the Data tab of the individual response.
Net Promoter®, NPS®, NPS Prism®, and the NPS-related emoticons are registered trademarks of Bain & Company, Inc., Satmetrix Systems, Inc., and Fred Reichheld. Net Promoter Score℠ and Net Promoter System℠ are service marks of Bain & Company, Inc., Satmetrix Systems, Inc., and Fred Reichheld.
