If you'd like to be able to easily track who has completed, partially completed, or not started the survey, as well as any identifying information you've uploaded about your respondents in a third party email program like MailChimp, follow these steps!
This workaround can be particularly useful if you are needing to customize your email from address, but don't have access to Alchemer's Custom Email Settings.
- First, create an Email Campaign in Alchemer. You will not need to set up campaign messages or go through sending your campaign, though; just follow the steps to create the campaign and upload your contacts.
- Next, you will need to download the Status Log (Export Contacts with Send Status) from the Delivery Statistics tab of your email campaign, seen here:
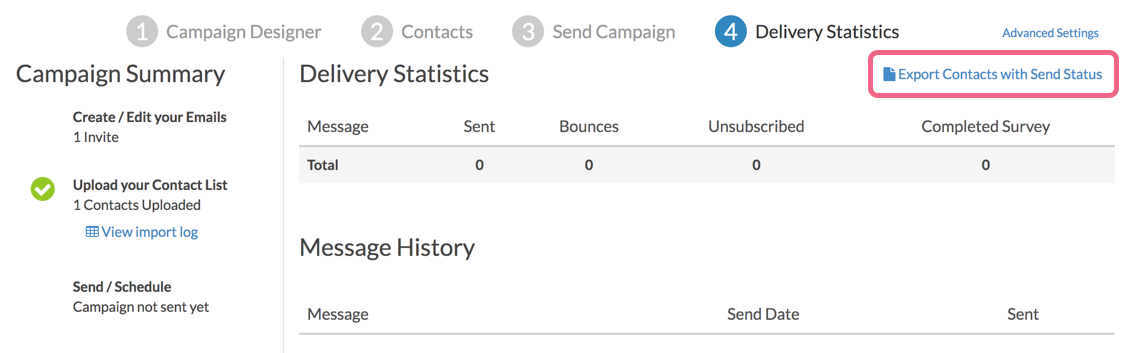 The Email Statistics on this page will not be updated during the distribution of your survey, as you will be sending emails through MailChimp and not Alchemer.
Your status log will download in a CSV file, which should look something like this: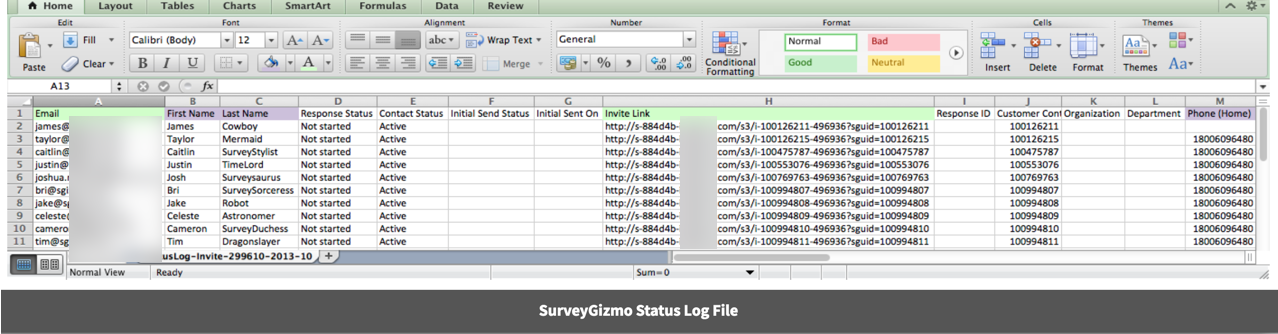 All of this information will be available for pre-populating questions or personalizing your survey. Here's an example of how you could use contact merge codes as default text to pre-populate information:
A bit later in the tutorial, you will see how this will appear for individual contacts once they've opened the survey from their e-mail! - Next, you will create a new audience in MailChimp. Then, you will import your contacts into the list. The Status Log that you've just downloaded from Alchemer will serve as your CSV file to import using the Upload from CSV option in MailChimp, seen here:

- Next, you will match the columns from your Alchemer Status Log to the fields in MailChimp. The only two that you must match are Email Address and Invite Link; the rest are optional. Some fields, such as Contact ID, Response Status, and Contact Status are rarely or never matched. In the screenshot of the status log above, you can see required fields indicated in green, and suggested fields in purple. You will only need to map fields that you would like to use in the e-mail message that will be sent to the survey taker.
When mapping your fields in MailChimp, you will need to create a custom field name for the Invite Link: Name this new field Invite Link/Survey Link or something similar so that you can easily identify it later. The Field Type should be marked as Text or Website (either will work fine). Once you have mapped any columns you'd like to use, click Import to upload your contacts.
 - Next, create a campaign in MailChimp. Choose the list you've just uploaded as the recipients. Specify any settings you'd like to change in Setup tab, then create your messages in the Design tab. This is where the important part comes in: adding the unique link for each person to take the survey! Design your message as desired, then use the Merge Tags button to insert your link.
From that menu, choose the field that you named for your Invite Link. This will insert a Merge Field into your message (something like *|MMERGE3|* ) that will dynamically display the unique link that was generated for each contact.
The e-mail received by each person will look something like this (but with the template or message you've chosen):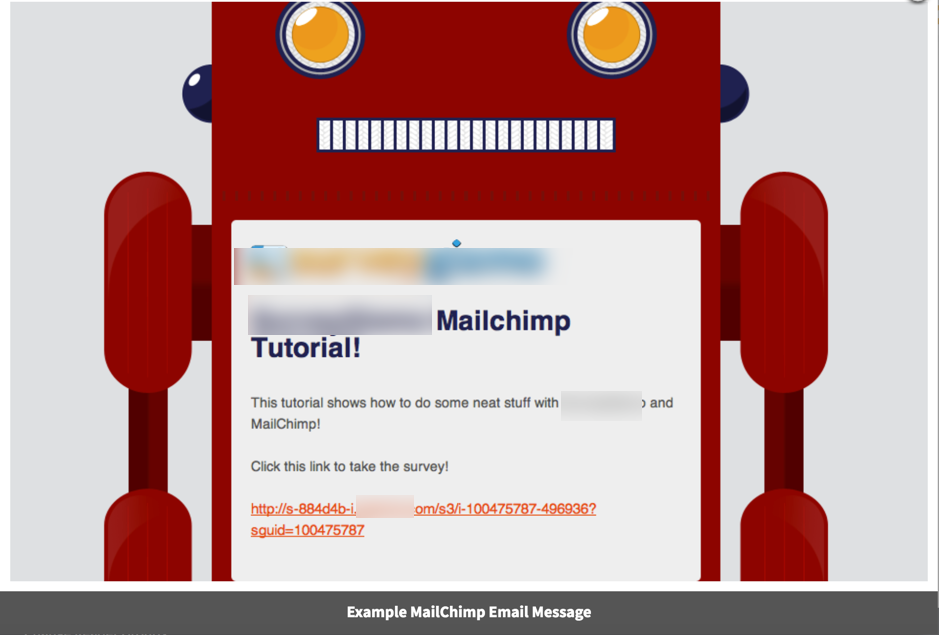 The link at the bottom will replace the Merge Field you inserted into your message before sending it out.
 The Email Statistics on this page will not be updated during the distribution of your survey, as you will be sending emails through MailChimp and not Alchemer.
 All of this information will be available for pre-populating questions or personalizing your survey. Here's an example of how you could use

 Name this new field Invite Link/Survey Link or something similar so that you can easily identify it later. The Field Type should be marked as Text or Website (either will work fine). Once you have mapped any columns you'd like to use, click Import to upload your contacts.
 The link at the bottom will replace the Merge Field you inserted into your message before sending it out.
Once you begin to receive responses to your survey, you can track MailChimp statistics like Open Rate for HTML e-mails. Since you've used the unique links generated by Alchemer in these e-mails, you can use Alchemer statistics as well! If you download the same Status Log file as earlier, you will be able to see which contacts have completed the survey.