Note tiles can provide an overview of a Dashboard or visualization, company branding through images, definitions of terms used in the Dashboard, descriptions of how to best use the data in the Dashboard or visualization, and so on. You can add note tiles anywhere in the Dashboard, unlike the Dashboard description, which is only at the top of the Dashboard. For example, if you have a visualization far down in the Dashboard that needs images and a long description to be best understood, use a note tile.
Creating note tiles
To create a note tile for your Dashboard, follow these steps:
1. Navigate to the Dashboard you would like to edit.
2. Select the Edit button at the upper right of the Dashboard. If this button is grayed out, you do not have edit privileges for the Dashboard. To resolve this, contact your administrator or the creator of the Dashboard.
3. In the top menu bar, select Add note.
4. A blank note template appears in the upper left corner of your Dashboard.

5. Add any content you would like to the note.
6. To move the note to a different location in the Dashboard, select the small gray bar that appears at the top of the note when you hover over it. This allows you to drag and drop your notes to new positions in the Dashboard.
7. When you are finished editing the note tile, select Save in the top menu bar of the Dashboard, or select Add note to create another note.
Supported formatting
- Note tiles support the following formatting options:
- Text: Heading levels 1 and 2, body text
- Bold, italics, underline, strikethrough
- Hyperlinks
- iFrames
- Bulleted list
- Numbered list
- Images from your computer or from a URL. Either .jpg, .jpeg, or .png. The image size can’t be greater than 5 MB.
- Tables
Using hyperlinks
To add a hyperlink to your note tile, follow these steps:
- Navigate to the Dashboard with the note tile you would like to edit.
- Select the Edit button at the upper right of the Dashboard. If this button is grayed out, you do not have edit privileges for the Dashboard. To resolve this, contact your administrator or the creator of the Dashboard.
- Select the note. The formatting bar at the top of the note tile appears.
- Type the word or phrase you would like to display as the link title.
- Highlight the word or phrase, and select the hyperlink icon, to the right of the strikethrough icon, in the formatting bar at the top of the note tile.
- In the Link text box, add the URL you would like to link to.
- Select Add.
- When you are finished editing the note tile, select Save in the top menu bar of the Dashboard.
Embedding content with iFrames
To embed content using an iFrame, follow these steps:
- Navigate to the Dashboard with the note tile you would like to edit.
- Select the Edit button at the upper right of the Dashboard. If this button is grayed out, you do not have edit privileges for the Dashboard. To resolve this, contact your administrator or the creator of the Dashboard.
- Select the note. The formatting bar at the top of the note tile appears.
- Select the Embed button .
- Paste the embed code for your content. This can be a video, a PDF, or a Figma file.
- Select the edges of the embedded content and drag to resize the content. Select the edges of the tile and drag to resize the note tile.
- When you are finished editing the note tile, select Save in the top menu bar of the Dashboard.
Inserting images
Images must be either .jpg, .jpeg, or .png. The image size can’t be greater than 5 MB. With the GA of the note tiles feature, you don’t need a specific privilege to upload images. To add an image to your note tile, follow these steps:
- Navigate to the Dashboard with the note tile you would like to edit.
- Select the Edit button at the upper right of the Dashboard. If this button is grayed out, you do not have edit privileges for the Dashboard. To resolve this, contact your administrator or the creator of the Dashboard.
- Select the note. The formatting bar at the top of the note tile appears.
- Select the image icon, to the right of the numbered list icon.
- The Add image dialog appears. Select From computer or From URL, depending on where the image is.
- If you select From computer, click Select file, and add a file from your file selector. Alchemer Dashboard allows .png, .jpg, or .jpeg files, 5 MB or less.
- If you select From URL, add the URL of the image in the Link text box.
- Select Add.
- Change the image size or rearrange the note tile as necessary.
- When you are finished editing the note tile, select Save in the top menu bar of the Dashboard.
Formatting tables
To add a table to your note tile, follow these steps:
- Navigate to the Dashboard with the note tile you would like to edit.
- Select the Edit button at the upper right of the Dashboard. If this button is grayed out, you do not have edit privileges for the Dashboard. To resolve this, contact your administrator or the creator of the Dashboard.
- Select the area in the note where you would like to add the table. The formatting bar at the top of the note tile appears.
- Select the table grid icon, at the far right of the formatting bar.
- A 3-by-3 table appears in the note tile. Note that you cannot move the location of the table itself; you must make sure to place your cursor in the correct spot before you add a table, or move items around the table.
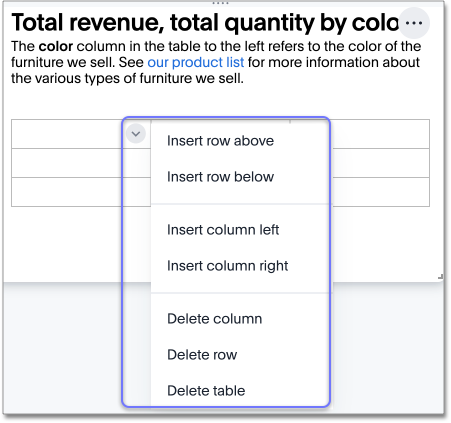
- Add or remove columns or rows as necessary. To add or remove columns or rows, select the down arrow that appears when you select any table cell. The table menu appears. Select
Insert row [above | below],Insert column [left | right],orDelete [column | row | table].
7. Add content in the table cells.
8. When you are finished editing the note tile, select Save in the top menu bar of the Dashboard.